Author Topic: Building another flintlock  (Read 85908 times)

0 Members and 2 Guests are viewing this topic.

Offline Eric Krewson

  • Member
  • Posts: 5,400
Re: Building another flintlock
« Reply #180 on: June 08, 2016, 11:28:22 pm »
First step in inletting the patch box, outlining the box with an exacto knife;


Remove the wood inside the lines I just cut;


Making room for the lid spring so the box will sit level on the wood;


This inlet is very tedious, a couple hours and I am ready to knock off for the day, so far so good, a nice tight fit.


Offline Del the cat

  • Member
  • Posts: 8,318
    • Derek Hutchison Native Wood Self Bows
Re: Building another flintlock
« Reply #181 on: June 09, 2016, 04:27:17 am »
... I picked up one tool to do a little of this and that and the time got away from me....
Yup, love it when that happens :)
Really enjoying this thread, thanks :)
Del
Health warning, these posts may contain traces of nut.

Online Pappy

  • Global Moderator
  • Member
  • Posts: 32,073
  • if you have to ask you wouldn't understand ,Tenn.
Re: Building another flintlock
« Reply #182 on: June 09, 2016, 08:42:23 am »
Looking very good Eric.  :)
 Pappy
Clarksville,Tennessee
TwinOaks Bowhunters
Life is Good

Offline Eric Krewson

  • Member
  • Posts: 5,400
Re: Building another flintlock
« Reply #183 on: June 09, 2016, 06:24:16 pm »
Time to drill out the cavity in the patch box with a forstner bit, I went a little too large on the bit but everything came out OK.


By the time I got everything cleaned up there wasn't a very wide lip but I think it is sufficient.


Now it is the standard black and chisel until I get the box level with the wood.


Offline Knotty

  • Member
  • Posts: 504
  • Don't regret your past, learn from it.
Re: Building another flintlock
« Reply #184 on: June 09, 2016, 09:16:00 pm »
Looking nice, excited to see the final result!
~Isaia

Offline Urufu_Shinjiro

  • Member
  • Posts: 709
Re: Building another flintlock
« Reply #185 on: June 10, 2016, 10:10:02 am »
Loving this thread still, every time it says there's a new post I get excited to see what you're working on next. When it's done don't forget to give us a full draw pic, i.e. a pic of smoke flying out of the barrel, lol.

Offline Eric Krewson

  • Member
  • Posts: 5,400
Re: Building another flintlock
« Reply #186 on: June 12, 2016, 12:29:11 pm »
I got the patch box in, then realized I had goofed up in several areas;


I realized that when I cut the patch box off to shorten it, I had cut the wrong end short. The lid end has a fixture to hold the lid spring which is now turned the wrong way so I had to improvise to make the lid spring work. I also decided to replace the initial screws that I had put in at a crooked angle and had to file down to mate them to the box lid, they ended up so flimsy after filing I was afraid they would twist off in the hole if I took them in and out much . You can see the plugged screw holes in this picture.


I chiseled out a mortise for the spring and shortened it.


Just the right opening with my jury rigged spring;


I am going to replace the #6 hold down screws with some larger #8 screws, now for the big problem, finding slot head wood screws around town, Lowe's and Home Depot don't have them. I have the right size 1" long but they will come real close to coming out the other side of my stock so I don't want to use them. There is and old hardware store down the road them may have some 1/2" screws.


Offline Eric Krewson

  • Member
  • Posts: 5,400
Re: Building another flintlock
« Reply #187 on: June 12, 2016, 07:14:26 pm »
The hardware store had all the screws I needed, I love these types of stores.

Sometimes it is best to put a flintlock project down for a day or two to regroup, the patch box was driving me crazy. If I lightly tapped on the box to get a soot transfer the thin metal of the box would deform. It was very hard to get into place.

I decided I needed to breathe some osage dust to clear my head. I have a bunch of mismatched osage billets, while I was getting over some surgery a while back I glued a bunch of these random billets together to make bow blanks.

I started a static recurve out of one of these bow blanks months ago but never got it tillered well enough to string it, today was the day. The strange thing about this bow is the limbs go every which way unstrung but straighten up perfectly strung. One limb is tough buttery osage, the other is dark chalky osage. One limb has a big wind shake in the fade, the other limb has drying checks about a foot long in the back, all superglued of course.

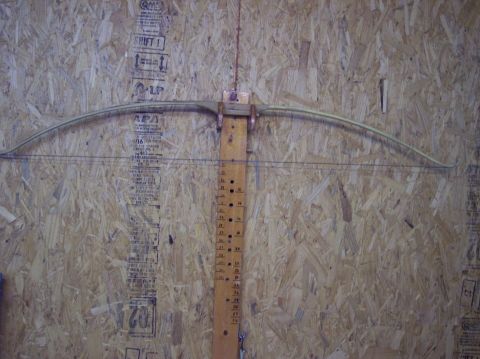
Strung without the handle shaped or tillering finished, I think the right (bottom) limb is 1 1/2" shorter than the left. The shadows make the tiller look off but the limbs are pretty closely matched.

« Last Edit: June 12, 2016, 11:13:44 pm by Eric Krewson »

Offline Eric Krewson

  • Member
  • Posts: 5,400
Re: Building another flintlock
« Reply #188 on: June 14, 2016, 08:09:03 pm »
I redrilled my patch box holes using a gimlet to locate and keep the  screw pilot holes centered and square. These are old fashion tools to drill holes and let you adjust the angle while you are making the pilot hole. Don't buy the cheap chinese gimlets off ebay, they don't work, I bought another set from Wade Garret, made in France, they work great.


On to the stock molding , first draw the line, no freehanding here.


Cut on the line with a vee gouge;


Follow the cut with a file, I use a knife edge file.


Finish up with various sanding methods to mute the line a little.


Now for the hard part, making the line on the other side match what I just cut. Maybe tomorrow, the patch box and moulding sapped my patience I think I will go out and weed eat.

Offline DC

  • Member
  • Posts: 10,396
Re: Building another flintlock
« Reply #189 on: June 14, 2016, 08:34:16 pm »
Yah, eatin' weed always mellows me out. In brownies is best ;D ;D

Offline Urufu_Shinjiro

  • Member
  • Posts: 709
Re: Building another flintlock
« Reply #190 on: June 15, 2016, 10:08:23 am »
Yah, eatin' weed always mellows me out. In brownies is best ;D ;D

 :laugh:

Offline Eric Krewson

  • Member
  • Posts: 5,400
Re: Building another flintlock
« Reply #191 on: June 17, 2016, 08:38:28 am »
Adding a little bling to an otherwise plain gun with forestock moldings.

First draw where the moldings should be and see how it looks;


I made an adjustable beading tool that runs in the ramrod groove  to scratch out a straight line down the forestock for my tools to follow;


I follow my line with a triangle riffler file to deepen the groove.


One side done except for sanding;


Not a perfect match side to side but close enough;


I only lack sights and a patch box lid catch to be finished. The sights come as pretty rough castings, I have cleaned up the one on the left and the right one still has the casting sprue.


Offline Eric Krewson

  • Member
  • Posts: 5,400
Re: Building another flintlock
« Reply #192 on: June 19, 2016, 09:11:41 pm »
Time to install the front sight;

First I measure the thickness of the base to see how deep to cut my dovetail;


I use the calipers to scribe this depth on the side of the barrel;


I thought I would try a dovetail cutting guide I bought years ago to try to get a precise dovetail.It didn't work very well becaue it has to be shimmed to produced the right depth, I tried dimes , pennies and quarters for shims to see which one gave me the correct dovetail depth, dimes came out close to what I wanted.


In but I took an extra swipe with my three cornered file and the sight is a little loose in the dovetail.


I removed the sight, turned it upside down in my vise and peened the base a little with a ball peen hammer to spread the metal out. I got a very tight fit after peening, the installation came out really good. I sanded the base and barrel together after I took this picture and everything blends just fine. I will cut the excess metal off the ends of the base after I sight the gun in.


Offline Eric Krewson

  • Member
  • Posts: 5,400
Re: Building another flintlock
« Reply #193 on: June 19, 2016, 09:20:16 pm »
I got a start on the rear sight, first , it is way too wide for a 13/16" barrel so I have to file it down, I am grinding and sawing off some of the base length as well.

First the length;


Next the width, a little difficult as one has to reshape each side of the sight with a file and keep the notch centered.


More later, I took Dad's day off from any shop work.

Just figured out I installed the rear sight and forgot my camera, anyway, it is in.


« Last Edit: June 30, 2016, 07:51:43 pm by Eric Krewson »

Offline Eric Krewson

  • Member
  • Posts: 5,400
Re: Building another flintlock
« Reply #194 on: June 30, 2016, 07:35:26 pm »
I have to come up with a patch box latch spring, I have looked at lot of them and decided to try a piece of hacksaw blade for a latch.


When I bent the catch into the blade it there was no springiness in the thing, when I tried it thin it it broke.


Next I tried a concrete nail;


Almost finished, it is much thinner than what is shown in the picture;


I heated the spring to red hot, quenched it in oil and am using the burning oil tempering method;