Author Topic: Osage splice  (Read 4457 times)

0 Members and 1 Guest are viewing this topic.

Offline Kennedy

  • Member
  • Posts: 19
  • Denham Springs, Louisiana
Osage splice
« on: January 23, 2014, 08:38:31 pm »
Ok so I'm acquiring two Osage billets and I was wondering how is the best way to splice it? And do I need rough out a stave before? This will be my first bow attempt so any advice will be appreciated.

Offline TRACY

  • Member
  • Posts: 4,523
Re: Osage splice
« Reply #1 on: January 23, 2014, 08:42:49 pm »
Marc st.louis has a slick way. Maybe he'll post the link or provide the issue I saw it in.

Tracy
It is what it is - make the most of it!    PN500956

Offline Will H

  • Member
  • Posts: 2,120
Re: Osage splice
« Reply #2 on: January 23, 2014, 09:00:53 pm »
I do the tapered finger joint like Marc described in his article in PA. Don't remember which issue though... Maybe he'll chime in and help you out :)
Proud Member of Twin Oaks Bowhunters
           Clarksville, Tennessee

   "Middle Tennessee is the place to be"

Offline Kennedy

  • Member
  • Posts: 19
  • Denham Springs, Louisiana
Re: Osage splice
« Reply #3 on: January 23, 2014, 09:18:55 pm »
I hope so. I have been wanting to build for a long time and I'm finally taking it on. I might need to subscribe to PA and learn from them too.

Offline Bryce

  • Global Moderator
  • Member
  • Posts: 3,125
  • Pacific Ghost Longbows
Re: Osage splice
« Reply #4 on: January 23, 2014, 11:47:23 pm »
Can draw it on some painters tape or one sides sticky paper.
Clatskanie, Oregon

mikekeswick

  • Guest
Re: Osage splice
« Reply #5 on: January 24, 2014, 05:24:17 am »
It depends on how much experience you have cutting joints and what tools you have.
There is nothing at all wrong with a simple v-splice. More than strong enough and for your first go easy enough to get perfect mating surfaces.
The quality of the joint is more important than adding another v!

Offline WillS

  • Member
  • Posts: 1,905
Re: Osage splice
« Reply #6 on: January 24, 2014, 05:56:14 am »
Hope this doesn't hijack the thread too much, but I've always failed miserably at splicing.  I don't have a bandsaw, so have to do it all by hand and I just can't seem to get it right with stave billets.  I draw out the splice on sticky paper, lay it on the stave but cutting always ends up wandering in the vertical plane.  I end up with sloping sides to every cut, meaning the splice doesn't work even with some rasping and tidying and I've wasted a good few yew billets this way.

I can't even work out how you'd keep a stave perfectly upright in a bandsaw, let along by hand! Do you guys have the splice template on both top and bottom of each piece so you can line the cuts up, or is it guess work?  Is it down to making the billet as square as possible like a machined plank first?

Offline Kennedy

  • Member
  • Posts: 19
  • Denham Springs, Louisiana
Re: Osage splice
« Reply #7 on: January 24, 2014, 06:53:27 am »
I appreciate it Bryce. I'll be posting a build along if everything goes right  ;)

Offline Will H

  • Member
  • Posts: 2,120
Re: Osage splice
« Reply #8 on: January 24, 2014, 08:40:28 am »
WillS the trick to making a good splice with a bandsaw is squaring up your work. Once the belly is flat you simply keep it on your saw bed whilst cutting :)

Kennedy, postage mailers work great as well. You can layout whatever splice you prefer then stick it onto your billets. The one Bryce showed you is one of the most commonly used splices. The 4" z splice. Or like mike said a simple v will also work. I personally like the tapered finger joint that Marc St. Louis perscribes. No matter which you decide on I would reccomend practicing on a few boards before you go cutting on your billets. It's not hard to do with a little practice and attention to detail.
Proud Member of Twin Oaks Bowhunters
           Clarksville, Tennessee

   "Middle Tennessee is the place to be"

Offline WillS

  • Member
  • Posts: 1,905
Re: Osage splice
« Reply #9 on: January 24, 2014, 08:48:16 am »
Thanks Will. Sorry to derail the thread! 

Offline Eric Krewson

  • Member
  • Posts: 5,351
Re: Osage splice
« Reply #10 on: January 24, 2014, 09:50:29 am »
I have always used a simple Z splice. I make mine about 3 1/2" long so 4" of handle leather will cover it up completely. I know, I can hear the nay sayers now , "that is not enough gluing surface area, it will come apart" or "better pin that splice with a dowel or it will come apart". After around 100 splices like this I can assure you, if you use urac, this baby isn't coming apart. I even use this spice for simi bendy handle bows.

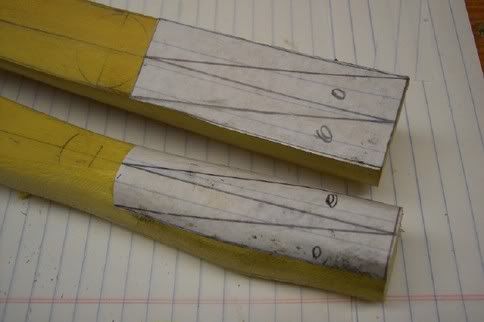
I draw the splice out on a legal pad, cut it out and glue it to the billet with Elmer's white glue, being careful to align the center of the splice with the center line on the billet.

In this picture I am replacing a broken limb on  bow. As you can see the glued on splice pattern conforms to the finished bow limb and will be cut out this way.


Even after cutting this type of splice you will have to make adjustments to the fit to get everything to slide together, a little sanding here or filing there and it WILL go together.

One thing that make splice cutting easy is to flatten the belly side of your billet prior to running it through a band saw.


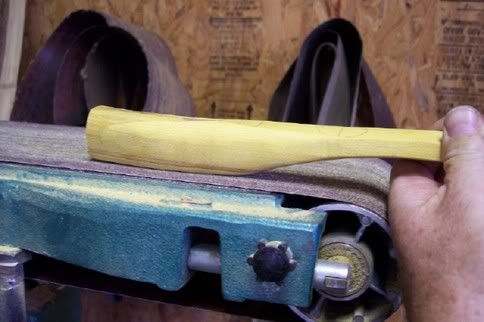
I flatten the belly, lay it on  may band saw table and sight down it. I adjust the flat belly to turn any slight twist up to the crown of the bow. I may add twist in the handle by flattening the belly at an angle section to remove twist in the working limb. Like I said I sight down the billet and select the position to correct as many alignment flaws as I can with my splice angle. I know, clear as mud......
« Last Edit: January 24, 2014, 10:24:19 am by Eric Krewson »

Offline snag

  • Member
  • Posts: 419
Re: Osage splice
« Reply #11 on: January 24, 2014, 10:04:17 am »
Can you add a little reflex by gluing them together with the limb tips forward of the handle?
Is. 49:2 ....He made me a polished arrow and concealed me in His quiver.

Offline Eric Krewson

  • Member
  • Posts: 5,351
Re: Osage splice
« Reply #12 on: January 24, 2014, 10:06:37 am »
Found some more old pictures, just billets, not a limb replacement.

Drawing the splice;


Looking closely at the picture I see I am cutting a splice on top of an existing splice on one billet. This works OK, the glued area is much stronger than the bare wood. I must have found a flaw in the previous billet on the first glue up. These slats are for a future BBO.


Glue up;


One thing I forgot to add about flattening the belly of your billet to run it through the band saw, you will have to add some handle material in most cases to finish out your bow.

This extra glued on piece strengthens you splice even more.

Adding the extra piece to build up the handle;


Handle shaping just about finished;

URL=http://smg.photobucket.com/user/ekrewson/media/bow%20making/limbreplacement11.jpg.html][/URL]


« Last Edit: January 24, 2014, 10:20:52 am by Eric Krewson »

Offline Eric Krewson

  • Member
  • Posts: 5,351
Re: Osage splice
« Reply #13 on: January 24, 2014, 10:12:10 am »
To answer your question Snag, yes.

Offline artcher1

  • Member
  • Posts: 1,114
Re: Osage splice
« Reply #14 on: January 24, 2014, 10:25:18 am »
I keep my splice the width of the narrowest part of the handle which is 1". That way I don't lose hardly any of my gluing surface. Like this:  Art