Author Topic: Central European Crossbow Project  (Read 57295 times)

0 Members and 2 Guests are viewing this topic.

Offline Dane

  • Member
  • Posts: 1,870
Central European Crossbow Project
« on: January 24, 2012, 07:57:56 am »
Hi, everyone. Here is a thread regarding my third crossbow project, a medieval-style (rather than an exact replica of a particular weapon) sporting bow.

If this seems to wander a bit, these kinds of projects can do that. There is no particular "right" or only way of approaching something like this, and essentially, there are three elements that make up a crossbow; the bow, or prod, the tiller, aka the stock, and the trigger and lock mechanism consisting, in this case, of a antler rolling nut and a tickler or trigger. The kind of trigger that will be illustrated in this project is a single axle system, very typical of medieval armbrusts / arbalists / crossbows.

For this project, I actually begain by creating the antler rolling nut, and will start there. As in life, there are many ways to skin a cat (PatB knowns all about this), and this is not the only way to manufacture a rolling nut. Modern materials such as Delrin, a high-tech plastic, can be purchased in round bar form, it is cheap, and from a few feet away, mimics antler nicely. Some crossbow builders have made nuts successfuly from hard woods such as walnut for lower powered weapons. I used moose antler, an ideal material, if not the cheapest, as it is light and flexible, and anter is what they used back in 1400. I have found in this case, as in so many, even if you aren't sure why a certain type of material or method was used, there was a good reason for it, and many hundreds or thousands of years of development that lead to that material or method must have been for a reason. Ya know?

Basically, I purchased a nice 8" moose antler stem from Moscow Hide and Fur. I own a little benchtop 4x10 lathe I got from Harbor Freight. A neat little machine, not overly expensive, and lots of fun to use, it is not an aerospace-accurate lathe, but not being a rocket scientist or an evil supervillan builiding a fleet of giant robots to enslave humanity, I can live with it.

The photos show the basic sequence, starting with the untouched stem, then (not shown) cutting it up (technically, the term is dismembering it :) ) and prepping it for the lathe, which I did using a small 9" bandsaw. After mounting in the lathe in the three-jaw chuck, I began turning the stem. It took about 2 and a half hours, approximately, to finish this step, and as I got closer to the final outside diameter of 1.25", I used a digital caliper to ensure that I didn't go past this and so require much drinking and therapy, or at least remorse that I ruined a $90 hunk of antler.

What I was left with when I removed that antler workpiece from the lathe was a nice 1.25" outside diamter rolling nut blank, long enough for about 4 nuts. Squirrles and crossbow builders both agree that you can never have enough nuts, as you will later see when I screw up a simple tapping procedure. :)

I did a basic polishing job after ensuring I was happy with the blank by putting it back in the lathe and using fine grain sandpaper glued to flat sticks for even pressue, then red polishing compound and a bit of leather glued to another stick. When it gleamed enough to satifsy lepricans that it is treasure, I cut the nut blank apart on the bandsaw, and then faced all eight sides of the four nuts I got out of the blank, put the lathe away, and went and celebrated.

Next entry, I will begin the process of building the wooden tiller or stock, in this case, from a thick maple board with a bit of curl.

Dane


« Last Edit: January 24, 2012, 08:06:18 am by Dane »
Greenfield, Western Massachusetts

Offline lowell

  • Member
  • Posts: 939
Re: Central European Crossbow Project
« Reply #1 on: January 24, 2012, 11:21:38 am »
Very cool rolling nut.  I would think that could really be polished!!

  And makes me want to go to Frieght Harbor and check out thier lathe.  I don't have one and didn't want to invest much for one ....but seems it would be handy for various projects.

  Looking forward to more progress reports!! 

   I made a crossbow a few years back from a build-a-long here on PA.  I used ebony for the nut.
My son says I shoot a stick with a stick!!

Offline Dane

  • Member
  • Posts: 1,870
Re: Central European Crossbow Project
« Reply #2 on: January 24, 2012, 01:21:27 pm »
Lowell, thank you. If you get a chance, could you share photos of the crossbow you built? Bet an ebony nut is very heavy, but tough. Working it must have been labor-intensive.

These little lathes usually run about $475 or so, and they generally have sales, so keep your eye out for those, and save an additional $100 or so. They do weigh about 75 or 80 lbs., so keep that in mind if you move it around a lot in your shop area (watch your feet). They are nice to have for small projects, and you can adapt them to turning wood, making pens, stuff like that. Also, building killer robots to enslave humanity if you really wish, and miscellaneous Steam Punk death rays and infernal contraptions. I’m going to use this one for making miniature catapult and onager parts, and maybe death rays once I find my goggles and white lab coat. I always try to buy tools I can find multiple uses for if at all possible.

I will get into this later in this discussion, but the most critical thing to consider when making the rolling nut is that it fits precisely in the accompanying socket built into the tiller / stock. A wobbly rolling nut equates to an inaccurate (and less safe) crossbow and less than optimal craftsmanship. The way I am doing it for this weapon is perhaps the simplest way to proceed, and that is to bore the socket directly into the wood. The area directly in front of the socket will take the force of the draw, and there is more than enough strength there for a 190# bow.

You can make a separate reinforced and lined unit that will drop into an accompanying space chiseled into the tiller, then pinned and glued into place. That allows for a strong socket for very powerful crossbows, up to and including a 1,000 lb. monster (and very attractive to contemplate) siege bows.

Probably anyone reading this will have guessed by now that some metal working is going to be required in making a crossbow, specifically the tickler, stirrup, and trigger sear. Not a gigantic amount, but unavoidable, too. However, all of it can be done with hand tools and some sweat. There are all-wooden crossbows which are an option that don’t use a rolling nut at all, but a push dowel type system. The Chinese or Manchurian repeater works on the same principle.

If any of this is confusing, all will be revealed in time.
Greenfield, Western Massachusetts

Offline Del the cat

  • Member
  • Posts: 8,297
    • Derek Hutchison Native Wood Self Bows
Re: Central European Crossbow Project
« Reply #3 on: January 24, 2012, 03:56:53 pm »
Nice bit of antler, lovely and light, I bet that will give a slick relase.
The solid steel nut on my bow weighs a ton :(
Wish I had a lathe, haven't got the room in my pokey little garage.
Del
BTW. I think letting the Leprecauns into the workshop is a big mistake.
Health warning, these posts may contain traces of nut.

Offline Elktracker

  • Member
  • Posts: 1,964
  • Josh
Re: Central European Crossbow Project
« Reply #4 on: January 24, 2012, 04:11:51 pm »
Thanks for sharing your progress look forward to following allong!

Josh
my friends think my shops a mess, my wife thinks I have too much bow wood, my neighbors think im redneck white trash and they may all be right on the money!!

Josh Vance  Netarts OR. (Tillamook)

Offline Dane

  • Member
  • Posts: 1,870
Re: Central European Crossbow Project
« Reply #5 on: January 24, 2012, 06:59:22 pm »
Thanks, Josh. Glad you are enjoying it.

Del, antler makes for very light, and that means very fast, nuts. Heavier materials like brass and steel are very durable, but they are very slow too upon release. As you know doubt know.

I've seen your shop, bigger than mine. The lathe tucks away nicel when not in use.

As for allowing the wee people in, won't they take me to Tír na nÓg? Mmm, maybe that is the fairies who live there.

Dane
Greenfield, Western Massachusetts

Offline lowell

  • Member
  • Posts: 939
Re: Central European Crossbow Project
« Reply #6 on: January 24, 2012, 11:04:39 pm »
Dane ,  Here is a couple pictures of the bow I made in '09.

  I hurt my shoulder and could not bowhunt that season so thought if I had to go to a crossbow I wanted it to be primitive and one I made.  The prod only came to about 70# and would have had to make it stronger to be legal here.  My shoulder healed up and was able again to hunt with a selfbow and never did more to make the crossbow legal.  It was a fun project!!

  Seeing it again reminded me that I think the center of the nut was maple with ebony outer layers.  The stock was cherry and curly oak.  The prod was osage. Maple was also the track for the bolt.  Just had fun with a bunch of different woods. 

    Have fun with your project too and will keep an eye out for progress reports!!
My son says I shoot a stick with a stick!!

Offline gstoneberg

  • Member
  • Posts: 3,889
Re: Central European Crossbow Project
« Reply #7 on: January 25, 2012, 12:50:39 am »
Good to see you back posting and working another crossbow.  Anxious to see how this one looks.

George
St Paul, TX

Offline jpitts

  • Member
  • Posts: 312
Re: Central European Crossbow Project
« Reply #8 on: January 25, 2012, 02:12:53 am »
Now I want to go get myself a lathe...LOL's
Can't wait to see what's next.
BTW.....if I see "little people" in my garage, I'm switching to decaff   ::)
Jimmy / Dallas, Georgia

Offline hedgeapple

  • Member
  • Posts: 1,835
Re: Central European Crossbow Project
« Reply #9 on: January 25, 2012, 02:38:11 am »
I'm looking forward to following this build a-long.  I've had the urge to build a small crossbow in a pistol kind of style, meaning it would not have a stock that rests agains my shoulder of say 50-ish pounds.  I've been wondering what to use for a rolling nut.  I was thinking dogwood, but not sure how to orient the grain--across the grain or sort of follow the circle of the growth rings.  Any advice here would be appreciated.
Dave   Richmond, KY
26" draw

Offline Dane

  • Member
  • Posts: 1,870
Re: Central European Crossbow Project
« Reply #10 on: January 25, 2012, 10:19:11 am »
Lowell, I remember that weapon now that i see the photos again. Great job! It looks like fun, even if you don't go hunting with it.

George, thanks. Jpitts, go get a lathe...I dont get a commission for each one sold, really. lol. And as for little people, if they are helpful, let them stick around.

Hedgeapple, not sure about a nut made from dogwood. You have to have a very, very hard material, as the forces are pretty signficant when even a light bow is drawn. Really dense hardwoods such as ebony or walnut can be used, but antler is the traditional choice. In the end, experimentation will give you your answers.

Dane
Greenfield, Western Massachusetts

Offline Dane

  • Member
  • Posts: 1,870
Re: Central European Crossbow Project
« Reply #11 on: January 25, 2012, 10:26:27 am »
Building the Tiller – First Steps

The stock is called the tiller in crossbow lingo, and I can only assume it is because it resembles a ship’s tiller. I found a live edge maple board in a retail woodworking store that was about five feet tall, between 12 and 15 inches wide, and 1.5” thick. One of the big advantages to laminate construction is that you don’t have to find a very large piece of hardwood, and you can lay out and make the rolling nut socket, tickler channel, and dill the prod binding hole, nut binding hole, and tickler pivot pin holes before you begin shaping the tiller.

The shape of the tiller is entirely up to you, and what do you like? This is a Central European design, so it has some really nice curves and tapers, but if you choose a slab-sided style such as the kind of crossbows popular in Northern Europe, that is fine. What kind of hardwood you choose is up to you, and may be determined because of availability or fancy. I love the look of maple, but cherry, oak, walnut, elm, and even some exotics would make into a beautiful tiller.

The length of the tiller is important, and one factor to keep in mind is how tall you are. Keeping the tiller the length of your inseam is not a bad idea, as you will be bending down to span or draw the weapon, and a very long tiller means it will jab you in the stomach, which is never fun. I chose to make my tiller 29” long, as I am short, and I like to shoot the crossbow holding it like a carbine or rifle. For the very long military style bows, you lay the tiller over your shoulder and press it into your clavical, but this is a small, handy sporting bow, so short is good.

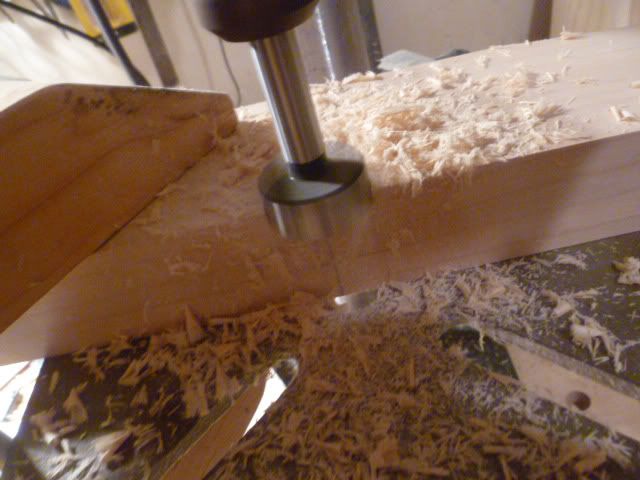
I used a skill saw to cross cut the board so I had about 36” of material, then ripped the board so I ended up with two pieces approx 3.5” by 1.5” by 36” long. I saw approximately, as I then fed them through a thickness planer until the two pieces were about 3” in height. The most important sides to each piece were the side I would laminate together, and as this was going to be a style of tiller with lots of nifty curves, carving would take care of the rest. The most important glue line is going to be the bottom of the tiller. The top glue line is going to be what is called the table of the crossbow, and I was going to make a bone top for it, so if the glue line was not perfect it was no big deal. The two ends you want to have a decent glue line on, as they will be visible as well. Monkey around a bit with a hand plane until you are satisfied. I had to do this a bit, maybe spending an hour until I was satisfied.

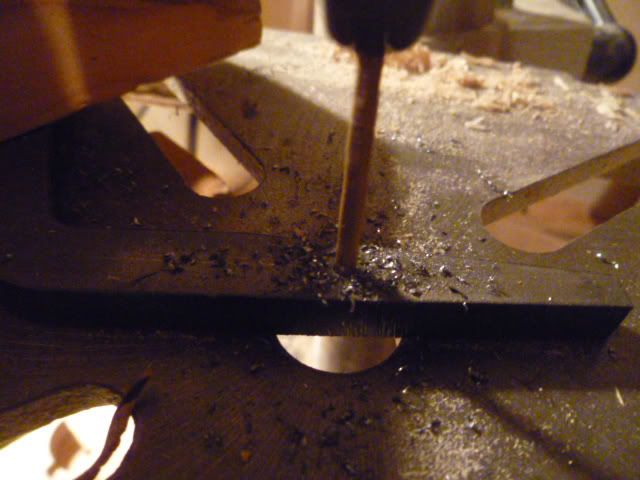
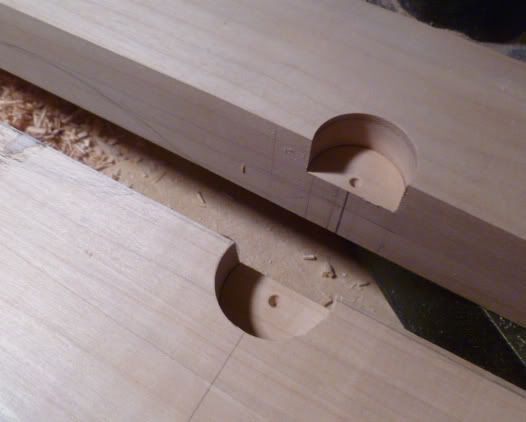
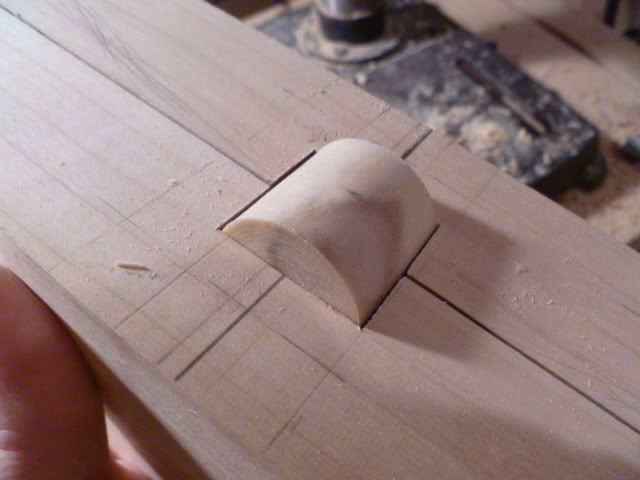
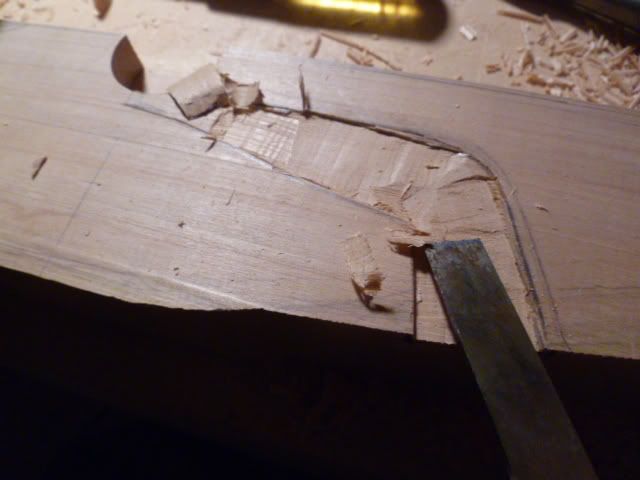
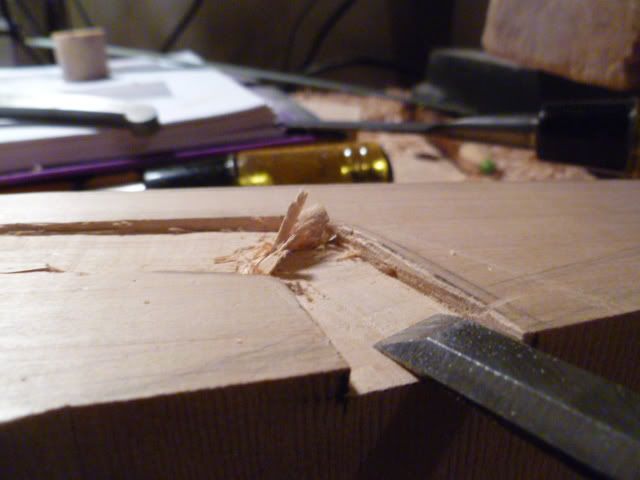
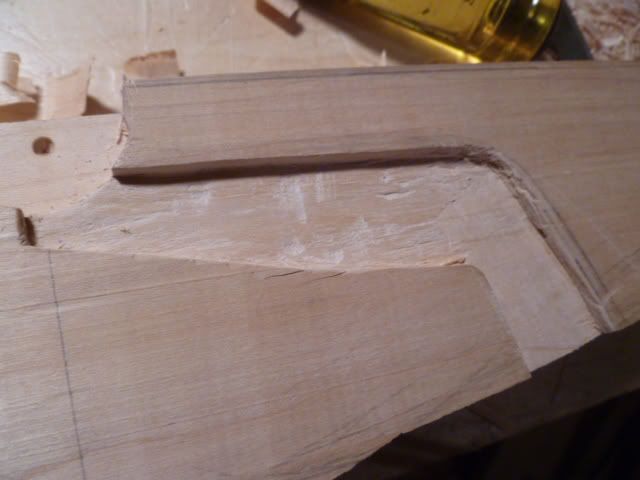
At this point, I laid out and made the rolling nut socket and the tickler channel. The tickler channel in particular is a beast to make if you use a single solid piece of hardwood for your crossbow, and incorporates electric drills, chisels, and very black language, so keep the kids far from the shop area.
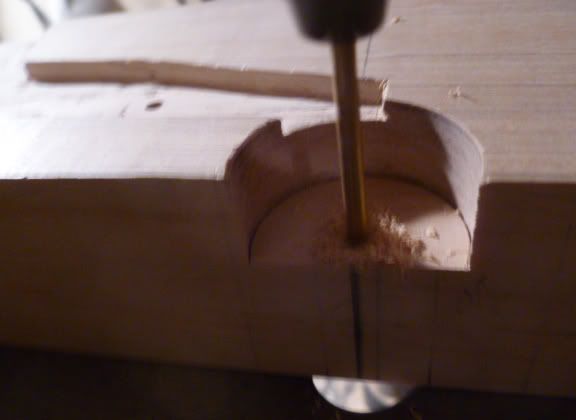
The nut socket is laid out 11.5” from the end of the tiller the prod or bow will be bound to. I purchased a steel bow from a vendor (making a bow, and the various types can be a broad discussion we may have later), and the specs are a 3.5” brace height and a draw height of 8”which comes to 11.5”. Leave enough wood in the “muzzle” end of the crossbow for the prod socket, perhaps an additional inch or a bit more wood. More is best, as you can remove but you can never put back. I’m sure all of us have experienced this life lesson :)

The nut socket was made using a 1.25” fostner bit in a drill press, and each half of the socket is half the width of the nut, which I had already made and so knew the exact dimensions to. You can do this socket and not have your nut already made, of course, and adjust the nut rather than the socket depth. I wanted the nut to be about 1/3 above and visible, and 2/3 inside the tiller, so I marked a spot 1/8” down from the top edge or table edge. If you make your nut to some other dimensions other than 1.25”O.D., adjust accordingly. I clamped the tiller half into my drill press and drilled down half the length of the nut, test fit, and did the same thing to the other half.

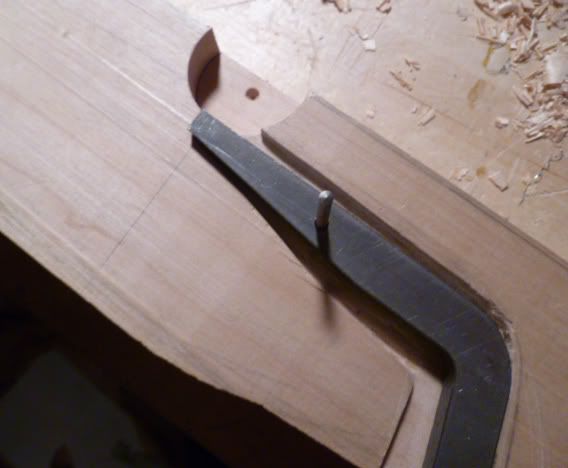
The tickler channel was simple to do, since I am comfortable working with chisels. If you don’t have much experience with them, practice with scrap wood. The channel is a shade wider than the total width of the tickler, which is made from thick gauge steel. Brass ticklers are very handsome, as well, and they can be purchased or made in your shop. There are regional differences in the profile of the ticklers, as you will find out by doing some research. I purchased my tickler from the same vendor as the prod, so the hard work was already done for me.
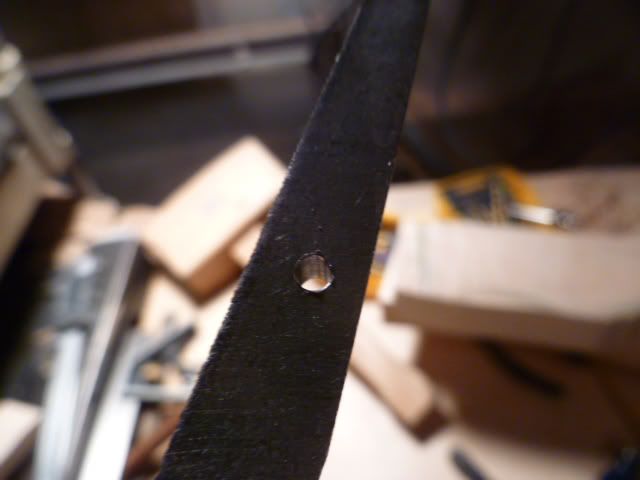
I used chisels (from a 1” mortising chisel to a 1/8” general purpose wood chisel) and mallet to form the channel, and it was not hard, and in fact, relaxing work. Once I had finished it to my satisfaction and tested the tickler to make sure that I had sufficient clearance to get the tickler in and out (sharp bends and curves can be your enemy here, trust me), I determined the placement of the tickler pivot hole, and drilled that. The pivot pin is going to be fashioned from steel threaded rod, for good reasons, and that will be discussed later.

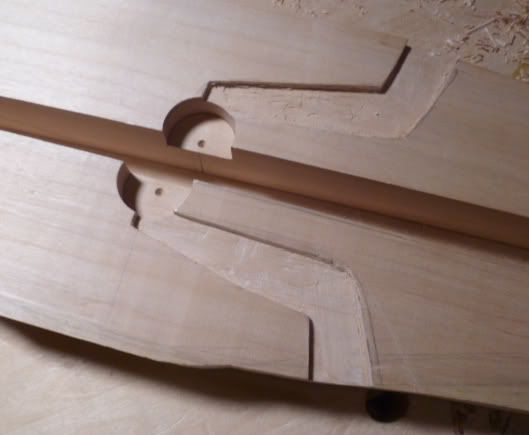
Glue up was straight forward and not too stressful. I used four clamps, and the glue used was Tightbond III. I had to take care that I kept the rolling nut socket true, as if they two sides didn’t mated perfectly there, I would have a bad socket and no end to troubles. That happend to me on my first crossbow, so I speak from experience. It wasnt a break situation, but the performance was never going to be optimal.

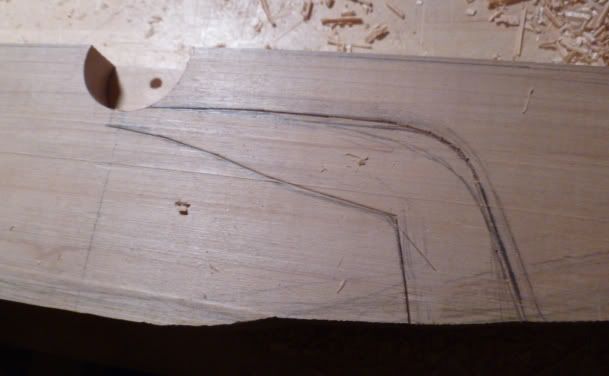
24 hours later, off came the clamps and I was ready to begin carving the tiller.

To be continued


[/img]http://i630.photobucket.com/albums/uu30/Danemitchell/tickler7.jpg[/img]


Greenfield, Western Massachusetts

Offline Parnell

  • Member
  • Posts: 5,554
Re: Central European Crossbow Project
« Reply #12 on: January 25, 2012, 01:03:13 pm »
Lovin this.  Keep it going.
1’—>1’

Offline Dane

  • Member
  • Posts: 1,870
Re: Central European Crossbow Project
« Reply #13 on: January 25, 2012, 03:45:15 pm »
Thank you, Parnell! Here you go....

Building the Tiller Part II


Rough carving was done primarily with a beloved hand-forged adz. It looks pretty (highly) crude at this point, but I could see inside the wood to what it was going to look like. There is an old saying that if you want to carve a horse, you simply remove all the wood or stone that doesnt look like a horse, and you are done. That applies sorta to this. Each stroke means more of the non-tiller looking wood is ending up on the shop floor.

As I came closer to what I had in mind for the tiller, I switched to a draw knife, wood rasps, a farrier’s rasp and various kinds of flat and half round metal and wood files, and finally cabinet scrapers as I defined the various angles, bevels and curves. I kept some notes and images on the workbench of historic examples that appealed to and inspired me, but remained flexible to the whispering of the muses.

I should mention that I did rough cut the side profile of the bow before the glue-up, to save time and have less wood to hew off, but if you begin with a blocky tiller “blank”, you are still good to go. Think of the this thing in front of you as a canvas. And remember, if you go with something with curvy sides like a German style bow, you will have to work in three dimensions, and think that way too. You can get one half of the tiller just the way you want, but then you have to match the other side perfectly. Taking you time, and having adult beverages at hand to calm your nerves may help at times, but please don’t mix margaritas and German beers with sharp tools. :)

I completed the bulk of the carving over a 3 day period, BUT continued to define and refine the shape up until the very last moment. As with bow building, a digital camera is a great tool to have, as you can see areas you missed or lopsidedness on the screen that the naked eye just didn’t catch.

Once the tiller was completed to my satisfaction, I used cabinet scrapers with a light hand to smooth the wood. In the medieval period, sandpaper as we know it (essentially an early 19th century invention), was unknown in Europe, and the idea of using sharkskin is both unworkable and to me, unethical. Instead, a finish that is achieved just using scrapers looks authentic and satisfying. Using a bone to burnish the wood was my last step, and while perhaps not necessary, this is a look I find appealing.

The last two shots are drilling the binding hole in the nose of the tiller. I used a 1" fostern bit in the drill press, and although it probably would have been easier to place and drill this whole while the tiller was still in two halves, I wanted to be very sure about where it was going to go, so I waited.

In part III, I will illustrate and discuss laying on a table surface. In my first German bow, I used holly wood for the table, and for this one, real bone. That is worth a chapter all by itself, so stay tuned.


« Last Edit: January 25, 2012, 03:56:53 pm by Dane »
Greenfield, Western Massachusetts

Offline Dane

  • Member
  • Posts: 1,870
Re: Central European Crossbow Project
« Reply #14 on: January 25, 2012, 04:25:49 pm »
Just cause, here is a preview of the bone table surface treatment.

Greenfield, Western Massachusetts