Author Topic: Side Quiver Build-along (*Finished*)  (Read 30873 times)

0 Members and 1 Guest are viewing this topic.

Offline Cameroo

  • Member
  • Posts: 1,579
    • Cam's Stuff
Side Quiver Build-along (*Finished*)
« on: April 19, 2011, 11:17:19 pm »
I started working on a quiver for myself today, and figured I'd share my progress as I went, so that maybe some other experienced leatherworkers can keep me from screwing up :)  I don't have any experience with hunting/stump shooting with a back or side quiver, and am not sure what I'm going to prefer, so I figured I'd combine what I thought are the best features of both, and make one that can be used either way.  It's basically going to be like a Jack Bowers Stealth side quiver, with a strap that will allow it to also be used as a back quiver. 

I picked up some nice heavy latigo (9-10 Oz) to use, since my first attempt with some lighter oil tanned leather turned out to be a tad flimsy.  I also plan on tooling some veg-tanned leather pieces to "pretty it up" a bit.

So far all I've done is cut out the pieces, cleaned up the edges with an edge beveller, and carved in some grooves for the stitching, and for decoration.  I'm just making up the patterns as I go, but hopefully everything will fit together once it's stitched up.  One thing that has to be taken into account when adding these accent pieces of veg tanned leather, is that they will have to be slightly longer to fit around the outside circumference of the latigo once it's rolled up.  What looks like it will line up nice when it's layed out flat will actually come up short once it's rolled into a tube.

Here's what I've got so far.  Probably going to tool the accent pieces next, and then start the tedious stiching.  I think I might add some wool shearling to the top opening on the inside, to keep the arrows quiet, but I'm not sure if that's necessary.


Thanks for looking.
« Last Edit: May 02, 2011, 10:15:14 pm by Cameroo »

Offline JW_Halverson

  • Member
  • Posts: 11,901
Re: Side/Back Quiver Build-along
« Reply #1 on: April 21, 2011, 12:18:58 am »
Yeah, PA forum is so much better that people posting here have reported lower cholesterol levels for the last 7 years. 

 ::)
Guns have triggers. Bicycles have wheels. Trees and bows have wooden limbs.

Offline Pat B

  • Administrator
  • Member
  • Posts: 37,597
Re: Side/Back Quiver Build-along
« Reply #2 on: April 21, 2011, 05:08:16 pm »
Cam, I was following your thread on TG but glad you are posting it here too. Looking forward to seeing her all dressed up. She sure in pretty already!  ;)   Will you stitch a leather bottom in this quiver?  I started using a tapered wood plug so I could remove it to clean out the accumulated crap that seems to collect inside. I glue on a thick piece of foam to the wood plug to hold broadheads and keep them sharp.
This is a quiver I made just recently for a special occasion. The blue portion of the plug is the foam.


Make the most of all that comes and the least of all that goes!    Pat Brennan  Brevard, NC

Offline NTD

  • Member
  • Posts: 1,771
Re: Side/Back Quiver Build-along
« Reply #3 on: April 21, 2011, 05:27:31 pm »
ooh this is going to be good.
Nate Danforth

Offline Cameroo

  • Member
  • Posts: 1,579
    • Cam's Stuff
Re: Side/Back Quiver Build-along
« Reply #4 on: April 21, 2011, 08:07:29 pm »
That's pretty much what I have planned for the bottom.  The insert will be more of a teardrop shape because of how I'm stitching the bottom together.  I was planning to glue a piece of latigo to both sides of the wooden plug, which will be enough padding for field points, and just inserting foam if I ever use it for broadheads (which I don't think is the smartest idea to use with a quiver with a big hole in the side :) I think I'd have to put some kind of cover on the side if I did that.  I don;t need to be tripping in the bush and slicing a hole in my guts :)

I'm going away for the Easter weekend so I likely won't have an update till after then.
« Last Edit: April 30, 2011, 02:16:33 am by Cameroo »

Offline Lee Slikkers

  • Member
  • Posts: 1,545
Re: Side/Back Quiver Build-along
« Reply #5 on: April 21, 2011, 08:38:12 pm »
Great stuff as usual...

Oh, and btw, now breaks and no traveling allowed...we need our fix and pics  >:D
~ Lee

~~~~~~~~~~~~~~~~~~~~~~~~~~~~~~~~~~~
"The last word in ignorance is the man who says of an animal or plant: 'What good is it?"
— Aldo Leopold
~~~~~~~~~~~~~~~~~~~~~~~~~~~~~~~~~~~

Offline Cameroo

  • Member
  • Posts: 1,579
    • Cam's Stuff
Re: Side/Back Quiver Build-along
« Reply #6 on: April 28, 2011, 01:42:19 am »
I finally got some more work done on this sucker today.  It didn't go exactly to plan, but turned out ok.  Here's how one "oops" turned into another, and then everything eventually came together.

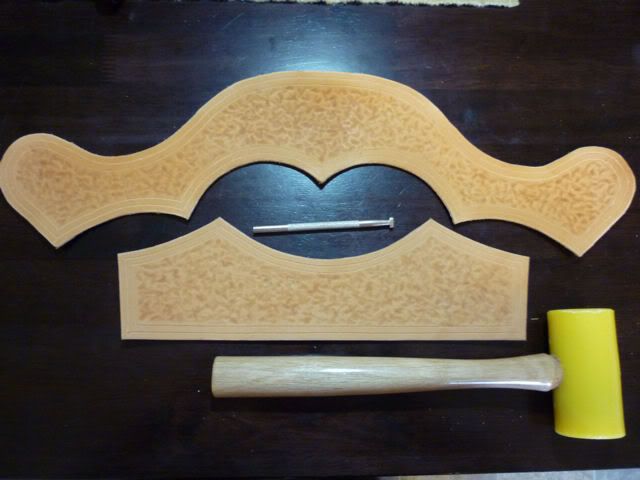
I started with tooling the accent pieces.  I just randomly hammered them with a pear shader stamp because I didn't want to spend a bunch of time tooling.


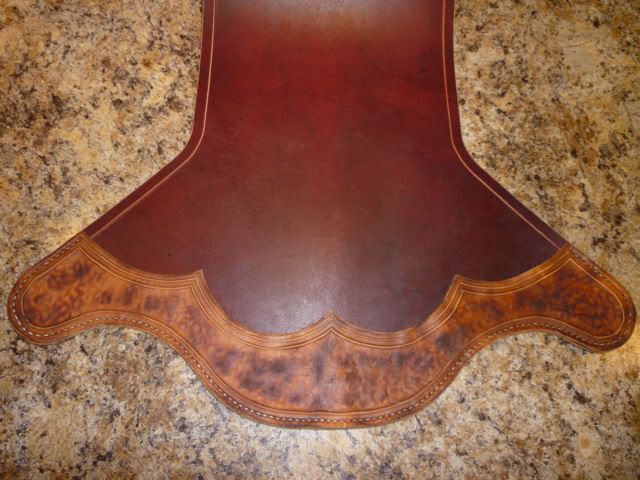
After that, things started going downhill.  I decided to apply some beeswax to the edges to keep the loose fibers down, and got a bit on the top surface too.  Then I figured the sealant I planned on using wouldn't penetrate the beeswax, so I rubbed wax on the whole thing.  I noticed the wax chunking up on the surface so I figured I'd put it in the oven a bit to let the wax melt and soak in.  While spreading the melted wax around on the first piece, I left the other one in a bit too long, and it got a bit toasted.  Great...

I didn't want to start again from scratch, so I decided maybe I'd try scorching the rest of the pieces with a torch to even it out.  It turned out looking ok, but through the whole heating process, the pieces ended up shrinking quite a bit.  I was about ready to give up for the evening, but figured I would try to soften it up with warm water, despite already having coated it in wax and mink oil.  Luckily it soaked up enough to make it pliable enough to stretch a bit.  What a relief :)  
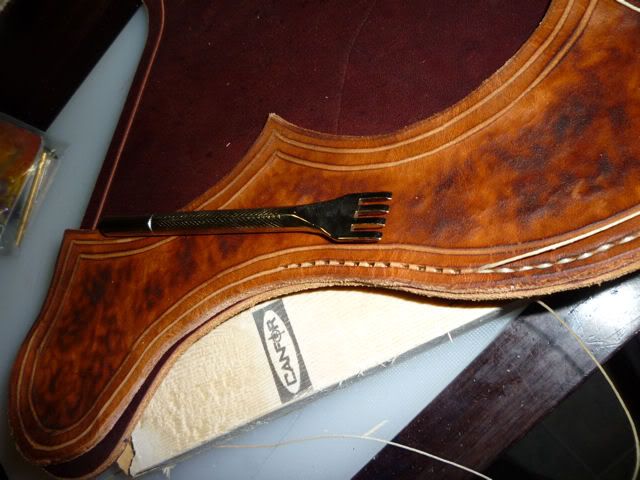
So I spent the next couple hours hand stitching, and wishing I had chosen another way to attach it.  What a boring job that was, and I'm not even half done.


Anyway, that's as far as I got tonight.  Thanks for looking.


HatchA

  • Guest
Re: Side/Back Quiver Build-along
« Reply #7 on: April 28, 2011, 04:40:29 pm »
Looking very tasty, Cam.

Offline JW_Halverson

  • Member
  • Posts: 11,901
Re: Side/Back Quiver Build-along
« Reply #8 on: April 29, 2011, 02:13:18 am »
The toasted accenting makes it look like extra fine burled hardwood. 

But we are all afraid you work is too good to allow it to be posted any further.  Moderators, do your stuff!   >:D
Guns have triggers. Bicycles have wheels. Trees and bows have wooden limbs.

Offline razorbak

  • Member
  • Posts: 58
Re: Side/Back Quiver Build-along
« Reply #9 on: April 29, 2011, 04:53:08 am »
cmon bud....handstitching is fun ;D....good save and if you have issues in future..just rub with water and if that dont work...put a tiny coat of gum trag and lightly burnish with paper bag...works great....cant wait to see what you come up with next

PS...use a blowdryer next time..will save you big time...when I form a new sheath..I use a blowdyer to help speed and can regulate flow and distance...heck I use a blowdryer alot for leather work...heck I toasted a nice piece of leather in oven in past..hence the blowdyer....
« Last Edit: April 29, 2011, 04:57:46 am by razorbak »

Offline Cameroo

  • Member
  • Posts: 1,579
    • Cam's Stuff
Re: Side/Back Quiver Build-along
« Reply #10 on: April 29, 2011, 05:09:51 pm »
Stephen - It sure didn't smell tasty! More like burnt hair :)

Art - good to see you here :)  But if you call that fun, maybe I'll send it your way and let you enjoy yourself :)  Good advice though.  I've been using the girlfriend's blow dryer a lot for my leather tooling, don't know why I didn't think of using it to melt the wax in.
« Last Edit: April 30, 2011, 02:17:22 am by Cameroo »

Offline razorbak

  • Member
  • Posts: 58
Re: Side/Back Quiver Build-along
« Reply #11 on: April 30, 2011, 12:51:39 am »
yep Im gonna start coming here more often again...little more open minded here...yep blow dyer is awesome and send any stitching my way...can do it for you...actually enjoy it...can stitch with my eyes close ;D

Offline Cameroo

  • Member
  • Posts: 1,579
    • Cam's Stuff
Re: Side/Back Quiver Build-along
« Reply #12 on: April 30, 2011, 01:18:34 am »
yep Im gonna start coming here more often again...little more open minded here...yep blow dyer is awesome and send any stitching my way...can do it for you...actually enjoy it...can stitch with my eyes close ;D

You enjoy it hey.  I gotta say you're a strange fellow...  ;)

I just finished stitching the top piece on, took another hour or so.  Am I that slow or does it take you that long?  The bottom piece will have to wait till my significant other is away, she's not too keen on the noise from punching holes.  But my eyes were starting to go squirrelly anyway.  Hopefully I'll have some progress pics by tomorrow or Sunday.

Offline razorbak

  • Member
  • Posts: 58
Re: Side/Back Quiver Build-along
« Reply #13 on: April 30, 2011, 03:25:34 am »
everyone is different when stitching is concern...takes me about 15minutes or so to do about a 300 holes stitch...did use to do like you from your pics..stitch some...punch holes but now days I either make all stitch holes first or I use a stitch wheel and premark my holes and I punch and stitch at the same time....either way bud..your gonna do awesome ;)

Offline razorbak

  • Member
  • Posts: 58
Re: Side/Back Quiver Build-along
« Reply #14 on: April 30, 2011, 03:26:45 am »
everyone is different when stitching is concern...takes me about 15minutes or so to do about a 300 holes stitch...did use to do like you from your pics..stitch some...punch holes but now days I either make all stitch holes first or I use a stitch wheel and premark my holes and I punch and stitch at the same time....either way bud..your gonna do awesome ;)