Author Topic: Fish arrow build-a-long  (Read 3991 times)

0 Members and 1 Guest are viewing this topic.

Offline Dakota Kid

  • Member
  • Posts: 897
  • Maker of Things
Fish arrow build-a-long
« on: November 26, 2015, 10:45:38 am »
I had a request awhile back to do a build-a-long for the fish arrow I made for the member trade. This is/was my first build-a-long and it was more of an effort than I anticipated. I'd like to thank all the members who take the time to give instructions like this. I had no idea the time involved and how much more difficult it makes the project.  Just when you get a groove going you have to stop for pictures. It's also very hard to build anything and take pics at the same time. I've had my third arm on back order for years. I'm wondering if they're discontinued. Because of the unexpected amount of work involved this will be presented in installments. Please be patient, I'll try not to take too long.
With that out of the way, I present Dakota Kid's primitive fish arrow build. We'll assume those reading have a basic arrow building knowledge. I'll be leaving out part that already have instructions posted, like straightening boo, preparing sinew, and cutting self nocks. I tried to keep things as primitive as I could. The only modern materials used were TB3, food coloring, and a drop of airbrush paint. Pics of the actual trade arrow can be found in that thread. This is one I'm making for a trade with trapper rob, but is for the most part identical.  The design was based on some images of inuit fishing arrows I found online.

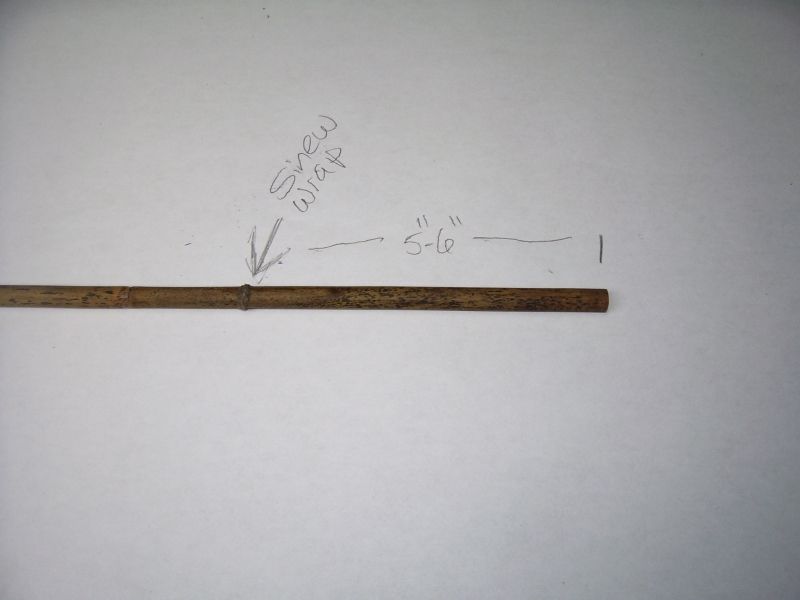
Step one, get a nice straight boo shaft about 6" longer than you typically use for your draw length. Measure six inches back from what will be the point end and do a nice tight sinew wrap. Stay away from hide glue as this arrow will be getting wet. TB3 works great. I rehydrate the sinew then soak it int he glue. Allow the glue to dry before proceeding. You could also do your self nock at this point as well.


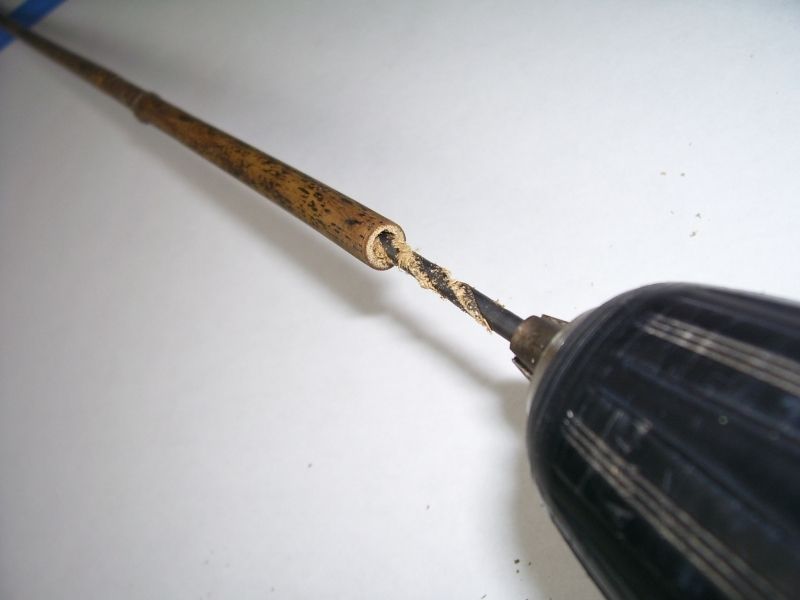
Step two, drill out the hollow in the boo shaft. Make sure you drill almost as deep as your sinew wrap.


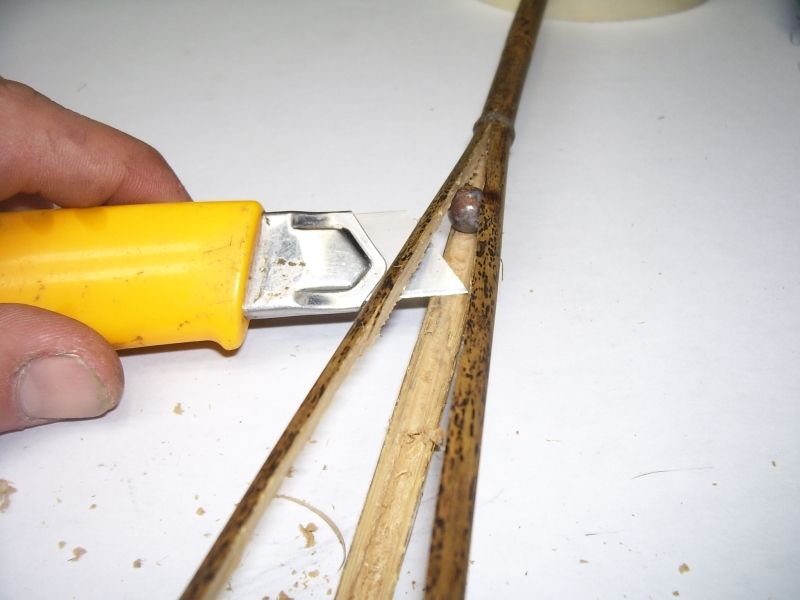
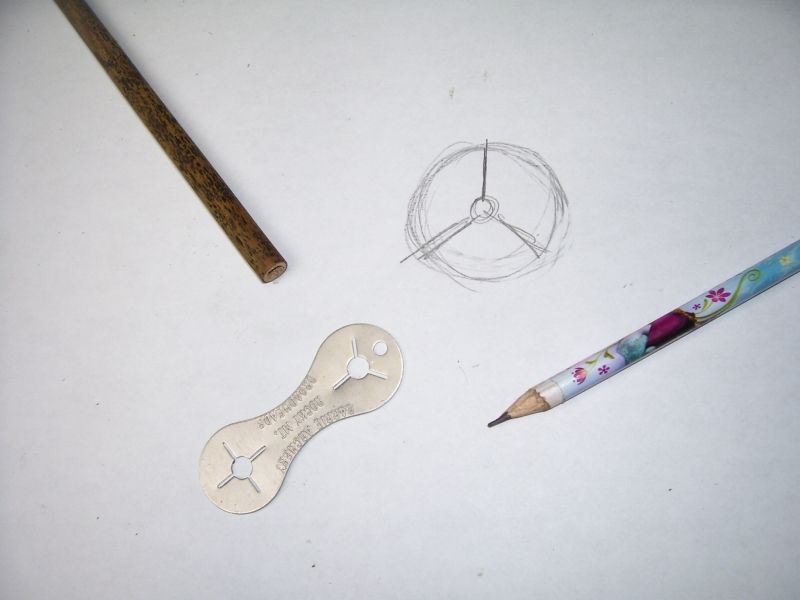
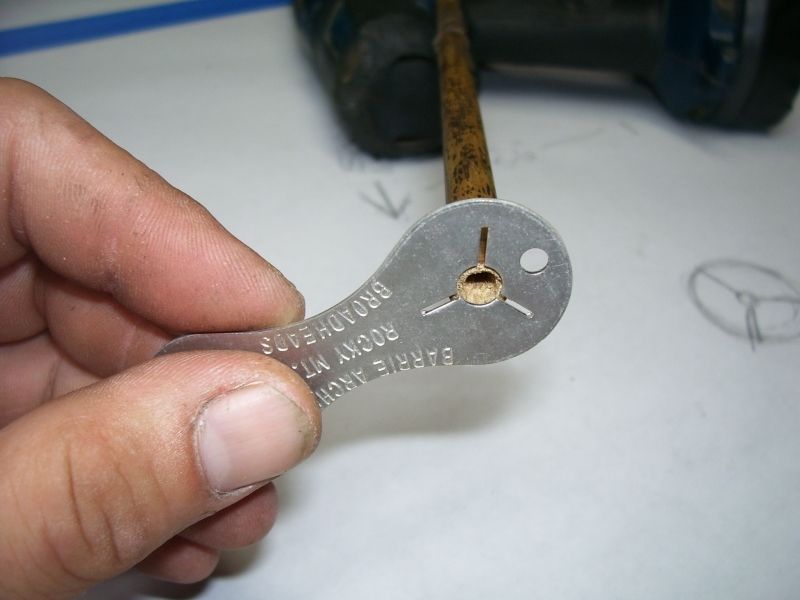
Step three, marking the boo and cutting the three prongs that will make the points. I usually just eyeball the division lines, which I mark on the end of the shaft. If you don't trust you inner ruler, a standard 3 blade broadhead wrench works great for a template.


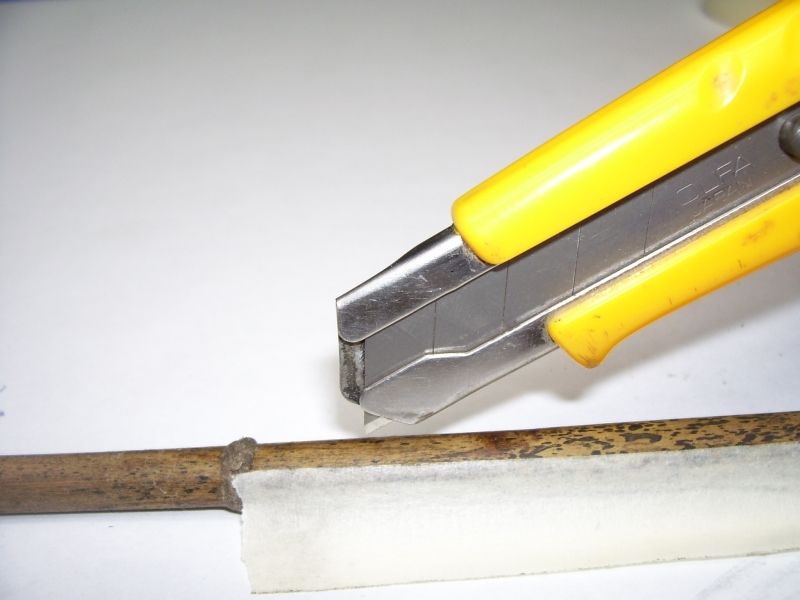
Slap a piece of tape down the side of the shaft to help keep the kinfe from drifting. Make your cuts with an adjustable saftey razor with the blade depth set shallow enough you don't cut throught to the opposite side wall. Do this for all three cut lines.


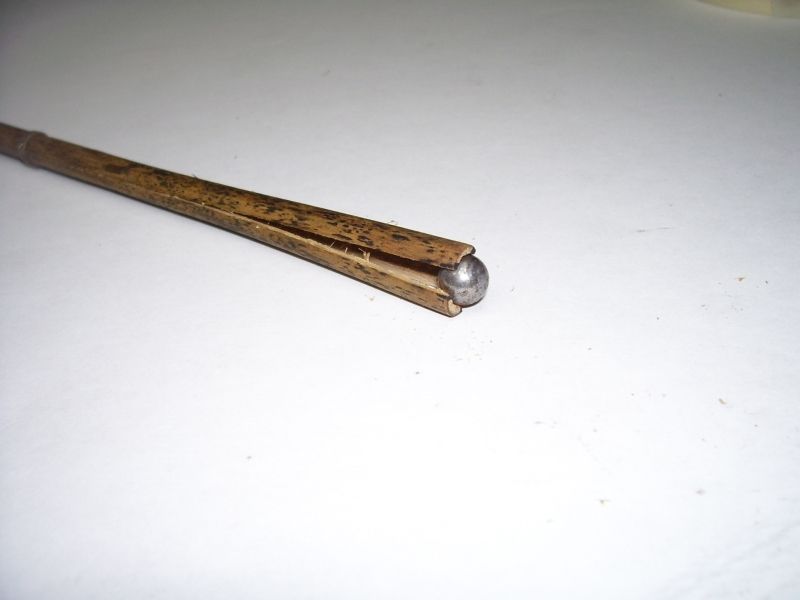
Step four,  Splitting and spreading the boo prongs. Find a small, hard, round object. I'm using the shaker ball from an empty spray paint can. Work the ball into the hollow of the shaft. You may need to make a few small cuts to completely free any fibers that may have been missed on the first cut.
Work the ball as far back to the sinew as you can without cracking the prongs. You'll feel when you run out of room. Make sure the prongs are spaced evenly before you continue becasue the next step will fix them in place.


Step five, cleaning up the boo prongs. Now that the ball is in place you have easy acess to the center and sides of the prongs. Clean up the backside and square off the edges.


I have nothing but scorn for all weird ideas other than my own.
~Terrance McKenna

Offline Dakota Kid

  • Member
  • Posts: 897
  • Maker of Things
Re: Fish arrow build-a-long
« Reply #1 on: November 26, 2015, 10:50:37 am »
Step six, sealing the boo prongs. Take some TB III and a small brush and paint the backside of the prongs. I like to spray water on the areas being glued to help the glue soak in. Also apply to the exposed area behind the spacer ball.


Step seven, fixing the spacer ball with heavy sinew wraps. Wrap glue soaked sinew on both sides of the spacer ball. Don't be stingy with the sinew. This is a weak point in the arrow that will receive a lot of stress on impact. The wrappings behind the ball will spread the points out. You be able to bring the prongs back toward center with the front wrap. Adjust the prongs so they will enter the target more straight on than angled out. If they angle outward too much they will snap when penetrating.

Step eight, preparing the prongs to receive the bone points/barbs. Sand down the prongs so the bones will point inward slightly when fixed to the prongs. This will push the prongs inward during penetration. When barbs exit the target they will want to spread apart causing the barbs to work more effectively. 


Step nine, evening the prongs. Make sure the prongs are the same length and everything seems balanced. Standing the srrow on the prongs will let you know when you got it right.


Let the sinew wraps dry before proceeding. I'll get the next series of steps up soon. In the mean time feel free to ask any questions or voice concerns.
Thanks for looking, stay tuned.
I have nothing but scorn for all weird ideas other than my own.
~Terrance McKenna

Offline DC

  • Member
  • Posts: 10,396
Re: Fish arrow build-a-long
« Reply #2 on: November 26, 2015, 12:11:38 pm »
Very good job so far! You should do more of these build-alongs >:D

Offline BowEd

  • Member
  • Posts: 9,390
  • BowEd
Re: Fish arrow build-a-long
« Reply #3 on: November 26, 2015, 12:43:43 pm »
Hey...that's cool.I like it.
BowEd
You got to stand for something or you'll fall for anything.
Ed

Offline BowEd

  • Member
  • Posts: 9,390
  • BowEd
Re: Fish arrow build-a-long
« Reply #4 on: November 26, 2015, 01:32:00 pm »
Have you shot a number of fish with this type arrow?
BowEd
You got to stand for something or you'll fall for anything.
Ed

Offline Dakota Kid

  • Member
  • Posts: 897
  • Maker of Things
Re: Fish arrow build-a-long
« Reply #5 on: November 26, 2015, 04:28:38 pm »
Thanks guys.

I have not shot any fish with type of arrow(yet). My options in this state are limited to carp, suckers, and catfish. The best carp locations are a few hours south from me, so I rarely make it down there. When I do get out, I typically used a more modern design that I can make in an hour or so. I wanted to do something a little more impressive for the arrow exchange and this is the result. I actually think this will be more effective than the standard single metal barb point. The way the prongs are under tension and tighten further with penetration will make this arrow almost impossible for a fish to shake free. I wanted to try it out for frogs next summer as well. The sucker spawning run will be close to home and should start soon so I will be trying this arrow out before too long. 
I have nothing but scorn for all weird ideas other than my own.
~Terrance McKenna

Offline Trapper Rob

  • Member
  • Posts: 3,719
Re: Fish arrow build-a-long
« Reply #6 on: November 26, 2015, 07:05:00 pm »
Been waiting to see this build along.

Offline Urufu_Shinjiro

  • Member
  • Posts: 709
Re: Fish arrow build-a-long
« Reply #7 on: November 27, 2015, 09:37:27 am »
Watching this thread closely, cool stuff man!

Offline Sockrablur

  • Member
  • Posts: 103
Re: Fish arrow build-a-long
« Reply #8 on: November 27, 2015, 04:37:33 pm »
Cool build, love it! Do we have to wait till spring for the fishing part?

riverrat

  • Guest
Re: Fish arrow build-a-long
« Reply #9 on: November 29, 2015, 04:48:28 am »
i really like that ! made a bamboo spear with a tip like that while i was in J.E.S.T. school back in the early 80's. caught some fresh water shrimp and a trout if i recall correctly.them type of points are for smaller fish. id imagine a arrow like that could get small birds too.nice work. Tony

Offline Ed Brooks

  • Member
  • Posts: 1,020
Re: Fish arrow build-a-long
« Reply #10 on: November 30, 2015, 11:18:33 am »
I like this idea however, I have to ask, have you shot it in the water to see how it will act, I mean with the three prongs, will it not tend to divert the arrow when it hits the water? Ed
It's in my blood...

Centralia WA,

Offline Dakota Kid

  • Member
  • Posts: 897
  • Maker of Things
Re: Fish arrow build-a-long
« Reply #11 on: December 01, 2015, 01:36:54 am »
I would imagine that it would cause some drag and slow the arrow if the fish was deep in the water. In my experience with bowfishing most of the fish being shot at are right on the surface or just below. There is some importance in keeping things spaced evenly and symmetrical, which should eliminate major diversions. Drag would be a bigger concern is shooting at a deep target.


Lets continue shall we?
Step ten, selecting the barbs. You could use bone, antler, shell, horn, hardwood, slate, or anything else that's hard but workable. This is the pile of my tiny scraps that I had to choose from. My only advise is to stay away from bird bones as they are quite brittle compaired to mammals.

These are the pieces I ended up choosing. They were deer leg bone fragments, fibia or tibia I suspect. They have to be as wide as the boo prongs to get the strongest attachment.

Step eleven, shaping/sharpening the barbs. I typically refrain from power tool use as a personal preferance, but it was easier than hand sanding with camera in hand. The barbs should be a needle point on the front end and a chisel point on the back side. The inside of the bone needs to be flat sanded.

Sand all three and you should end up with something like this.

Step twelve, notch the barbs and prongs. Take a triangular file and notch the barbs just behind the center of both sides. This will be where the sinew wraps go.

Take the barbs and hold them in place on the prongs. Either mark the notches and then file or just file them while holding them in place if you have a high dexterity.

Step thirteen, attach the barbs to the prongs with sinew soaked in TB III.  Just make  a  couple  wraps  around the notches then do a figure 8 around the back and notch grooves. Apply glue to the flat surfaces being mated as well. Allow to dry before proceeding.

That's it for now. It was a long day, first day of rifle here in PA. This was the first time in at least ten years I saw nothing from my stand all day. I did however see my first white deer on the drive over. I'm fairly sure it was n fact a white deer not an albino which makes it even rarer. Anyways, off to bed to dream of the deer I didn't see. If I can remember what they look like.
I have nothing but scorn for all weird ideas other than my own.
~Terrance McKenna