Author Topic: Building another flintlock  (Read 85923 times)

0 Members and 1 Guest are viewing this topic.

Offline Eric Krewson

  • Member
  • Posts: 5,400
Re: Building another flintlock
« Reply #120 on: March 05, 2016, 12:26:49 pm »
I may have posted this before, this is how they did it in colonial times;

https://www.youtube.com/watch?v=lui6uNPcRPA

Offline Eric Krewson

  • Member
  • Posts: 5,400
Re: Building another flintlock
« Reply #121 on: March 05, 2016, 04:46:27 pm »
Measuring my length of pull for inletting the buttplate;


Marking the buttplate profile;


No turning back now;


Rasping to my lines, I leave plenty of extra wood so I can jocky the buttplate into place as I inlet it into the wood.

« Last Edit: March 05, 2016, 05:59:28 pm by Eric Krewson »

Offline Eric Krewson

  • Member
  • Posts: 5,400
Re: Building another flintlock
« Reply #122 on: March 05, 2016, 05:55:45 pm »
black it and chisel;


Getting there, I took a look at my installation from a distance and realized I had the buttplate askew. I lined up the return with the barrel and tang and started going down again. I thought this precarve wouldn't have any cast off but it does, another consideration on the final buttplate position. Glad I left some extra wood.


Offline Eric Krewson

  • Member
  • Posts: 5,400
Re: Building another flintlock
« Reply #123 on: March 12, 2016, 06:24:49 pm »
The buttplate is pretty much in. I drilled the holes in the buttplate for the mounting screws and countersink the holes.


I don't think I have ever cut a perfect countersink. I have studied the proper way to make a chatterless hole, tried all the ways and still get lousy holes. At least the screw head covers up the less than perfect countersink.

The next step is to drill out your screw holes in the stock and plug them with dowels so you can drill them in the right place the next time. I like to pull the plate down with screws to get a good lamp black transfer for inletting. As you inlet deeper into the wood, the screw holes that were right when you started will be off center as you go down.

I have plugged the same hole 4 or 5 times and redrilled on other builds before I got just right.

« Last Edit: March 12, 2016, 06:35:12 pm by Eric Krewson »

Offline Eric Krewson

  • Member
  • Posts: 5,400
Re: Building another flintlock
« Reply #124 on: March 14, 2016, 06:58:44 pm »
Finally, I have the buttplate where I want it to be, I redrilled the screw holes 4 or 5 times before I had them just right for the pressure of the screw heads to pull the buttplate into perfect alignment.


I filed off the extra wood and low and behold, GAPS! a few tiny ones less than the width of a piece of paper. My inletting was almost perfect, no gaps but changing the screw position changed things. This shot is after I filled a few gaps with shavings, can you see them?


It is a rare inlet that I don't glue in a few gap filling shims, they never show on a finished rifle. There are several in this picture.


Dressed up;


I have built two rifles from a plank, this is my first attempt at building from a precarved stock.  Parts alignment is a pain with the precarve as the precarve is never perfectly cut out.

I have one more precarve kit waiting in the wings, after that one it will be plank builds only for me.


« Last Edit: March 14, 2016, 07:19:00 pm by Eric Krewson »

Offline Eric Krewson

  • Member
  • Posts: 5,400
Re: Building another flintlock
« Reply #125 on: March 14, 2016, 07:06:21 pm »
Trigger guard time;

First you have to saw off the casting sprues, the trigger guard is pretty rough at this point.


File off the remainder of the sprues and clean up the inside of the bow, lots of sanding ahead to get rid of the file marks.


The guard is held in place by the lugs you see in the picture. The lugs are inletted into the stock and pinned into place like the barrel was.


Offline DC

  • Member
  • Posts: 10,396
Re: Building another flintlock
« Reply #126 on: March 14, 2016, 07:36:02 pm »
Is there any reason that the butt is screwed on but the trigger guard is pinned?

Offline Eric Krewson

  • Member
  • Posts: 5,400
Re: Building another flintlock
« Reply #127 on: March 14, 2016, 11:36:19 pm »
I suspect the buttplate needs a really secure attachment and needs to be tightened down into place because of the complex inlet, the screws are really large.

The trigger guard can be pinned or screwed on. Many Tennessee rifles have their trigger guards held by screws, for other style rifles a pin in the front and a screw in the back is real common. A screw in the front may end up in the ramrod channel.

I am building a Bogle like rifle which has the trigger guard pinned.
« Last Edit: March 14, 2016, 11:40:41 pm by Eric Krewson »

Offline Eric Krewson

  • Member
  • Posts: 5,400
Re: Building another flintlock
« Reply #128 on: March 15, 2016, 07:13:19 pm »
This step takes me days and leaves me with several sore fingers; filing out the casting marks then  sanding, and more sanding.


Offline caveman2533

  • Member
  • Posts: 640
  • Steve Nissly
Re: Building another flintlock
« Reply #129 on: March 16, 2016, 10:24:22 am »
 I make a lot of countersinks in material at work and one of the most important to making a smooth one is rigid mounting. The next thin I would do is get rid of the 2 flute countersink and get one that is six. slow down the rpm and use a bit of oil. I am loving your build along. Always something I wanted to try and maybe will start on another project t and build confidence to do this.

Offline JW_Halverson

  • Member
  • Posts: 11,905
Re: Building another flintlock
« Reply #130 on: March 16, 2016, 12:39:32 pm »
You do several things differently than I have, and on more than one occasion I have almost jumped in and said, "Don't do it that way, do it this way."  So far, I have held my tongue and spent time considering why you have done what you have done.  By doing this, I have added a couple tricks to my trick bag, so thanks for that!

I know a guy that was really tired one night, but had vowed to do a little every day on his rifle build.  That night he decided to use his Dremel and a cutoff wheel to remove the casting sprues from the triggerguard.  The next morning he called around town to find someone that would be willing to braze the bosses back on so that he could pin the @#$% thing to the stock!  I am not going to embarrass the fellow, as I know he reads these posts, but his initials are John William Halverson.
Guns have triggers. Bicycles have wheels. Trees and bows have wooden limbs.

Offline Eric Krewson

  • Member
  • Posts: 5,400
Re: Building another flintlock
« Reply #131 on: March 16, 2016, 05:09:27 pm »
Does this look familiar JW?


One of my major goofups was to try to drill a pin hole for the trigger guard lug through the wood and lug at the same on my fowler. My bit hit the lug, went screech and broke off deep in the wood. I tried to drill from the other side and screech, pow, another bit broken off deep in the wood and lug.

The lug was pinned but not in the manner I wanted and never coming off. I hadn't shaped the wood yet plus there was a philips head screw temporarily holding the back of the trigger plate in which is muzzleloader blasphemy.

I shaped the wood with a chisel and piece of sandpaper, it took forever.

A guy on one of the gun building forums said to get a 1/16" carbide bit and put it into in my errant hole with only the weight of the electric drill on it and let it eat.  I started seeing metal shavings after about 15 minutes and pow, it made it through lug, eating up the broken drill bit on the way.

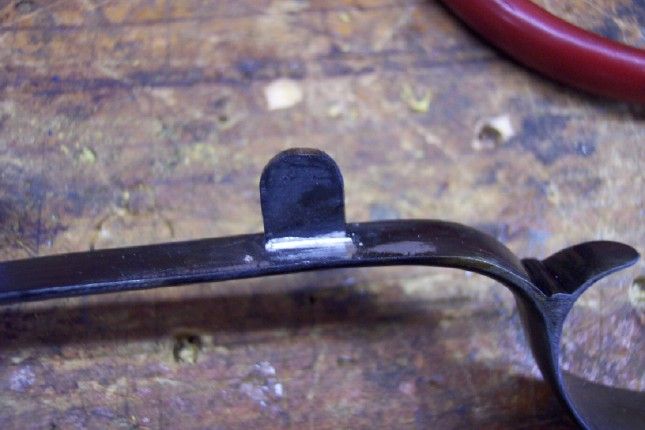
I got the trigger guard off, removed the phillips screw, made a new lug as shown above, redrilled and everything was fine.

Offline Eric Krewson

  • Member
  • Posts: 5,400
Re: Building another flintlock
« Reply #132 on: March 21, 2016, 09:44:39 am »
Well, I will start with a typical gun building tale of woe; My rear trigger wouldn't fit in the trigger guard and needed to be bent a little. I heated it and bent it, pretty good but I went to far so I tapped it cold with my hammer, Bang!, it broke intwo. I ground the ends at a long bevel and used solder paste to stick the parts back together. I will order a new back trigger so I can brown it without a line showing but this will work for now.


Offline Eric Krewson

  • Member
  • Posts: 5,400
Re: Building another flintlock
« Reply #133 on: March 21, 2016, 09:52:10 am »
Trigger guard inlet; lay out some center lines.


Cut slots for the luggs;


Test fit, lugs in the slots. One would think a steel trigger guard would be cast straight, this one had all kinds of surprises, twisted on the ends, ends out of alignment and such. I would inlet a little, tweek the trigger guard to try to get it to lay flat and repeat. I finally got it fitting pretty good.


Outline the trigger guard with an exacto knife.


Down we go;

« Last Edit: March 21, 2016, 10:00:00 am by Eric Krewson »

Offline nclonghunter

  • Member
  • Posts: 1,779
Re: Building another flintlock
« Reply #134 on: March 21, 2016, 10:42:51 am »
I can almost smell the powder burning....looking good.
There are no bad knappers, only bad flakes