Author Topic: New braintanned warshirt  (Read 6664 times)

0 Members and 1 Guest are viewing this topic.

Offline Peatreg

  • Member
  • Posts: 76
New braintanned warshirt
« on: June 01, 2015, 02:17:06 pm »
Since the first one went so well I decided to do another one. Another build along of sorts. This time I'm using real brain tanned hides (thanks Red!!). I'm using the same two hide design. These hides aren't as long as the ones from the previous shirt so it's not as long but the hides themselves in this type of "poncho" style dictate the shape of the shirt to a certain extent.  The two hide method takes the top 1/3 (head end) of each hide and those folded along the spine create your sleeves. The bottom 2/3 of each hide creates the front and the back of the shirt.  The first couple pics are of the two hides on top of each other after I've chosen the sides which will be towards the inside of the shirt vs. the outside.  Traditionally the shirt was layed out as if the deer was standing on its hind legs. This way the finished shirt would retain the shape of the deer. In these two pics the head end is at the bottom of the picture and the rear end towards the top.


This last picture is after the two hides have been cut (a nerve wracking proposition when dealing with expensive brain tanned hides) and the overall shape of the shirt can plainly be seen.


Next will be to locate the neck hole and stitch the front and back together and then sew the sleeves to the body.  This shirt won't have any beadwork on it. I'm planning on perforating the top half of the body and the sleeves with many "bullet" holes. These holes are sometimes seen on Plateau shirts and among the Blackfeet.  I'm also planning on adding several ermine hides to the shirt. Lastly the right side will be painted red with earth pigments and the left side will be painted black with soot from a campfire possibly supplying the color. We'll see as things could change as I go along.

Until next time...

Offline Peatreg

  • Member
  • Posts: 76
Re: New braintanned warshirt
« Reply #1 on: June 01, 2015, 04:41:11 pm »
You cut the top third of the hide off for the sleeves. Since the hides are arranged for the hind legs to be on the bottom of the shirt it's the head end that you cut. The following picture shows how it works...


The top of each hide makes up each sleeve. I want to cut behind the front legs so that they form a natural decoration. It's basically impossible to get commercial hides with much if any of the legs so sometimes they need to be created by sewing another piece of hide below the sleeves and conversely on the bottom of the shirt to create the hind legs. These hides have some of each leg on them but I may still add more hide on both sleeves and the bottom of the shirt.

These hides are about 10 sq. ft. each so I wasn't able to make a long shirt. In earlier times the shirts of the plains tribes were quite long often reaching below the knees. At a certain point in time they started making them shorter and shorter. I've seen some originals that would look something like a midriff shirt they were so short. I like the looks of the long shirts myself. The shirt I made before reached about mid-thigh at the shortest part and longer at the sides. This shirt will be higher than that with the shortest part being 4-6 inches below the waist. Belts weren't worn over the shirts so it's not like I need to have enough to belt.

Another point to look at is how much of the top third do you need to create your sleeves. On a narrow/long hide your top third would need to be cut more behind the front legs to get a longer piece to form full length sleeves while a wider hide you wouldn't need as much of the top third. The earlier two-hide style shirts such as this was never really tailored so to speak (shirts later on tended to be more fitted and tailored and in my opinion less interesting). They were very much a poncho in affect with the shoulder seam not necessarily in the same location as in a modern t-shirt but further down the arm. These hides were about 25" wide, so with cutting off about 15" off the top I'm going to get a shirt cuff to cuff of about 55". I could have cut more than 15" off to get longer sleeves but it would also shorten the shirt length. If I had let's say 4 hides I'd use two hides for the front and the back and the top third of the other two hides for the sleeves which would leave 2/3rds of two hides for the neck flap, sewn on appendages and fringe should you want to add some. Since I only have three I'm using the two-hide shirt with the third hide providing extra material. I'm looking at making this shirt with shorter sleeves ending just below the elbow and not being sewn at all. Traditionally only the cuff to just below the elbow might be sewn with the rest open or held together with thongs. The sides traditionally weren't sewn either except maybe tied together with thongs.

Each shirt I've made I've used the shape of the hides to determine the ultimate shape and look of the shirt. So I make sure I try and think through everything and in my mind envision how it will go together before I make that first cut. I don't use a pattern so I really let the hides dictate what it will look like.

I'm going to use real sinew. Normally I use imitation sinew but since this is my first shirt of real brain tanned I decided to go really traditional and use real sinew. This will be my first attempt with real sinew so maybe I'll end up using imitation but hopefully not. As far as using leather laces, it wasn't traditionally done as the laces would be uncomfortable and punching big holes for the lace weakens the seams. For sake of comfort and tradition and durability I hand sew it.

Offline Peatreg

  • Member
  • Posts: 76
Re: New braintanned warshirt
« Reply #2 on: June 01, 2015, 04:49:09 pm »
After getting the top third of each hide for the sleeves and the bottom two thirds for the front and back I was able to start sewing it together.

Neck hole:  I needed to locate the hole for the head to pass through. I measured the width of the hides where I cut on the solid line...


Measuring I came up with 28" approximately for each the front and the back...


Making a mark at the halfway point of 14" I measured to either side 6" and made corresponding marks to locate the edges of the neck hole...


Sewing the front and the back: Earlier I had determined which side of the hides would be towards the inside of the shirt (body side) and which sides would face out. Placing the hides back to back, with the outsides of the shirt facing each other, I started the whip stitch from the right side of the neck out to the right shoulder and then followed with the left side of the neck to the left shoulder...


Turning the shirt right side out you see the look of the seam...


Sewing the sleeves:  Folding the top third of each hide in half I produced each sleeve. Making a mark at the halfway point I lined that up with the seam that I had just sewn. Like the front and the back I placed the sleeve against the shoulder seam, making sure that the outside of the sleeve went back to back with the outside of the body.  Again using the whip stitch I started sewing the sleeve to the body. Sewing to a length I deemed adequate I tied off the sinew and started sewing from the shoulder down the other side...


All done stitching the shirt together...


The next steps will include adding whatever "legs" I require to the bottom of the shirt or the underside of the sleeves. Cutting the skirt fringe along the outside of the garment, attaching the front and back together with thongs as well as the sleeves. I'm planning on the sleeves being loose and instead of sewn from the cuff to the elbow like the other shirt I did this one will be closed together with thongs and left open.  Later will come the painting half red and half black and the adding of the "bullet" holes, ermine, etc.

This is the sketch showing an approximation of what the shirt will look like...


Offline Peatreg

  • Member
  • Posts: 76
Re: New braintanned warshirt
« Reply #3 on: June 01, 2015, 04:56:13 pm »
End of last post I had the shirt completely seen together. I decided for this shirt the front and back yokes or bibs would be long and rectangular. I've got the pieces cut and placed and ready for stitching...


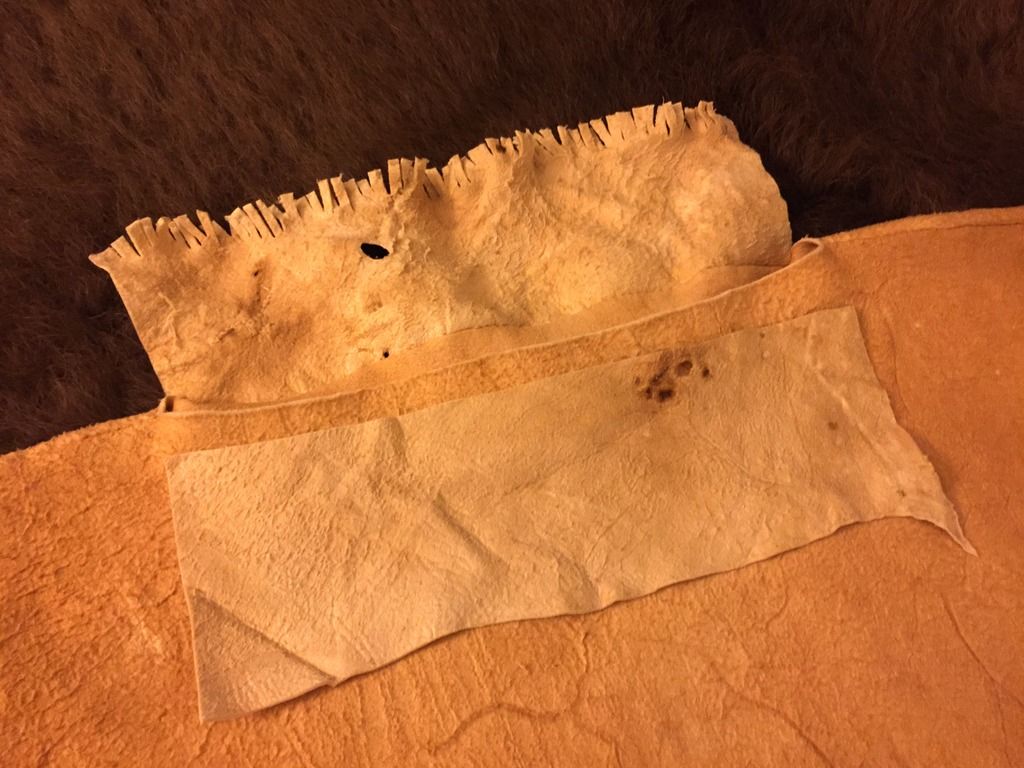
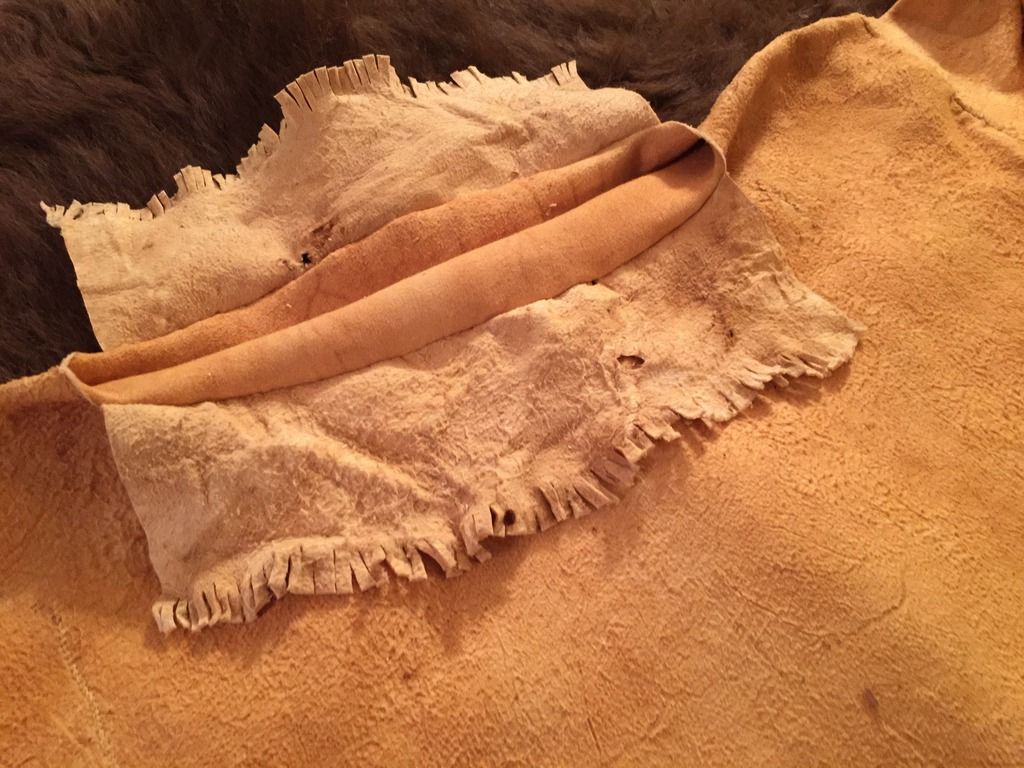
The bibs are sewn while inside the shirt, stitched together and then folded over the neck to hang on the outside. This pic shows the bibs inside and whip stitched together...


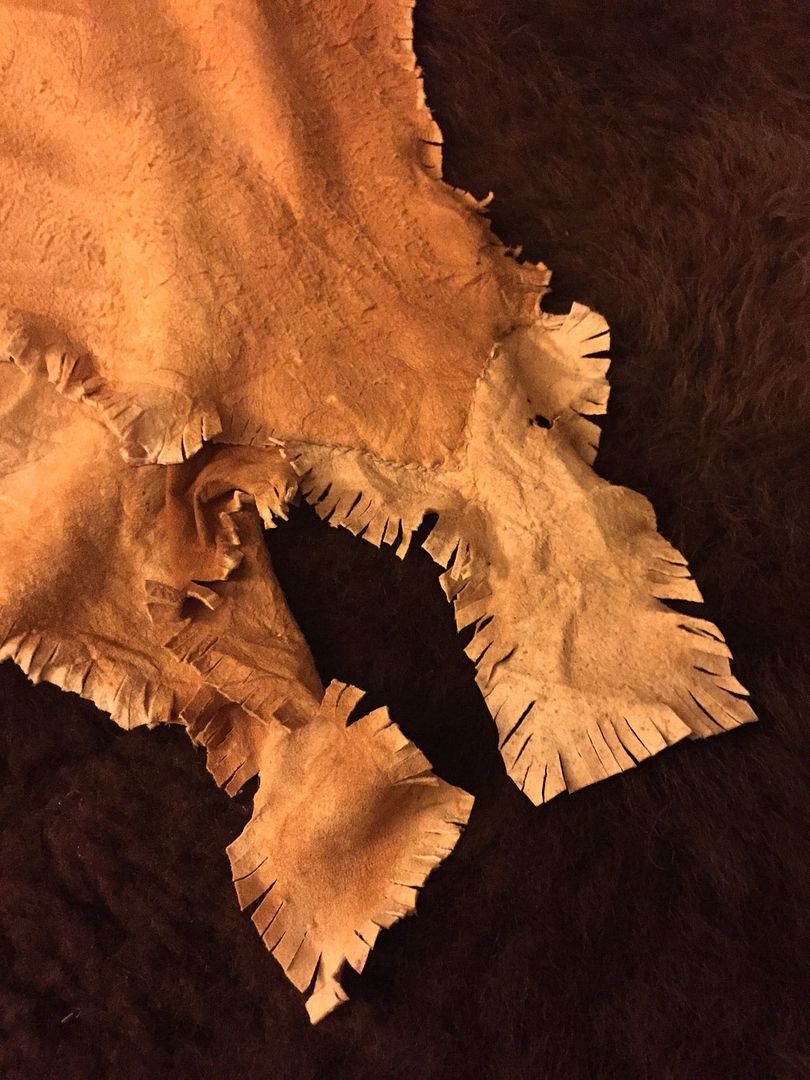
One side of the shirt didn't have any of the hide down the rear legs so I had to sew them on. The next couple pics show the legs sewn in place...


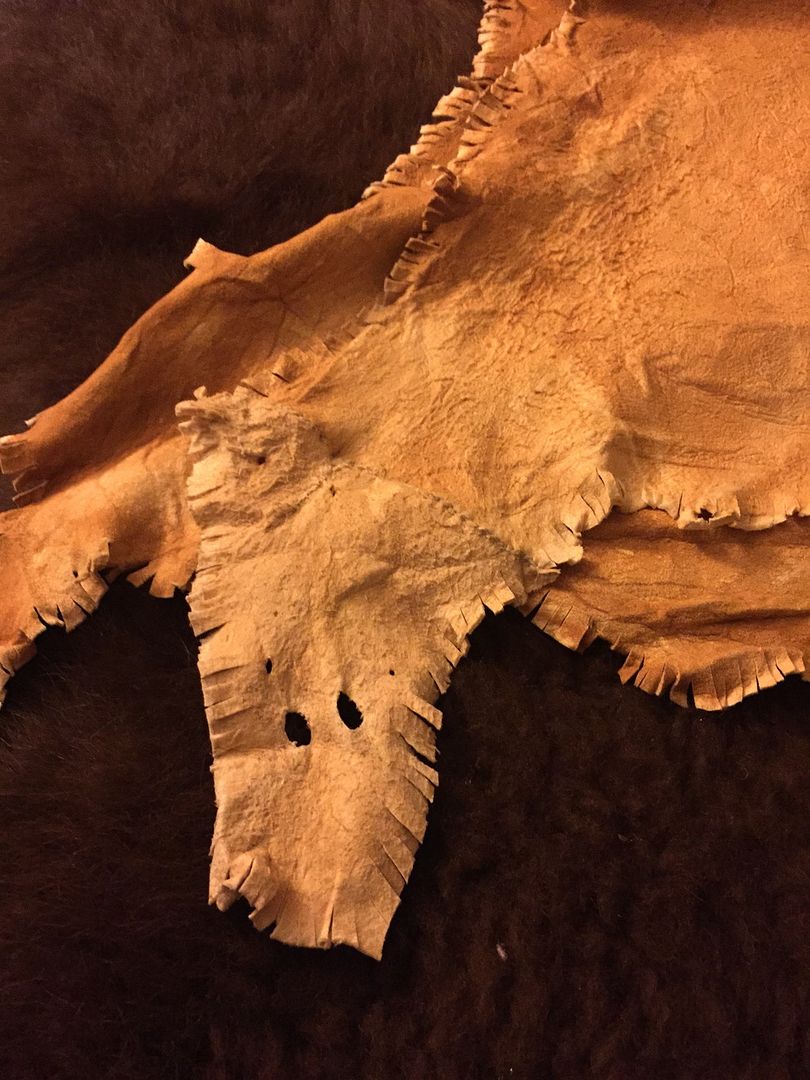
The hide from the tail on the back of the shirt didn't line up with the front so I decided to cut it off, reposition and then re-sew. I also think it adds some character and age to the shirt. The following pic shows the tail moved and sewn...


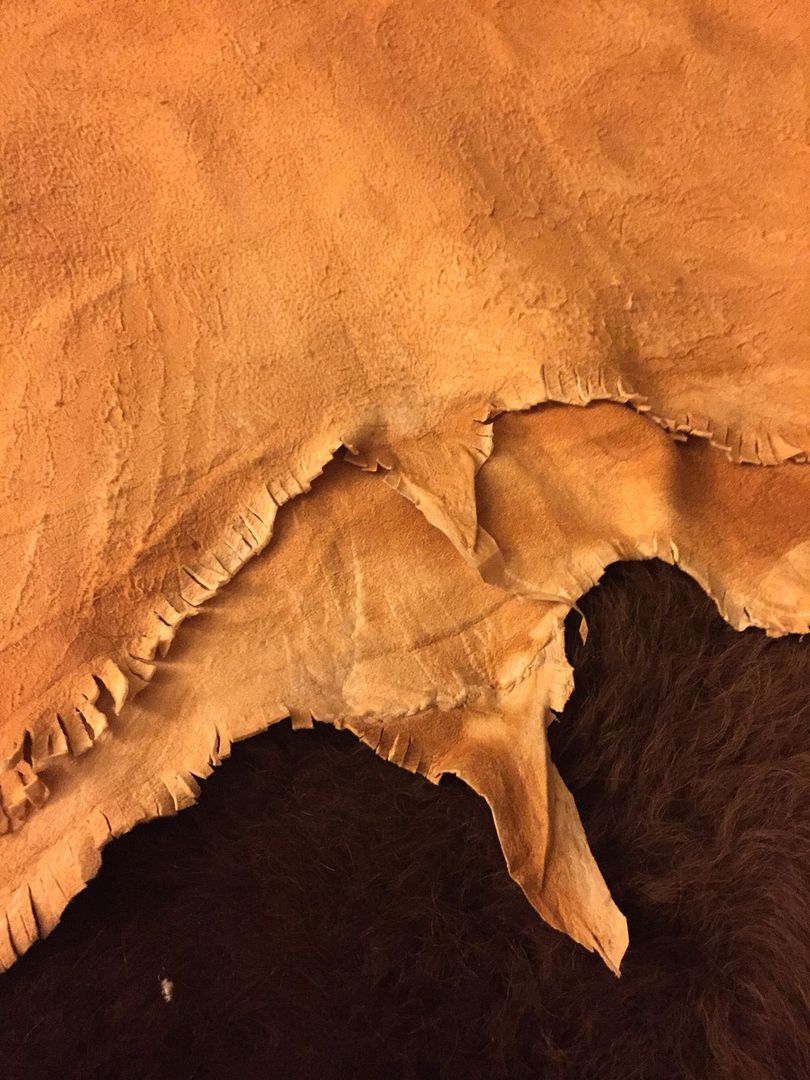
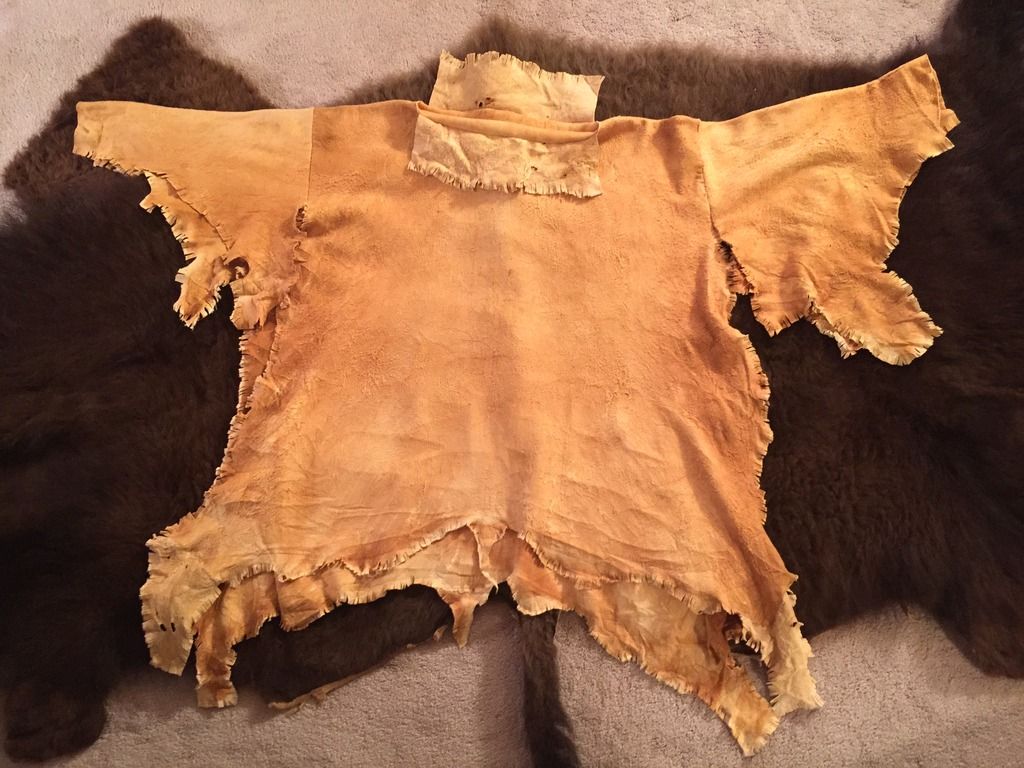
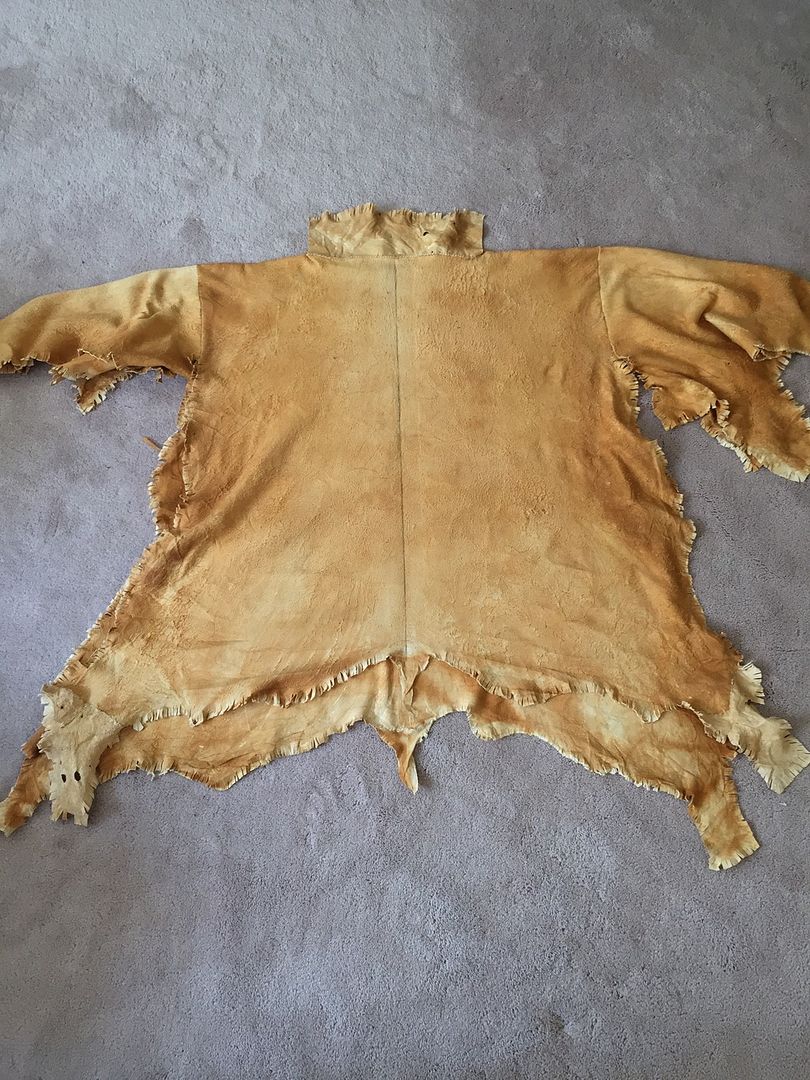
The next couple of pics show the shirt after the edges have been fringed, the neck pieces have been sewn and fringed and the shirt is ready for the next steps...


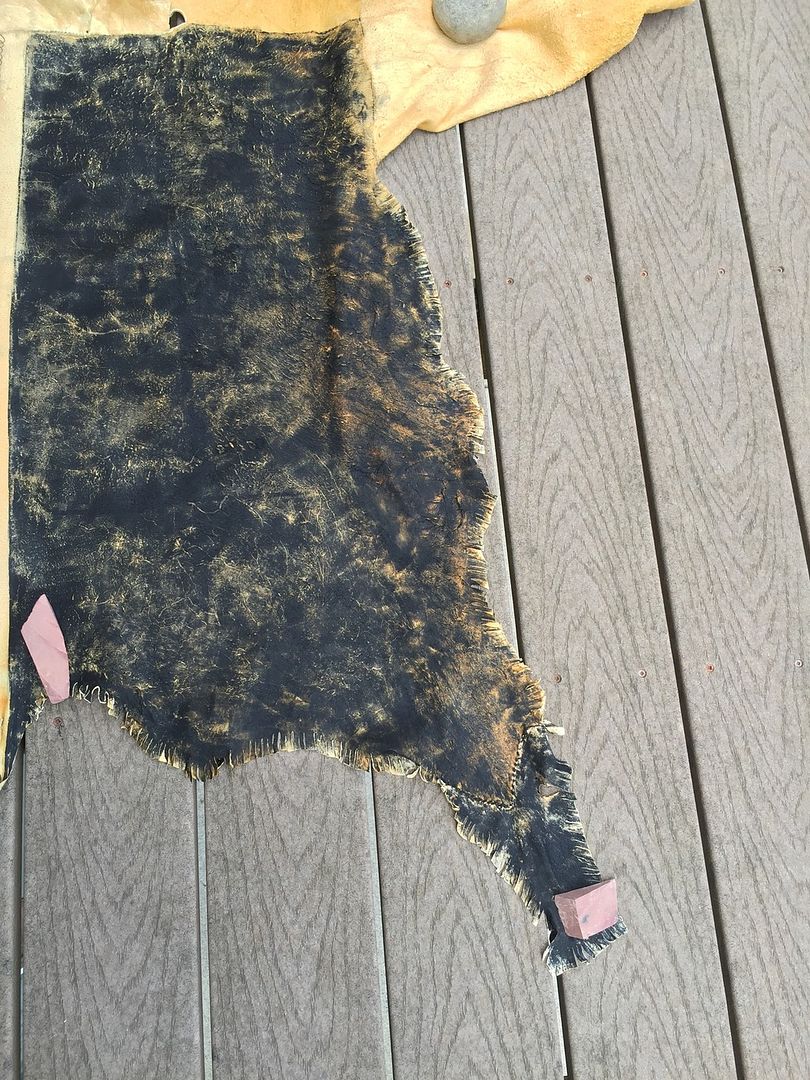
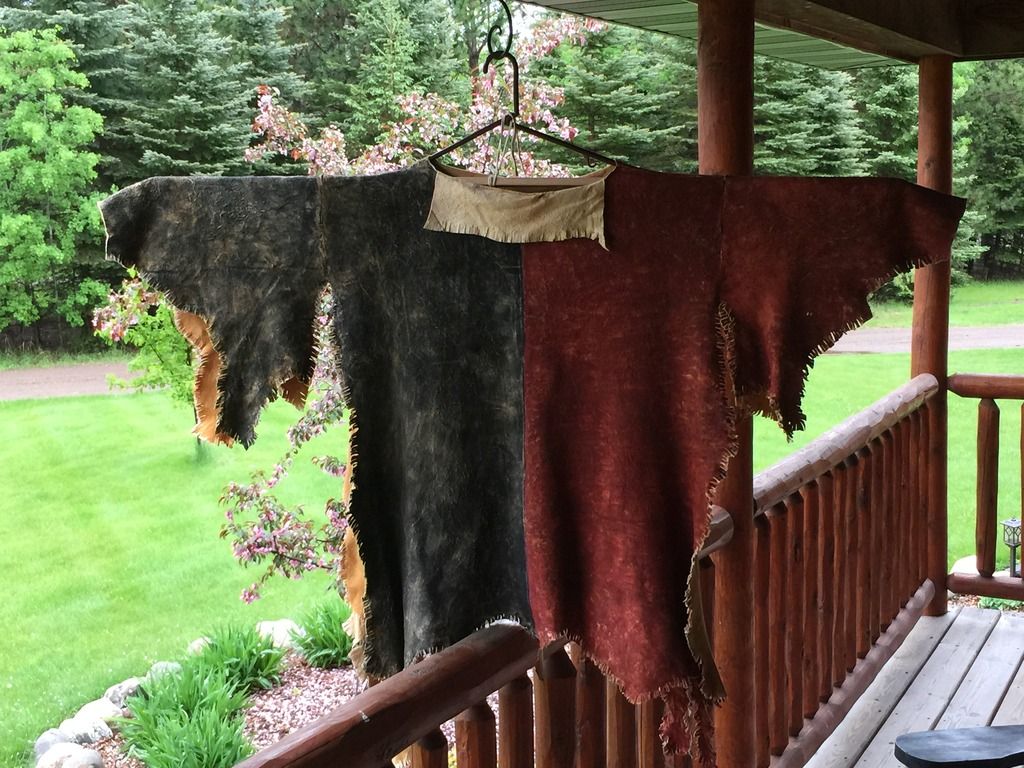
The shirt is now ready to be painted. I decided to paint the shirt half red and half black. According to one source, only warriors who have gone in search of an enemy, hunted him down and single handedly killed and scalped him were allowed to paint their clothing in this half and half pattern. The source was talking about the Hidatsa so I'm assuming this was within that tribe. I don't know if the same could be said about other tribes. Not all traditions and methods were the same among every tribe obviously. The next pic shows the line I've marked on the shirt showing where the two colors would meet...


For the paint I ordered some paint cookies, pigment already mixed with hide glue and dried into round discs roughly 1" to 1.5" in diameter. Testing the paint out I found that after misting the hide with water and applying the paint that after it dries it no longer transfers the color. Getting it wet again will make it transfer but it won't run onto another color. Although I don't plan on wearing the shirt out in a downpour it's nice to know that if I were the two colors wouldn't mix. This method also doesn't require the spray fixative I used on the other shirt I did which gives the hide a distinct chemical smell. Getting rid of that smell would be a different discussion so I'll move on.  The following pic shows the front half of the shirt after the black has been applied...


The following pics show the shirt after the painting has been completed...


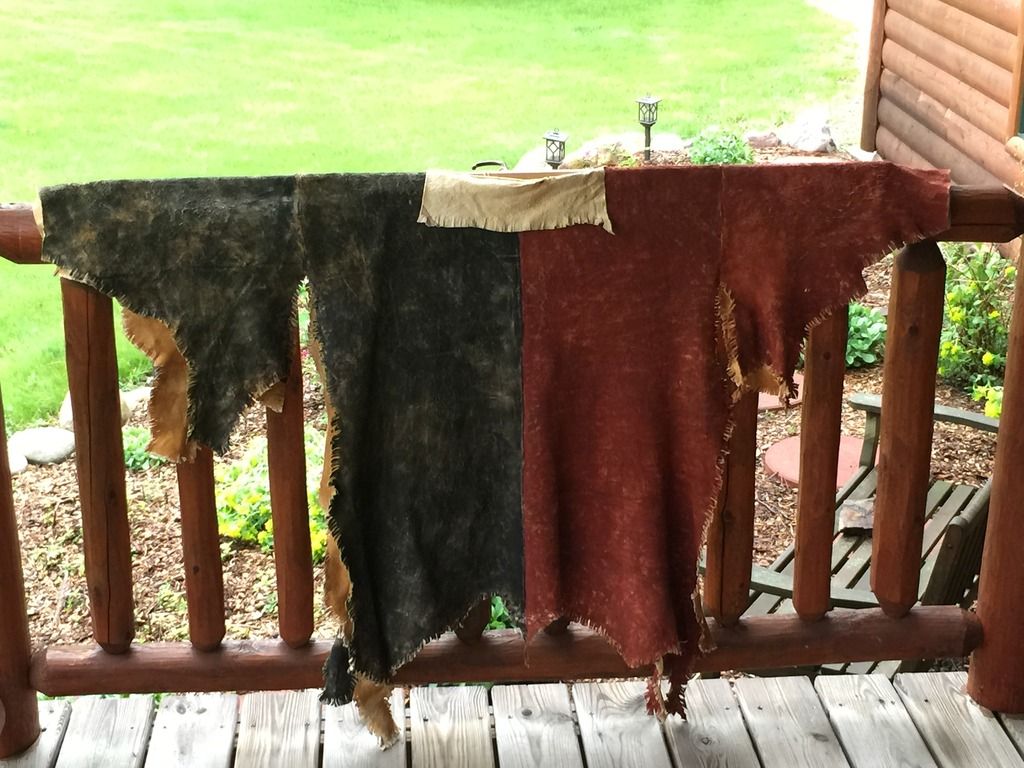
I was very pleased with the way the shirt looks after the paint. After using the paint cookies I'll definitely be using then again when I need to paint something. My next steps are to add the ermine hides and to cut the holes in the shirt. I'm thinking that I'll wrap the ermine hides with red trade wool on those that hang on the black side and with dark blue trade wool for those that hang on the red side. I may also add some of the hand painted realistic "eagle" feathers but we'll see. Until next time.

Offline Peatreg

  • Member
  • Posts: 76
Re: New braintanned warshirt
« Reply #4 on: June 01, 2015, 05:08:04 pm »
Last post!! Last time I had the shirt sewn and painted. Attaching the ermine hides and doing the holes were the last steps. I decided that the ermine hides that were to be placed on the red side would be wrapped with dark trade wool and those on the black side with red trade wool...


I would be placing 6 on each side. I also decided that I would put a trade bead on the top of each ermine. These beads are called Padre beads and were a very early trade bead.  Before starting the holes I experimented on a scrap piece to see the best way of doing them. I ultimately decided on tracing a circle and then cutting it out. Traditionally I'm assuming a knife would have been used or perhaps some kind of drill but I'm not sure. I cheated I guess you could say and used a scissors :/ After trying that out several times, I ised the scrap piece as a template of sorts to keep the holes relatively lined up...


The following pic is part ways into the process of cutting the holes. It gives you an idea of what it will look like...


Adding the ermine hides was the last step. Notice on the front that I added two quilled hairlocks with red porcupine quills.

Finished front of the shirt:


Finished back of the shirt:


Detail:


Final thoughts. I learned so much from the first one that I had done and I'm finding them much easier to do but it's addicting to where I want to do another one. We'll see when I get around to it. I may do another build along of sorts but will probably do it all at once. I hope that this gives you an idea of how the old two-hide style shirts were made and maybe will give others the confidence to start cutting into some of those brain tanned hides!!

Ultimately I want to stress, as someone who doesn't have any native blood and to others who don't have native blood, that when I or if you decide to try your hand at one that we do it respectfully. These shirts held great spiritual and powerful meaning to the tribes on the plains. Only men who had shown great bravery were allowed to wear them. I don't copy an original work exactly the same for that very reason. I will take certain design elements from originals and incorporate them into my own.  I make these out of an admiration for a culture and as a way to learn about them. How they're made, how the shape of the animal is incorporated and maintained to keep the spirit of that animal alive. I believe that as long as we keep in mind and know the reasons why we make these and try our best to do it with honor and respect that we as non-natives should be able to make them. Ultimately, this is just an accumulation of skin, fur, glue, earth and tendon put together to create a representation of something that held great power, medicine and spirituality to a culture that has had so much stolen from it. I hope that if a native person sees this they don't see it as something being stolen from them but rather something meant to honor and teach others about a culture that we owe a debt of gratitude.
« Last Edit: July 11, 2015, 11:42:45 pm by Peatreg »

Offline Pat B

  • Administrator
  • Member
  • Posts: 37,542
Re: New braintanned warshirt
« Reply #5 on: June 01, 2015, 05:27:55 pm »
Nice build along. Thanks for posting it.   8)
Make the most of all that comes and the least of all that goes!    Pat Brennan  Brevard, NC

Offline Zuma

  • Member
  • Posts: 4,324
Re: New braintanned warshirt
« Reply #6 on: June 01, 2015, 06:53:04 pm »
Wow!
Thank you for taking the time to learn us.
No battles please. >:D
Zuma
If you are a good detective the past is at your feet. The future belongs to Faith.

Offline Aaron H

  • Member
  • Posts: 3,437
Re: New braintanned warshirt
« Reply #7 on: June 01, 2015, 07:37:36 pm »
Very very cool,  thank you.

Offline chamookman

  • Member
  • Posts: 2,993
Re: New braintanned warshirt
« Reply #8 on: June 02, 2015, 05:18:39 am »
Cool - Thanks for posting, really appreciate the work. Bob
"May the Gods give Us the strength to draw the string to the cheek, the arrow to the barb and loose the flying shaft, so long as life may last." Saxon Pope - 1923.

Offline Pappy

  • Global Moderator
  • Member
  • Posts: 31,904
  • if you have to ask you wouldn't understand ,Tenn.
Re: New braintanned warshirt
« Reply #9 on: June 02, 2015, 05:42:01 am »
Very nice work, I need to try one but I hate sewing.  :)
   Pappy
Clarksville,Tennessee
TwinOaks Bowhunters
Life is Good

Offline Silver John

  • Member
  • Posts: 30
Re: New braintanned warshirt
« Reply #10 on: June 02, 2015, 01:13:26 pm »
Very nice project.

Offline Spotted Dog

  • Member
  • Posts: 700
Re: New braintanned warshirt
« Reply #11 on: June 03, 2015, 12:00:25 am »
Beautiful. Going to make one soon.  Where did you get your hides ? I need 2 large for front and back.
A three strand cord is not easily broken. Ecc.4:12

Offline Peatreg

  • Member
  • Posts: 76
Re: New braintanned warshirt
« Reply #12 on: June 03, 2015, 01:04:38 am »
Thanks for the words. Pappy, there really isn't too much sewing on one like this. Obviously a different style shirt with fully sewn seams would be more work. Spotted Dog, I got them from a guy on the paleoplanet forum. I could give you his name and info if you'd like

Offline Spotted Dog

  • Member
  • Posts: 700
Re: New braintanned warshirt
« Reply #13 on: June 03, 2015, 01:46:57 am »
Yes, Please do.
A three strand cord is not easily broken. Ecc.4:12

Offline Badly Bent

  • Member
  • Posts: 3,750
Re: New braintanned warshirt
« Reply #14 on: June 05, 2015, 07:49:29 am »
The shirt looks great and your build along is very informative. I think buckskin war shirts are a thing of beauty. I also like how they provide a nice natural backdrop for decorating with color and attachments
making each one unique and individual, limitless possibilities of personalized expression in the decorations.
Thanks for posting this Peatreg, one day I'd like to try one myself and this post will be very helpful.
I ain't broke but I'm badly bent.