Author Topic: Hazelnut bow build-a-long (fixed pictures)  (Read 286145 times)

0 Members and 1 Guest are viewing this topic.

Offline Dano

  • Member
  • Posts: 1,349
Re: Hazelnut bow build-a-long
« Reply #150 on: December 10, 2007, 11:36:16 pm »
Gordon, you are the man!!! Awesome work my friend.
"If the women don't find you handsome, they should at least find you handy."


Nevada

Offline Gordon

  • Member
  • Posts: 3,299
Re: Hazelnut bow build-a-long
« Reply #151 on: December 11, 2007, 01:15:21 am »
Next I am going to trim the tips in order to hide the transition between the skins and the painted tips. For this job I’m going to use red no. 4 Brownell nylon serving thread.


I cut off about 3 feet of thread and begin wrapping from the tip toward the skin.


When I have about ¼” left I form a loop with a short piece of thread and wrap over it.


When I am done wrapping I thread the end of the serving through the loop and pull the thread underneath itself and out again. This is called whip finishing. I then trim the end close to the wrapping with a razor blade.


« Last Edit: October 06, 2012, 06:44:49 pm by Gordon »
Gordon

Offline Gordon

  • Member
  • Posts: 3,299
Re: Hazelnut bow build-a-long
« Reply #152 on: December 11, 2007, 01:16:46 am »
Finally I put a few drops of superglue on the wrappings to hold them in place.


And here are the trimmed tips.


« Last Edit: October 06, 2012, 06:45:12 pm by Gordon »
Gordon

Offline bootboy

  • Member
  • Posts: 441
    • vinland longbows
Re: Hazelnut bow build-a-long
« Reply #153 on: December 11, 2007, 02:31:26 pm »
they need to make this builalong into the next copy of the magazine. Man this is this serious!!
Are you planning to sell this bow or is it for keeping on your wall to put all the other bowyers to shame hahaha
knapp 'um if you got 'um

Offline Gordon

  • Member
  • Posts: 3,299
Re: Hazelnut bow build-a-long
« Reply #154 on: December 11, 2007, 04:08:36 pm »
Thank you for the compliment BB. I am building this bow for a gentleman that lives in Washington state. Based on my conversations with him I expect that he will be shooting the bow (and not just hanging it on a wall). This build-a-long has been nice in that I have been able to collaborate throughout the process with him.
Gordon

Offline DanaM

  • Member
  • Posts: 9,211
Re: Hazelnut bow build-a-long
« Reply #155 on: December 11, 2007, 08:39:52 pm »
Heck of a nice build along Gordon, Thanks for sharing and BTW Have a Merry Christmas ;D
"Prosperity is a way of living and thinking, and not just money or things. Poverty is a way of living and thinking, and not just a lack of money or things."

Manistique, MI

Offline Keenan

  • Member
  • Posts: 4,824
Re: Hazelnut bow build-a-long
« Reply #156 on: December 12, 2007, 01:21:16 pm »
  Gordon, You have topped the chart with this buildalong !!!  I'm sure all would agree that we are thankfull to have such a skilled bowyer showing and sharing in detail the techniques that bring about an awesome bow such as this. You are a humble man to say that you aren't qualified for to be in the BB. However there are many of us on here that would gladly learn from your talents.  Thanks again for all you do for PA.      Keenan
« Last Edit: December 27, 2007, 12:25:25 pm by Bornagainprimitive »

Offline juniper junkie

  • Member
  • Posts: 714
Re: Hazelnut bow build-a-long
« Reply #157 on: December 13, 2007, 12:53:35 am »
DITTO!!!! ;D

Offline Gordon

  • Member
  • Posts: 3,299
Re: Hazelnut bow build-a-long
« Reply #158 on: December 15, 2007, 02:59:25 pm »
I’m now ready to begin applying the finish. I first wipe shellac on the snake-skins. Shellac will stick to almost anything and helps ensure that the finish will adhere nicely to the skins.


I like Tru-Oil for a finish because it is easy to apply, it’s durable, is simple to repair and results in a beautiful finish.


« Last Edit: October 06, 2012, 06:45:32 pm by Gordon »
Gordon

Offline Gordon

  • Member
  • Posts: 3,299
Re: Hazelnut bow build-a-long
« Reply #159 on: December 15, 2007, 03:01:26 pm »
I dab the tip of my finger lightly in the Tru-oil and apply evenly over the surface of the bow. I usually need to repeat about 4-5 times to cover the back of one limb. Be careful not to apply the finish too thick or it will create unsightly runs.


When the back is done I remove the bow from the vice and apply a light coat of finish to the edges.


Then I clamp the bow again and apply a finish to the belly.


« Last Edit: October 06, 2012, 06:46:00 pm by Gordon »
Gordon

Offline Gordon

  • Member
  • Posts: 3,299
Re: Hazelnut bow build-a-long
« Reply #160 on: December 15, 2007, 03:03:43 pm »
When I’m done applying the finish, I inspect the bow looking for runs. If I see one, I simply smooth it out with my finger. I then slowly rotate the bow for about 5 minutes. This will ensure that the finish flows evenly over all the surfaces.


I turn the bottle of Tru-Oil upside down to prevent it from hardening in the bottle.


In the winter I let the bow dry at least 12 hours between coats. In the summer months it can take as little as 4 hours to dry. Place the bow somewhere warm and dust free to dry.


« Last Edit: October 06, 2012, 06:46:46 pm by Gordon »
Gordon

Offline Gordon

  • Member
  • Posts: 3,299
Re: Hazelnut bow build-a-long
« Reply #161 on: December 15, 2007, 03:05:39 pm »
After a couple of coats have been applied, I’ll sand the skins between coats to remove the little “nibs” at the tips of the scales. With some 220-grit paper I sand lightly in the direction of the scales (from the handle to the tips). Be careful not to overdo this step as it is easy to sand through the skins – a couple of light stokes is sufficient. You’re not trying to smooth the skins in one step – it will happen gradually over the course of several coats.


I’ll also lightly sand the wood surface with 400-grit sandpaper about every 3rd or 4rth coat to remove embedded dust and other surface irregularities. After sanding I wipe the bow down with a clean cloth and then blow any remaining dust off with compressed air.


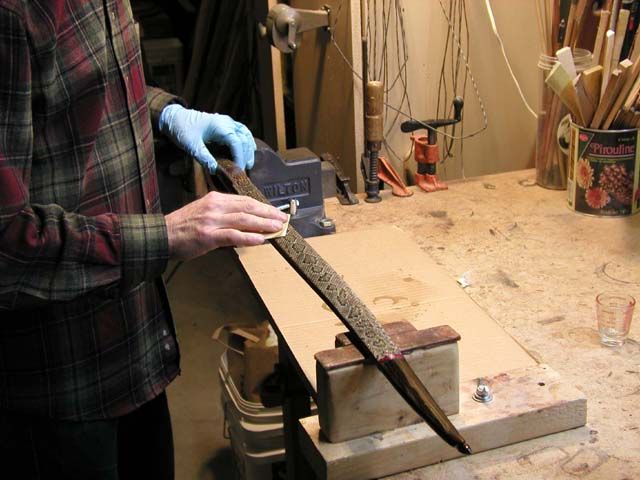
Here is a close-up of the tip after about 4 coats of finish. In all I will  apply about 10-12 coats of finish. But before I go much further I will need to letter the bow.


« Last Edit: October 06, 2012, 06:47:20 pm by Gordon »
Gordon

Offline Nightmyth

  • Member
  • Posts: 29
Re: Hazelnut bow build-a-long
« Reply #162 on: December 15, 2007, 06:09:33 pm »
Your craftmanship is worthy of praise Gordon. I have been following this build along, and obtaining the same materials from the same suppliers you have been using. My bow is a simple Maple board bow, but the finish I am applying to it is going to be like yours. We'll see how I fair.  ::) (this is my 3rd bow) The only things I may do different on mine is leaving the wood its natural color, and I haven't decided if I will take the snake skins all the way to the tips yet. Your string method really looks cool I may opt to go that way.

Myth

Offline cowboy

  • Member
  • Posts: 7,035
  • Paul Wolfe. Springtown, TX
Re: Hazelnut bow build-a-long
« Reply #163 on: December 15, 2007, 07:31:39 pm »
Bow is coming along very smoothly Gordon - looks great so far. One question for ya, why do you not go all the way to the tips with the snake skins? I've heard (or read) PatB say that the serving wrap will abraid your string over time (which is a good reason) is that your reason also? Thanks....
When you come upon a track or trail you do not know, follow it to the point of knowing.

Offline Gordon

  • Member
  • Posts: 3,299
Re: Hazelnut bow build-a-long
« Reply #164 on: December 15, 2007, 08:15:38 pm »
Quote
One question for ya, why do you not go all the way to the tips with the snake skins?

Purely decorative Paul. The gentleman I am building this bow for liked the black tips that I did on an ealier bow and wanted the same.
Gordon