Author Topic: Hazelnut bow build-a-long (fixed pictures)  (Read 286068 times)

0 Members and 4 Guests are viewing this topic.

Offline Keenan

  • Member
  • Posts: 4,824
Re: Hazelnut bow build-a-long
« Reply #120 on: November 28, 2007, 03:57:13 pm »
 Gordon, 
   Just trying to get caught up this buildalong was one of the first that I'm seen.  AWESOME !!   Very well written and informative. I chuckled several times because I have always thought that some of my own ways of shaping and forming bows to be somewhat hokey and not to modern. But when I saw that I'm not the only one hanging weights from a bow in a vice, I was greatly encouraged. Also the way you clamp blocks to your bench.
  Having a steel fab shop I have found myself hanging all kinds of tubing or steel scraps when needed.
 Like JJ said can't wait to see that beauty finished.   Keenan

Offline Gordon

  • Member
  • Posts: 3,299
Re: Hazelnut bow build-a-long
« Reply #121 on: November 28, 2007, 04:42:35 pm »
Keenan,

Are you saying I'm not modern! :o

I take that as a high compliment!  ;D
Gordon

Offline Nightmyth

  • Member
  • Posts: 29
Re: Hazelnut bow build-a-long
« Reply #122 on: November 28, 2007, 05:07:53 pm »
"I’m going to dye the silk a dark color to bring out the colors and pattern in the snakeskin."

Gordon, are you saying that the Snake skin picks up the bows back colors? I'm assuming the snake skin has scales that are somewhat translucent. Is this correct?

Myth

Offline Gordon

  • Member
  • Posts: 3,299
Re: Hazelnut bow build-a-long
« Reply #123 on: November 28, 2007, 08:56:54 pm »
Myth,

Yes, it creates more contrast between the pattern and the background. If you do not do this, the pattern tends to wash out - at least that has been my experience with rattlesnake skins.
Gordon

Offline Pat B

  • Administrator
  • Member
  • Posts: 37,542
Re: Hazelnut bow build-a-long
« Reply #124 on: November 28, 2007, 11:01:06 pm »
With some of the thicker skins snakes, like Eastern Diamondback and Timber rattlers, I don't think it is as critical as with the western rattlers, copperheads and other thin skinned snakes. The bow I'm hunting with this year is an osage self bow with a prairie rattler backing. The osage yellow does show through but I don't mind the design not being very vivid.
   I have never darkened the back of the bow before skinning so I have a biased opinion. I'm sure I will try it at some point.     Pat
Make the most of all that comes and the least of all that goes!    Pat Brennan  Brevard, NC

Offline Nightmyth

  • Member
  • Posts: 29
Re: Hazelnut bow build-a-long
« Reply #125 on: November 28, 2007, 11:15:34 pm »
I understand. You guys taught me something new, thank you. :)

Offline Gordon

  • Member
  • Posts: 3,299
Re: Hazelnut bow build-a-long
« Reply #126 on: December 02, 2007, 03:45:50 pm »
I ordered a matched set of rattlesnake skins from Pine Hollow Longbows for this bow. I had a problem with the first set of skins I received, but the folks at Pine Hollow took care of it immediately and I had a replacement pair within 2 days. That’s great customer service – thank you Mike!

I’m going to use Titebond liquid hide glue for this job. The back of each limb is first sized by applying a thin coat of hide glue and then letting it dry.


Each skin is hydrated in warm (not hot!) water for about 5 minutes. Then I remove the skins from the water and blot them dry on a towel.


« Last Edit: October 06, 2012, 06:40:45 pm by Gordon »
Gordon

Offline Gordon

  • Member
  • Posts: 3,299
Re: Hazelnut bow build-a-long
« Reply #127 on: December 02, 2007, 03:47:05 pm »
I spread a thin coat of hide glue along the back and then lay down the first skin starting from the tip and moving to the handle.


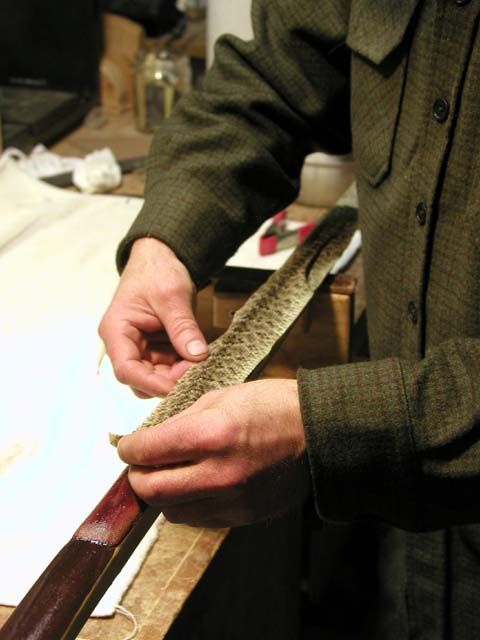
I carefully stretch and adjust the skin so the pattern runs down the middle of the limb. Then using my fingers, I remove any air bubbles that are trapped under the skins. This is important as air bubbles will result in cracks in the finish.


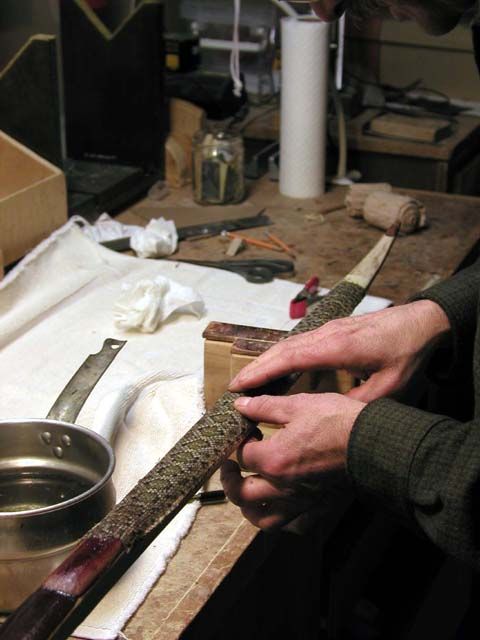
When the air bubbles are removed, I trim away any excess skin by running a razor blade along the edges of the limb. I keep the blade angled away from the back to ensure I don’t accidentally remove too much skin.

I repeat the process for the other limb.
« Last Edit: October 06, 2012, 06:41:09 pm by Gordon »
Gordon

Offline Gordon

  • Member
  • Posts: 3,299
Re: Hazelnut bow build-a-long
« Reply #128 on: December 02, 2007, 03:51:15 pm »
There is no need to wrap the limbs as the hide glue has great affinity for snakeskin and literally sucks it to the surface of the limb. After allowing the skins to dry overnight, I smooth the edges of the limbs with 150-grit sandpaper and a block. I angle the block toward the back to bring the skin just slightly back from the edge. This will help prevent the skin from lifting after the finish is applied. I sand by making strokes from the back to the belly and from the handle to the tip. Take care when sanding as the skins are delicate and may tear if you are too aggressive.


You must remove the scales before a finish is applied. Some folks use adhesive tape to do this, but I’ve torn skins using this method. A better method is simply to run coarse steel wool gently over the skins in the direction of the scales (from handle to tip). This will quickly remove most of the scales.


« Last Edit: October 06, 2012, 06:41:33 pm by Gordon »
Gordon

Offline Gordon

  • Member
  • Posts: 3,299
Re: Hazelnut bow build-a-long
« Reply #129 on: December 02, 2007, 03:54:08 pm »
As you move the steel wool over the limb listen carefully for any whisper-like noise. This indicates a bubble trapped underneath the skin that will have to be fixed. To remove the bubble, first use a fine needle to poke a hole through the skin. This will allow the air to escape.


Then take a warm iron and gently heat the area under the needle hole. This will liquefy the hide glue and fill the void created by the bubble.


Finally, use your fingernail to remove any remaining scales


And here is what it looks like when done.


« Last Edit: October 06, 2012, 06:42:12 pm by Gordon »
Gordon

Offline Ryano

  • Member
  • Posts: 3,578
  • Ryan O'Sullivan, North Western Pennsylvania
Re: Hazelnut bow build-a-long
« Reply #130 on: December 02, 2007, 04:29:16 pm »
looks nice Gordon. how come you left the outer limb uncovered?
Its November, I'm gone hunt'in.......
Osage is still better.....

Offline Gordon

  • Member
  • Posts: 3,299
Re: Hazelnut bow build-a-long
« Reply #131 on: December 02, 2007, 05:16:31 pm »
I left them uncovered because this bow will have painted tips.
Gordon

Offline mullet

  • Global Moderator
  • Member
  • Posts: 22,890
  • Eddie Parker
Re: Hazelnut bow build-a-long
« Reply #132 on: December 02, 2007, 09:17:10 pm »
    This is going to be a fantastic looking bow Gordon.
Lakeland, Florida
 If you have to pull the trigger, is it really archery?

Offline juniper junkie

  • Member
  • Posts: 714
Re: Hazelnut bow build-a-long
« Reply #133 on: December 03, 2007, 12:05:01 am »
great info gordon. did you not use glue on the skins, but just on the bow? I have not seen the tightbond hide glue before, is it readily available? I have enjoyed the build-a-long, cant wait to see the finished product. thanks for the info. :)

Offline Gordon

  • Member
  • Posts: 3,299
Re: Hazelnut bow build-a-long
« Reply #134 on: December 03, 2007, 01:01:20 am »
Dave,

You don't need to put glue on the skin if you use hide glue. You can get titebond hide glue at any fine woodworking store. Here is where I get mine:

http://www.woodcraft.com/family.aspx?FamilyID=350
Gordon