Author Topic: Sheep horn bow buildalong  (Read 34697 times)

0 Members and 3 Guests are viewing this topic.

Offline Kviljo

  • Member
  • Posts: 488
  • Archaeologist, Antitheist
Re: Sheep horn bow buildalong
« Reply #30 on: November 09, 2012, 05:22:49 pm »
So, I got started tonight, roughing out the horn and shaping it.

This is the horn before any work. Well, it was cut in half by the company that I bought it from, to save shipping costs. It was the largest water buffalo horn that I had, at about 34 inches long on the outer curve. First job is to sand down the outer curve to get a smooth surface without any bumps and cracks. I used a disc sander with a coarse grit paper to do the rough work, and a belt sander to make finer adjustments of the shape. Even though the horn will be boiled and straigthened, it is important to sand it as evenly as possible, to keep the "grain" running through the horn as well as possible.a


Offline Kviljo

  • Member
  • Posts: 488
  • Archaeologist, Antitheist
Re: Sheep horn bow buildalong
« Reply #31 on: November 09, 2012, 05:37:22 pm »
As you see, the horn have got some sideways twist, but this was no problem as the bow will only have 1/2-inch wide tips. It is not a good idea to try to boil the horn to straighten it sideways, as the horn will eventually go back to it's original shape. So, the laminate for the bow has to be cut straight out of the horn. Luckily the horn was just big enough to get a straight laminate from it. I bet it would also have been possible to make an S-shaped bow with some character, but I suspect that would make the bow very difficult to "tame" once it is ready to be bent and braced.

So, step two in the process is to cut the laminate from the horn. It is possible to use a hack-saw and other narrow-bladed hand saws, but the quickest and most painless is to use a bandsaw. The process is a little scary, as it is easy to mess up a horn by cutting it the wrong way. I use the method that Adam Karpowicz uses for his horn/wood/sinew composites. He has written an article on it here:
http://atarn.org/islamic/turkish_bow/cutting_horn.htm

It basically involves glueing the horn to a wooden board, to make sure it is held in the correct position when one is making the saw-cut. Hot-melt glue is superb for this use. Here is an illustration-picture after I had cut the horn. I screwed up and ripped off the inner cut-off part before I took the picture, so the picture does not really show the process well... The next photo shows both the cut-off laminate and the "scrap" piece, which of course will be used for lots of smaller and possibly bigger projects. (a schytian composite?)


Offline ionicmuffin

  • Member
  • Posts: 1,787
Re: Sheep horn bow buildalong
« Reply #32 on: November 09, 2012, 05:47:45 pm »
it looks like its going well! going to be a mighty fine bow!
Amo innectis arcus- I love crafting bows (latin)

Offline Kviljo

  • Member
  • Posts: 488
  • Archaeologist, Antitheist
Re: Sheep horn bow buildalong
« Reply #33 on: November 09, 2012, 05:53:26 pm »
When the horn laminate is cut off, I rough-sand the inner side of it to even out the thickness a little and chuck it in a big pot with boiling water. It is important not to boil the horn for too long, two or three minutes is enough. You only want the horn to be hot, and 100 degrees celcius makes it very pliable. Pretty much like a thick piece of leather. The aim is to straighten out the natural curve, to make it easier to shape it into a piece that has no sideways bend.

A friend of mine welded this long pot for me, which I use to boil the wooden core for asiatic composites. The 30-7/8" long horn laminate for this one fit into it just barely. It is of course also possible to use steam, but I would not use dry heat, as it is quite possible to over-heat the horn.


After boiling I quickly place the horn on the bench and clamp it down. Let it stay there untill it has cooled completely, something that takes surpricingly long time. Horn holds heat very well. The laminate was at this stage about 9mm thick.


After the horn had cooled, I started the layout of the bow. I drew the width profile when the horn was still clamped flat to the bench. These bows are so small! As you see from the next picture, there was some sideways bend in the laminate, but there was enough material to fit the bow straight into it. Phew... :)  A regular pencil does show, even on the black horn.

« Last Edit: November 09, 2012, 05:59:22 pm by Kviljo »

Offline Ifrit617

  • Member
  • Posts: 1,596
Re: Sheep horn bow buildalong
« Reply #34 on: November 09, 2012, 05:58:25 pm »
Sweet! I can't wait to see this one get finished up!

Jon

Offline Kviljo

  • Member
  • Posts: 488
  • Archaeologist, Antitheist
Re: Sheep horn bow buildalong
« Reply #35 on: November 09, 2012, 06:33:28 pm »
Oh, I forgot to show a picture inbetween here. As I'm making the bow from one horn, one tip is going to be made from the solid tip of the horn, while the other will be made of the scull-section of the horn. The part of the horn closest to the scull is usually pretty thin, and was so in this case also. The horn was some inches longer than the finished bow, so I cut off a little at the base of the horn, to get rid of some of the thinnest part of it. Still, one tip of the bow will have more sinew than horn because there was not enough horn thickness. In the next picture you can see the hollow part of the horn, which accounts for the thin wall in it. The picture was taken after boiling and straightening it.


After this, I cut off the waste of the sides of the laminate, and shaped the width profile, while also adjusting the thickness. I was aming for 7mm thickness at the middle, and 6mm from mid-limb to tips. One tip will taper even more, down to 4mm. I'm sure it will not be a problem to compensate with some extra sinew, even though it might give it some extra reflex that will have to be corrected in the finished bow.

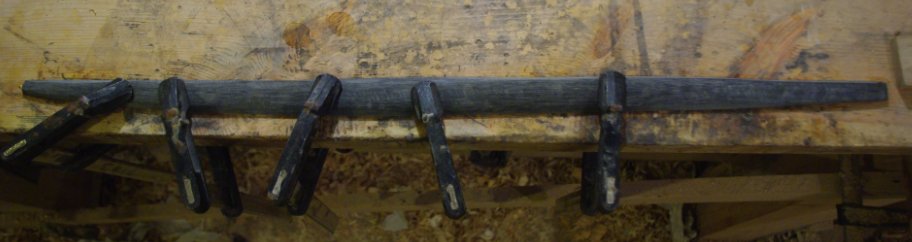
After shaping the laminate further, I boiled it once more, and clamped it to the bench again. As you see from the picture below, it is starting to look like an outline of a bow, even though there is still some sideways bend in one tip.


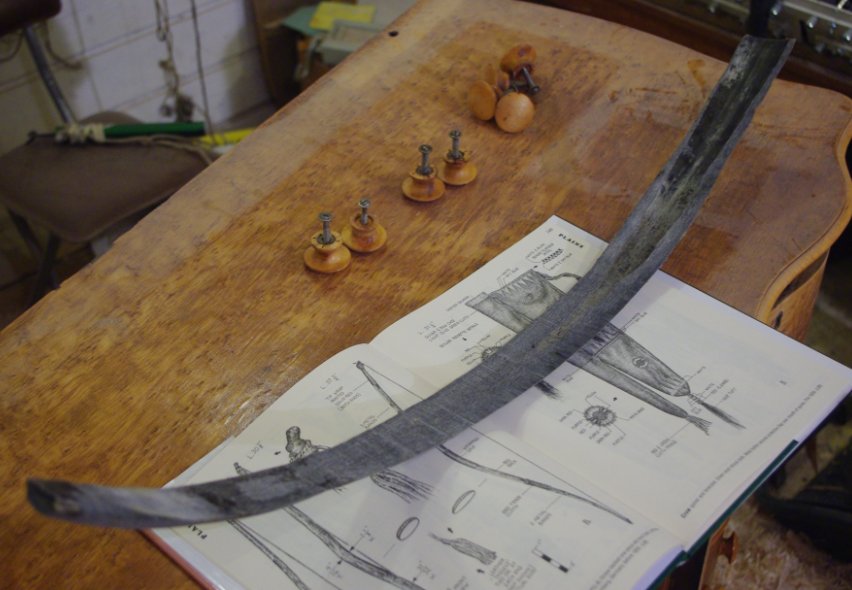
The next image shows the amount of reflex the horn had after the second round of straightening. I don't worry about straightening the horn too much, because it will regain all of it when I do the sinewing. I'm pretty confident the tips will touch or even cross after I have put on the last layer of sinew. Most of that will have to be stressed out of it to make the bow shootable, but it will make sure that the bow will perform well. You may also recognize the page in one of the encyclopedias, with the drawing that I am working out from.


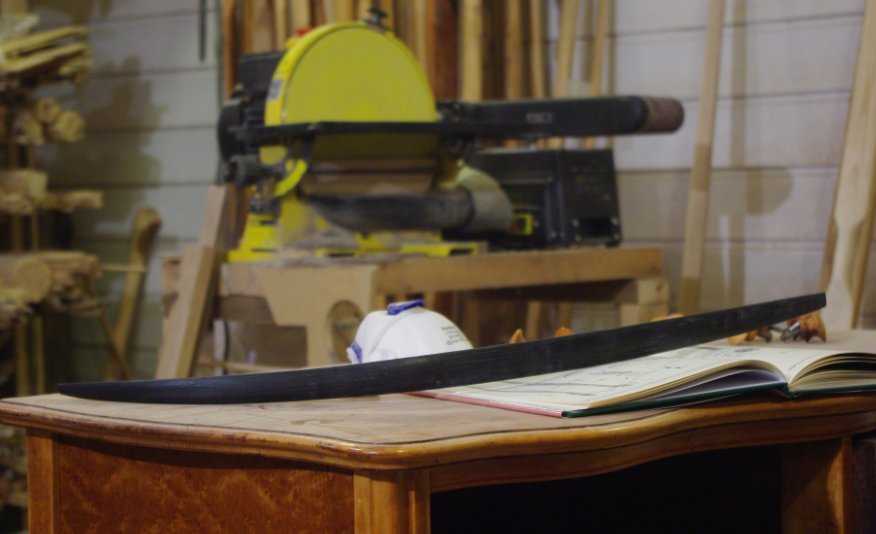
After some more shaping, I scraped the whole horn. Horn works great with a scraper, and it is a joy to see the horn change into the black shiny surface. It is really a pretty material, even though sheep horn would be somewhat more interesting. The picture below shows the width profile of the laminate after it has been scaped. You can also see the two sanding machines I used to shape it, in the background. Far from primitive, and pretty smelly. But my head is full of bows that I "need" to make, and not enough spare time... It is also a very safe method of shaping horn as there is no stress on it from using adzes, and it does not need to be clamped to something while using rasps. It can of course all be done with hand tools too.


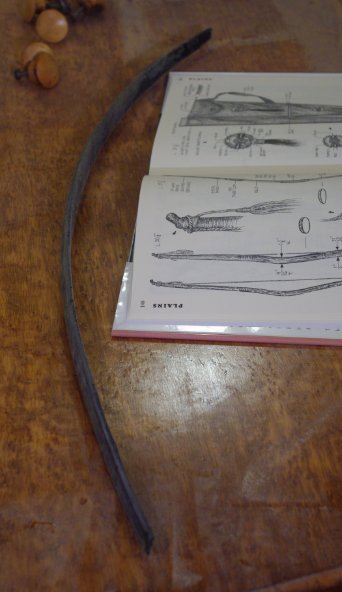
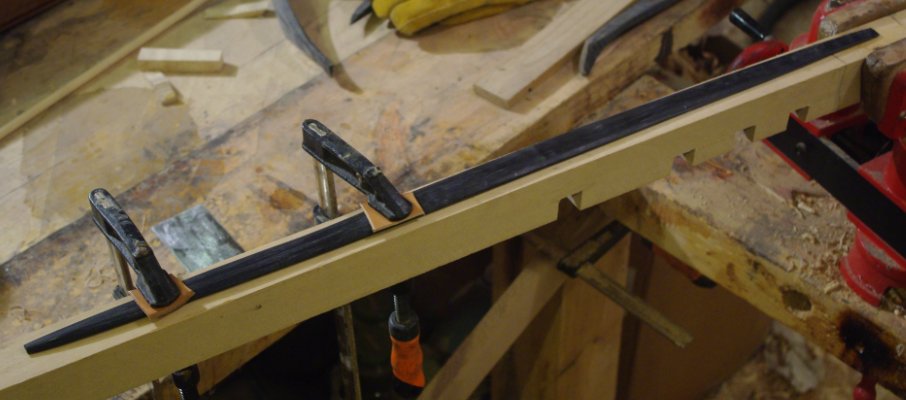
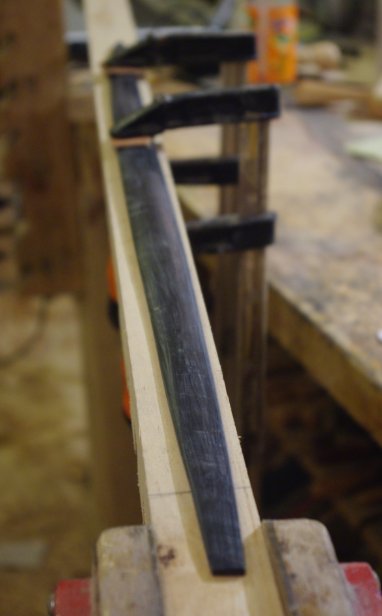
The next two pictures show the laminate as it was when I finished for the evening. Pretty much ready for sinew. I will do some final touch-up of the cross section and make sure the limb taper is pretty good first. The horn can be tillered to some extent. It is very flexible, although I will not risk bending it to full-draw without sinew on the back. It might well have survived that though.


So, that was all for tonight. It will be very interesting to put sinew onto this little bastard. I bet it will curl up pretty quickly, although I will intentionally put on the first layers of sinew somewhat sloppy. As far as I have seen on original american-indian sinew backed wooden bows, the sinew layer has been a little rough. It also means that I don't have to put as much effort into preparing the sinew strands for the first build-ups of sinew, which is a welcome time-saver.

Offline Bowman

  • Member
  • Posts: 252
Re: Sheep horn bow buildalong
« Reply #36 on: November 09, 2012, 08:09:50 pm »
Thanks Ivar. Looks like you have turn'ed on the 6.th gear. Look forward to see the final result. :-)
"for veik var kongens bue......."

Offline uncleduck

  • Member
  • Posts: 179
  • Dave W
Re: Sheep horn bow buildalong
« Reply #37 on: November 09, 2012, 08:16:46 pm »
Looking pretty awesome so far, cant wait to see the finished product!

Offline Keenan

  • Member
  • Posts: 4,824
Re: Sheep horn bow buildalong
« Reply #38 on: November 09, 2012, 09:15:50 pm »
Great buildalong and looking awesome. Thank you

Offline Ifrit617

  • Member
  • Posts: 1,596
Re: Sheep horn bow buildalong
« Reply #39 on: November 09, 2012, 10:55:05 pm »
This is going to be one hell of a cool bow! Can't wait to see her finished!

Jon

Offline Bowman

  • Member
  • Posts: 252
Re: Sheep horn bow buildalong
« Reply #40 on: November 10, 2012, 10:12:32 am »
Ivar: I'm connvinced. I'm going to build a bow like that during the next year. Oddbjørn can help me with the horn and the band saw. :-)
"for veik var kongens bue......."

Offline Kviljo

  • Member
  • Posts: 488
  • Archaeologist, Antitheist
Re: Sheep horn bow buildalong
« Reply #41 on: December 21, 2012, 04:25:43 pm »
Finally some progress on this bow. I lightly cross-scratched the back of the horn after having scraped the glue surface of it. I applied about 10 layers of 5% hide glue to make sure the the sinew layer will not delaminate from the horn. Horn is a difficult material to glue, but by putting on many near-water-thin coats of hide glue, one can be pretty sure the glueing will go alright.

Up untill now I have put on two layers of sinew that consists of about 40 grammes of sinew fibres. My plan is to add layers untill it reaches the original dimentions, which is about 50/50 horn and sinew. I think one or two more layers will be enough.


Offline killir duck

  • Member
  • Posts: 747
  • i like elk
Re: Sheep horn bow buildalong
« Reply #42 on: December 21, 2012, 04:37:24 pm »
that looks good, i was just wondering if you had made any progress on that bow
PRIMITIVE ARCHERY what other way can you play with sticks and rocks all day and not look like a little kid

Every time i shoot at a bunny i recall the wise words of Elmer Fudd "I've got you now you waskally wabbit!"

Offline Lee Slikkers

  • Member
  • Posts: 1,545
Re: Sheep horn bow buildalong
« Reply #43 on: March 07, 2013, 08:59:16 am »
Any progress or updates on this build...looks fantastic so far.  Thanks
~ Lee

~~~~~~~~~~~~~~~~~~~~~~~~~~~~~~~~~~~
"The last word in ignorance is the man who says of an animal or plant: 'What good is it?"
— Aldo Leopold
~~~~~~~~~~~~~~~~~~~~~~~~~~~~~~~~~~~

Offline Kviljo

  • Member
  • Posts: 488
  • Archaeologist, Antitheist
Re: Sheep horn bow buildalong
« Reply #44 on: March 10, 2013, 12:30:21 pm »
I've had some minor trouble with sinew lifting off the horn, as a result of narrowing the bow a little which exposed the glue line too much. It's now glued down, and the bow has gotten in total 74 grams of sinew. Still I have to add a little to get it to original dimentions, but as the tips are now about to cross, I've decided to open it up a little before I put on the final layer(s). The bow will be a small beast, and I'm very curious to see how it will behave, and how far it will be possible to draw.

What I've learned is that the horn probably should have been scratched some more before putting on the sinew, and I would also straighten out the horn completely before starting to sinew. I should also have narrowed down the horn to about 2mm narrower than the original dimensions before putting on the sinew, so that I would not have to expose the horn/sinew glue line when the thick sinew layer was still contracting. That would have avoided the problems with sinew lifting off.

There will be some more photos of the continuation, it is just taking a little extra time :)