Author Topic: Anyone know of an inlaid arrow pass howto?  (Read 4595 times)

0 Members and 2 Guests are viewing this topic.

Offline Whitebeam

  • Member
  • Posts: 27
Anyone know of an inlaid arrow pass howto?
« on: August 27, 2012, 05:16:31 am »
I'd like to inlay a piece of horn on my next bow to protect the wood at the arrow pass. I suspect that the idea is to shape the horn first and then carefully cut around it with a very thin sharp blade and hollow out the hole with a fine gouge, but I'd really like to see it done first before attacking my beautiful creation with such tools. Anyone know of a howto with photos anywhere please?

Peter

obe_22

  • Guest
Re: Anyone know of an inlaid arrow pass howto?
« Reply #1 on: August 27, 2012, 07:41:59 am »
That’s the way I did it with far from perfect results, but that’s due to my poor craftsmanship and the sharp corners that I used on the inlay. Shaped the inlay, traced the contour on the handle and shaped the inlay hole with a dremel.  Here’s a couple of tips:
 Don’t shape the edges parallel, make the inlay and the hole in a cone kinda shape (with the wider base on top). This will insure a better fit and less visible glue line.
If you don’t have a perfect fit, try mixing some sawdust in the epoxy (that’s what I’ve used) to make the adhesive to blend in with the wood.
If you have a glass finish on the horn, this will go away quick due to feather abrasion.  Treat the horn inlay with some “nail hardener” and the shine will last a lot longer .Or use some abrasion resistant lacquer, but I was surprised with the results of this nail hardener on horn. 
I’ve found the sharp corners kind of difficult to shape perfectly on the inlay hole, as you can see ( the picture with what I got is how NOT to do it, even if it looks fine if you look at the inlay from 3 feet away).
Good luck with your project and I would like to see some pics on how it turned out.

Offline Del the cat

  • Member
  • Posts: 8,322
    • Derek Hutchison Native Wood Self Bows
Re: Anyone know of an inlaid arrow pass howto?
« Reply #2 on: August 27, 2012, 07:54:37 am »
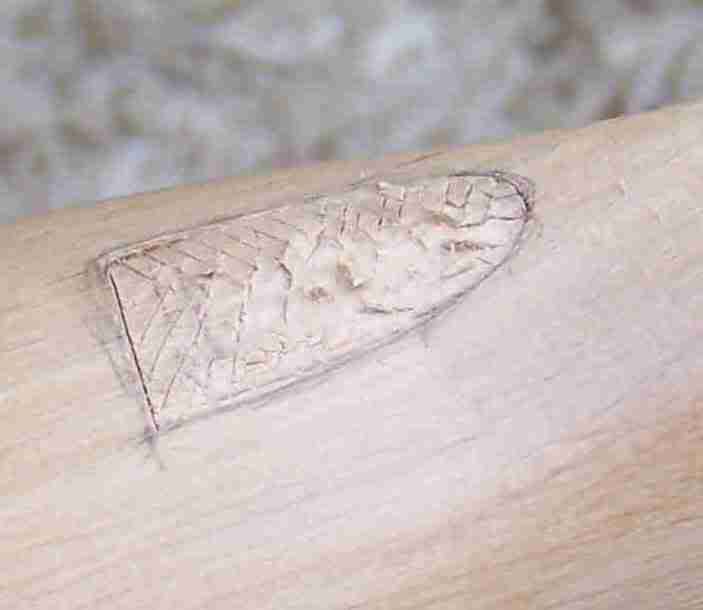
This pic shows how I remove the wood from the area to be inlaid.
(Sorry it's not a great pic)
I use a craft knife with a new blade. The old style cast knife, (not one of those modern ones with a retractable blade that prevents it being useful >:( )

Once you have cut the outline, you cut a series of cross hatched lines, cutting in from the perimeter towards the centre. That way there is no risk of cutting outside the area. You can then slice, pick or chisel* out the little pieces with the tip of the knife. You then repeat the process going deeper each time, it gets easier oneach subsequent layer as you have a better edge to work to.
* An old needle file (square or flat section ground to a chisel point is handy for this)
I used to mark round with a pencil, and cut just inside the line, but I sometimes use the knife from the start. The final fitting is done by ajusting the bit of horn usually. These days I go for an inverted shield shape as the curves aren't too tight and it looks good. The more you de the easier it gets.
A good trick assuming a shape like in the pic, is to cut thestraight lower edge a bit on the tight side, that way the pointed end can be adjusted to push in tight first and then the easier flater edge adjusted to drop in. Or looking at it another way, make the horn a tad long and adjsut the straightest edge last.
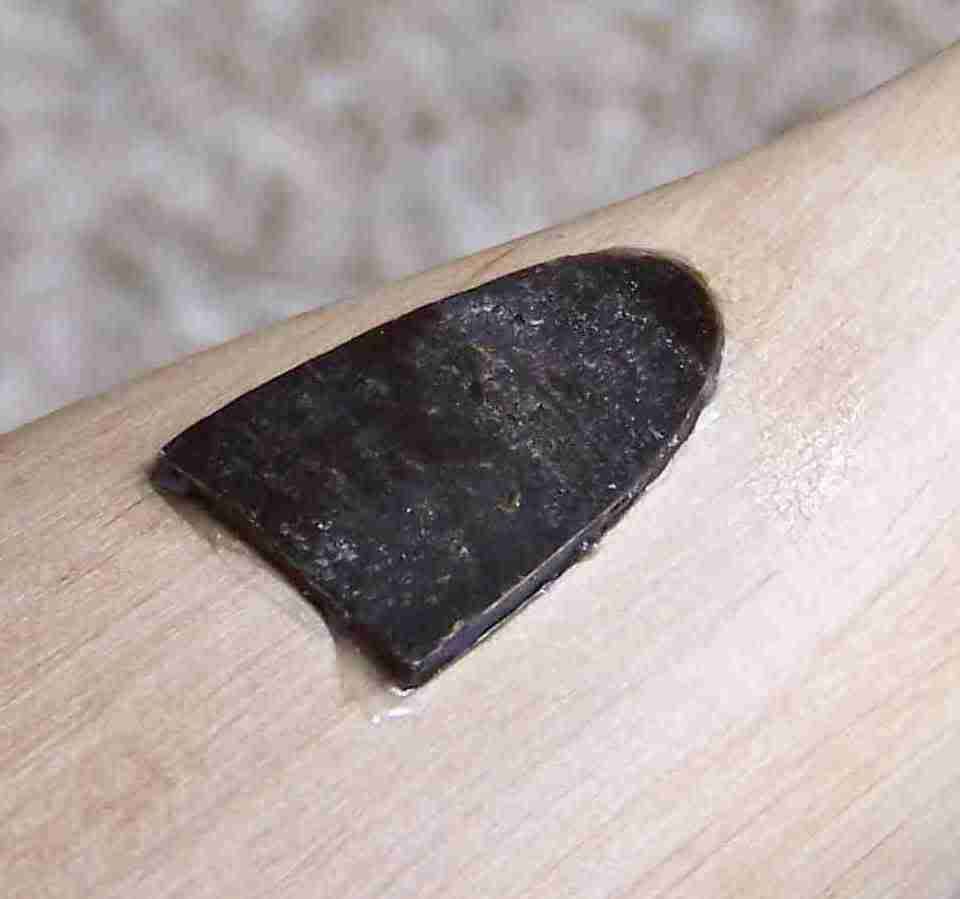
Another tip is to have the edges of the horn very slightly tapered like a cork so it gets tighter as you press it in to give a good fit.
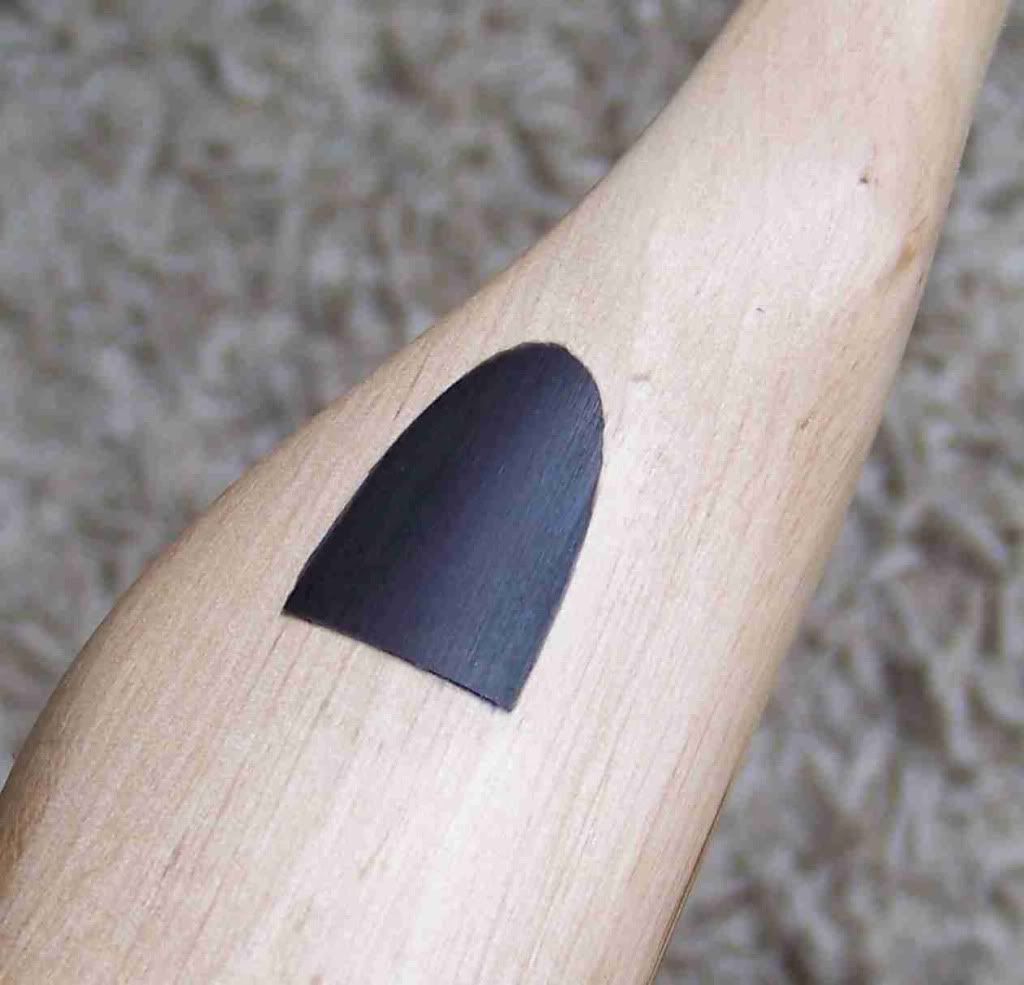
Hope this is some help
Del
« Last Edit: August 27, 2012, 08:06:13 am by Del the cat »
Health warning, these posts may contain traces of nut.

Offline Eric Krewson

  • Member
  • Posts: 5,432
Re: Anyone know of an inlaid arrow pass howto?
« Reply #3 on: August 27, 2012, 10:50:08 am »
The key is very sharp tools to cut your inlet. I even sharpen my exacto knife blade, it is not sharp enough out of the box. I use an 1/8" chisel to remove the wood after I outline the inlay with an exacto knife.

You need to file a draft on your inlay at about a 5 degree angle from back to belly so it will really have a close fit around the edges when you tap it into place.

I made two right hand bows for a couple but guy turned out o be a lefty. I used a name plate to cover where the rest was on the righty that I turned into a lefty and added the same to the ladies righty so they would both match.


Here is an inlayed strike plate done the same way;

 
« Last Edit: August 27, 2012, 10:53:47 am by Eric Krewson »

Offline coaster500

  • Member
  • Posts: 1,741
Re: Anyone know of an inlaid arrow pass howto?
« Reply #4 on: August 27, 2012, 11:23:28 am »
Quote from Del "Another tip is to have the edges of the horn very slightly tapered like a cork so it gets tighter as you press it in to give a good fit"

I did this also as the horn being harder than the wood helps form the edge by compressing it a bit. Inlay is a bit like a kids color book and requires staying in the lines. I wasn't that good at coloring and not much better at inlay :)


Inspiration, information and instruction by the ton and it's free,,, such a deal :)

Offline Del the cat

  • Member
  • Posts: 8,322
    • Derek Hutchison Native Wood Self Bows
Re: Anyone know of an inlaid arrow pass howto?
« Reply #5 on: August 27, 2012, 02:40:28 pm »
Hey Coaster! That's cool, I've never seen a combined arrow plate and shelf before :).
Del
Health warning, these posts may contain traces of nut.

Offline ErictheViking

  • Member
  • Posts: 1,504
Re: Anyone know of an inlaid arrow pass howto?
« Reply #6 on: August 27, 2012, 07:57:28 pm »
WOW! The end is near, Del liked an arrow shelf!  ;D  all are way better than what I could do, but ya coaster that combo is just cool.
"He that but looketh on a plate of ham and eggs to lust after it hath already committed breakfast with it in his heart"  C.S. Lewis

Offline coaster500

  • Member
  • Posts: 1,741
Re: Anyone know of an inlaid arrow pass howto?
« Reply #7 on: August 27, 2012, 08:44:48 pm »
Trying to spare the knuckles Del :)

It's a piece of antelope horn from one I killed in the 80's!!! Worked out pretty well....  but far from perfect
« Last Edit: August 28, 2012, 01:38:50 am by coaster500 »
Inspiration, information and instruction by the ton and it's free,,, such a deal :)

Offline lostarrow

  • Member
  • Posts: 1,348
Re: Anyone know of an inlaid arrow pass howto?
« Reply #8 on: August 28, 2012, 01:01:18 am »
[img]I inlay all of  my strike plates just because I don't trust a wide  glue joint on two materials that have drastic differences in seasonal movement. I've also been inlaying furniture with shell, Ivory, metal and various veneers for about 25+years now . Sounds like these guys have it right. If it's a complex shape you can use some thin double sided tape (Rhino tape) to hold it temporarily  while you incise the profile . I use a pencil style knife with replaceable blades (exacto).It's just like drawing with a pencil and the blades are more than adequately sharp. (scars to prove it)Sometimes I will use a hooked blade in a stouter version of the handle if the wood is extremely hard (Ebony or Blackwood hard ) and kind of pull the knife through the cut , as I get more control .As with all patern transfer you need to keep the blade on  an angle towards the patern so the business part of the knife makes contact, not the bevel. This coincidentally also gives you the "tapered cork like fit" of about 5-7 deg. Once incised , I take the pattern(inlay) off and "relieve " the incision by going around the inner portion with your knife on the opposite angle. Now you should have an outline made with a "V" shaped cross section. This extra step will help you stay within the lines. Now, using a small chisel , cut ACROSS the grain of the wood. If your chisel isn't sharp enough to shave with, you can get disposable ones to fit the above mentioned knives . My favorite for this task is a small triangular file blank that I ground ,polished and fit a handle to.I can't emphasise enough how important sharp tools are to your final product and your safety and enjoyment. When you are cutting across the grain you don't run into the problems of  splitting, chipping following the grain or hitting soft spots that make you run your chisel far past your stop cut. Try it on a scrap first to get the hang of it. After about three or four attempts at various shapes I'm sure you'll have the confidence to attempt it on the bow you just spent ?????????hours on. I usally put a finish on the bow before I inlay materials like bone, horn ,ivory or shell ,so the glue squeeze out doesn't stick. If it's veneer or wood that will be sanded flush , apply the finish after. I also rough up the back side of non porous materials, and clean off any oils on the metals. Be sure not to use too much glue  or make the fit too tight as this will create an air lock that prevents the materials from bonding properly and will leave your inlay proud of the bottom of the hole that it sits in. Goodluck all!

Offline Whitebeam

  • Member
  • Posts: 27
Re: Anyone know of an inlaid arrow pass howto?
« Reply #9 on: August 28, 2012, 04:52:23 am »
... you need to keep the blade on  an angle towards the patern so the business part of the knife makes contact, not the bevel. This coincidentally also gives you the "tapered cork like fit" of about 5-7 deg...

..."relieve " the incision by going around the inner portion with your knife on the opposite angle. Now you should have an outline made with a "V" shaped cross section.

...cut ACROSS the grain of the wood. ... When you are cutting across the grain you don't run into the problems of  splitting, chipping following the grain or hitting soft spots that make you run your chisel far past your stop cut.

Thanks Lostarrow! An excellent post with some key points I suspect. I'll try it out on a couple of 'nearly, but not quite' bows first to see how it goes.

Nice inlay Del - no visible glue line there.

Cheers all

Peter

Offline lostarrow

  • Member
  • Posts: 1,348
Re: Anyone know of an inlaid arrow pass howto?
« Reply #10 on: August 28, 2012, 11:24:44 pm »
 No problem , I'm still crazy busy with work and hunting season is fast approaching but I'll try to do some how to's on a few things that would probably make life a whole lot easier for anyone working with wood and such.