Author Topic: Central European Crossbow Project  (Read 57362 times)

0 Members and 1 Guest are viewing this topic.

Offline jpitts

  • Member
  • Posts: 312
Re: Central European Crossbow Project
« Reply #15 on: January 26, 2012, 03:33:52 am »
WOW.....I love it. Keep it coming Dane
The bone table is awesome...beautiful work
Jimmy / Dallas, Georgia

Offline Dane

  • Member
  • Posts: 1,870
Re: Central European Crossbow Project
« Reply #16 on: January 27, 2012, 10:50:49 am »
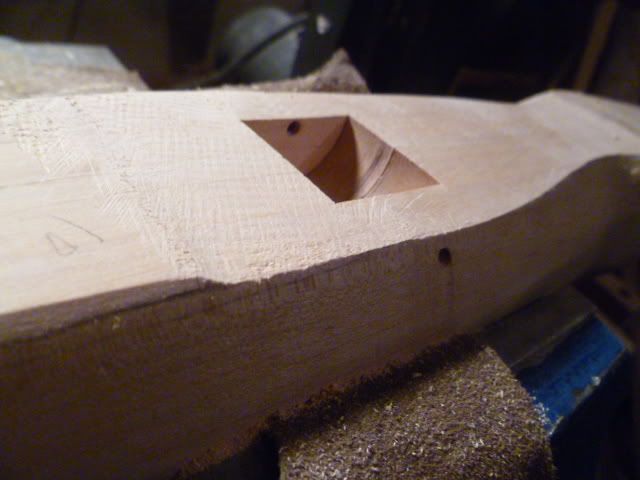
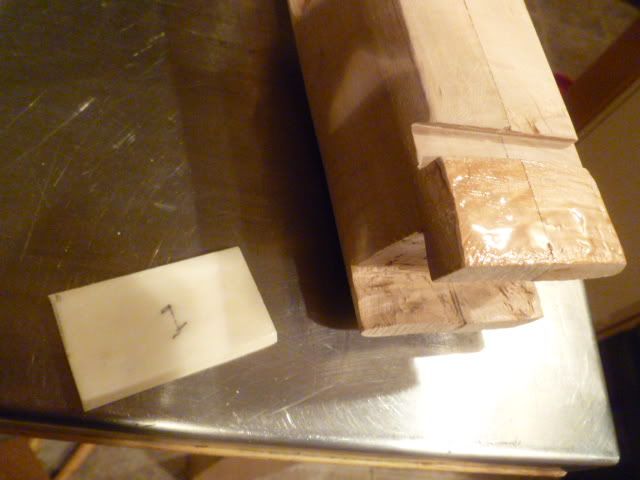
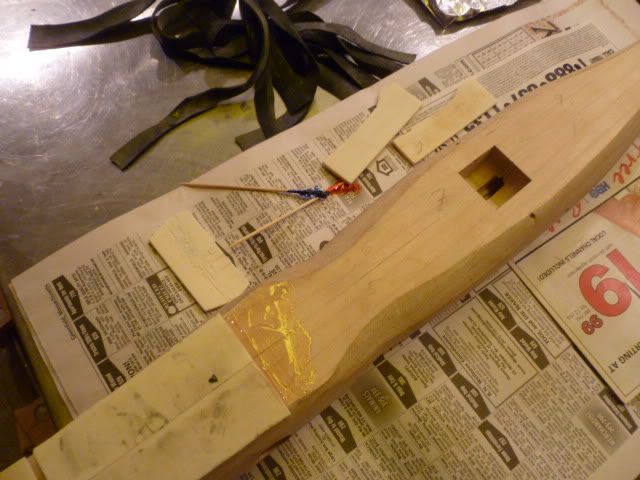
Before I could start the bone table work, a few more steps needed to be completed. Next, I made the dovetail slot for the quarrel or bolt rest. I am not sure you can tell, but the nose of the crossbow slops downward from around just before the prod binding hole. There are essentially two systems for medieval crossbows, one being a groove to guide the bolt as it is shot, and a more sophisticated quarrel rest coupled with a slightly downward sloping “nose.” The primary advantage to this style (besides looking more elegant and “cooler”) is that much less of the bolt is in contact with the tiller, thus reducing friction and improving velocity. A secondary benefit with an adjustable bolt rest (vs. one that is permanently glued on) is that you can then adjust the bow for windage. Since this bow (and almost universally historic bows from the medieval period) will not have a rear site, adjustment for elevation is accomplished by raising or lowering the bow by the shooter.

The much simpler bolt groove that was typical of earlier crossbows had the primary advantage of more robust construction, but at a cost of more friction to the bolt, which rests at all times along the interior of the groove. Lining the groove with bone will help in reducing velocity-robbing friction, so that extra step is one to consider.
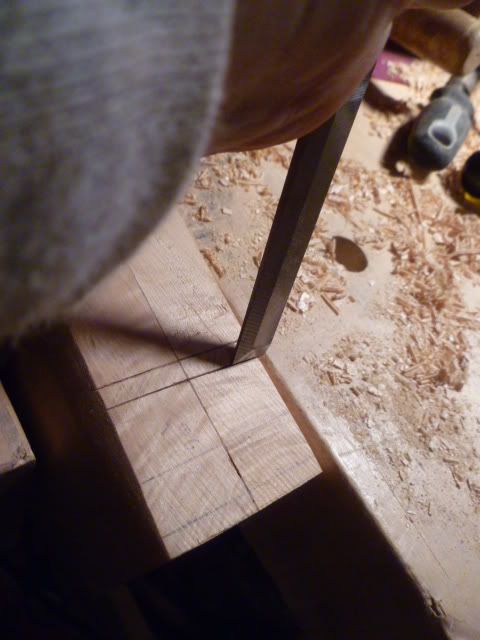
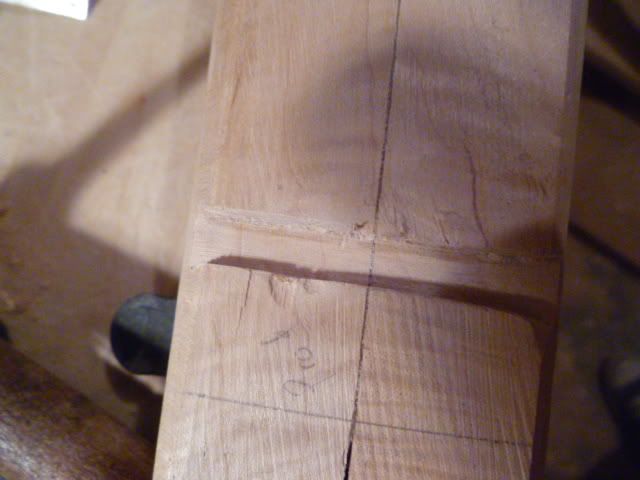
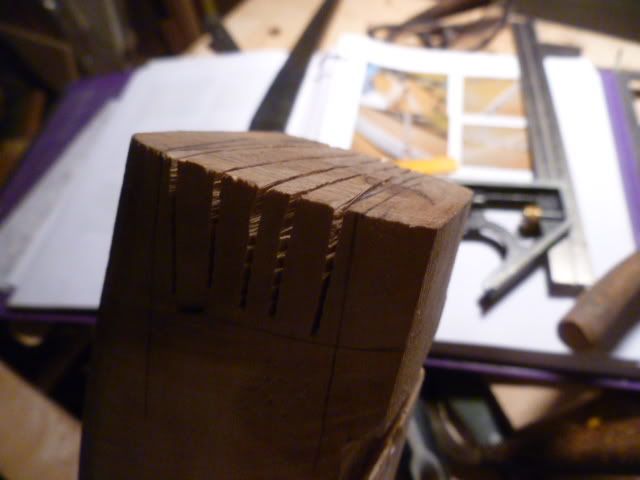
It wasn’t too hard to make this, and basically consisted of cutting a dovetail slot with a small saw and chisels and finishing the slot with a 60° triangular file and small flat files for the base of the groove. A router would speed construction of the slot, but at the risk of making a single fatal error and ruining all the work you put into the tiller up to this point. If you are like me, chisel work sometimes looks pretty ugly until you done, so don't dispair if you think things are not shaping up well. They really are.

After making the quarrel rest out of cow bone, I changed my mind and will be fashioning a new one out of a nice contrasty hardwood for a bit of added style and contrast to the color of the other tiller components.


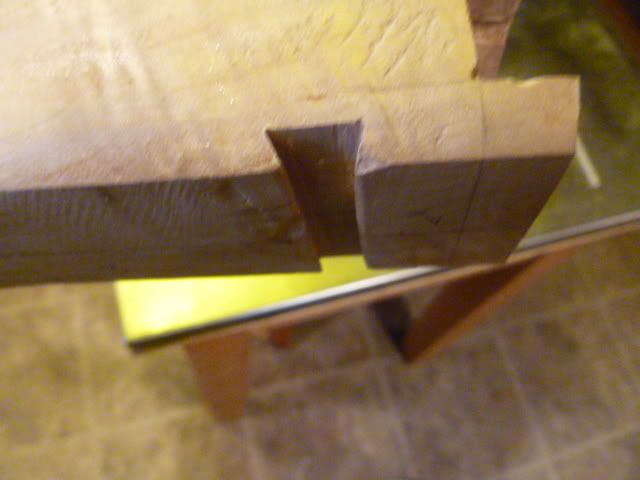
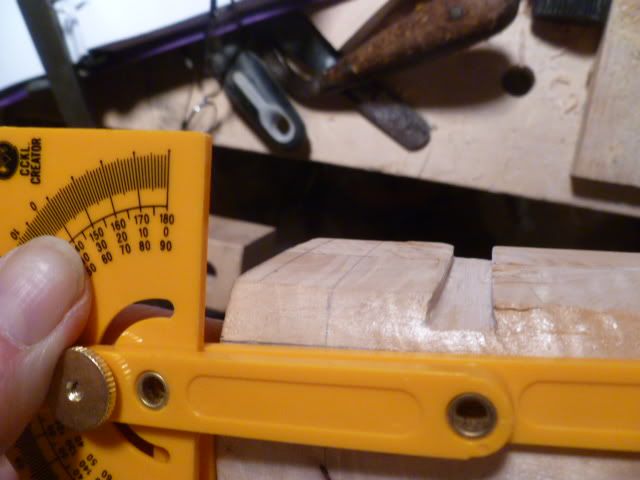
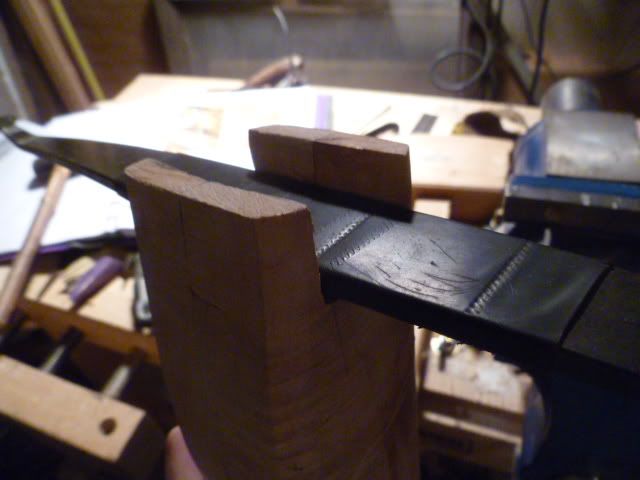
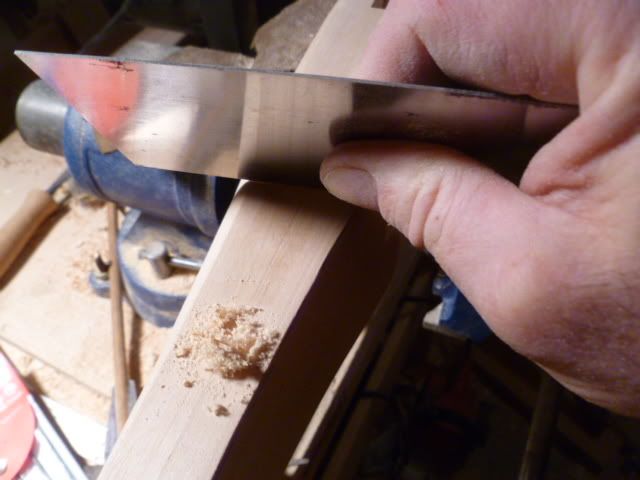
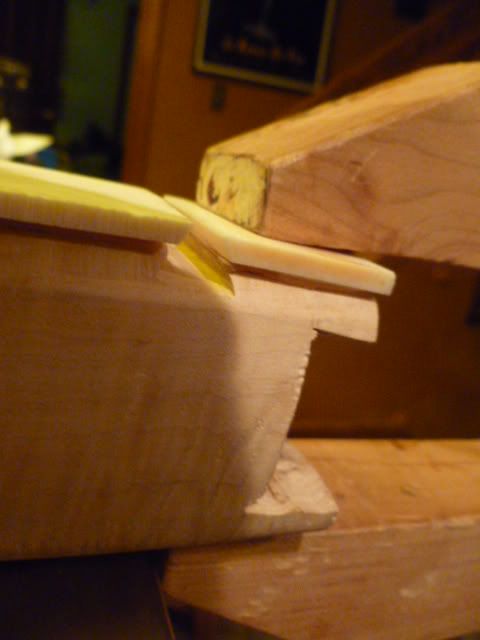
Next, it was time to cut my prod socket. Notice there is a lot of extra wood I left on the nose of the tiller just for this purpose. The back of the socket will be exactly 11.5” from the center (give or take a wee bit) of the rolling nut socket, and another point of measurement I used was where that slope ended and the table was flat all the way back to the butt end of the tiller. You will need the prod to be not at about a 6 degree angle, with the bow tips pointing up, toward the ceiling, rather than down, toward the ground (how is that for exact engineering language?) That is because of string clearance on the top of the tiller. Hopefully, the photos will make sense, but perhaps saying without that angle for the prod, the string would rest hard against the top of the tiller all the way through the draw, wearing out the string fast and causing hideous friction. You would have a beautfiful looking club, but not much of a bow. Ideally, when strung, the string never touches or barely touches the table top all the way through the draw from brace height. Once you string the bow, you will then be able to see if adjustments have to be made to the prod socket, perhaps wedges or shims, or judisious wood removal. But that for later, and for now, a 6 degree angle should be just right.

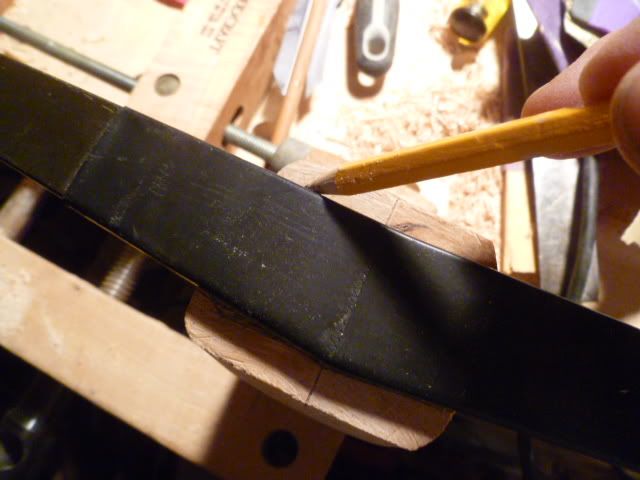
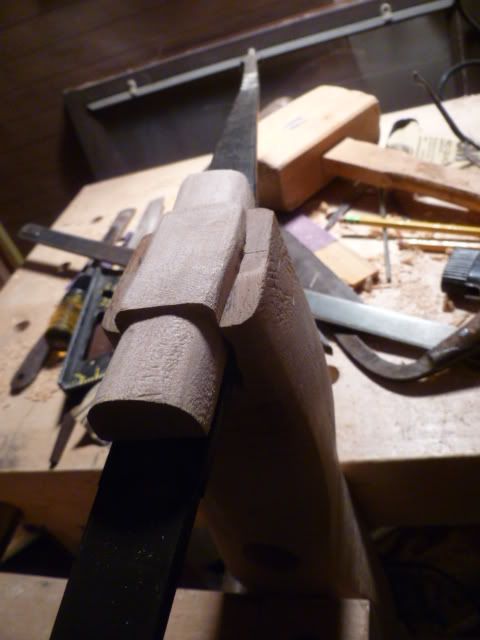
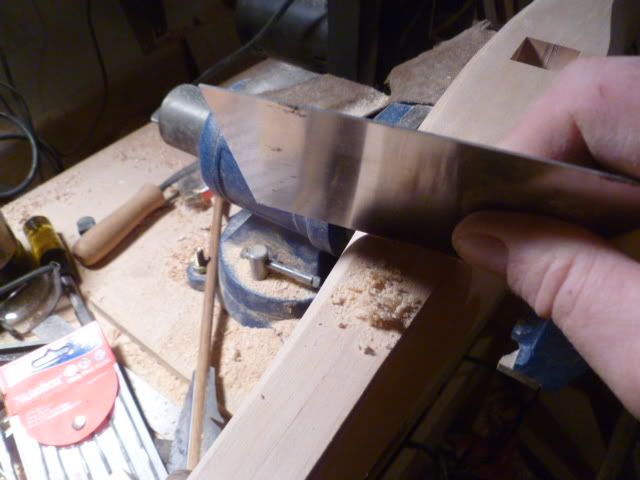
I laid the prod on the tiller, making sure I had equal amount of wood both above and below, and had left enough extra that I could monkey around a bit. I drew the outline with a pencil, and used a protractor to ensure I had a 6 degree angle at the back of the socket. I used a band saw to cut away the waste wood and then used chisels and rasps to do the rest. Notice perhaps that there is some curly figuration in the wood, and that means the wood was a bit harder to work, more brittle, and just a little more demanding than clean grained stuff. The price to pay for beautify, I guess :) So, the socket edges are not quite as precise as I would have liked them to be, but on the other hand, most of it is going to be hidden by a prod binding block (I will get to that simple component later), and the binding itself, both for the prod and the stirrup).


Now things got dicey – aka time to think on your feet and not despair. As I mentioned before, I had used holly wood for my last medieval crossbow’s table facing material. It looked great, and was very similar in appearance to bone or ivory. But it wasn’t bone or ivory, and I had wanted to use the “real deal” for a long time. Be advised that you can have no special table surface material at all, and you will have a very fine crossbow.

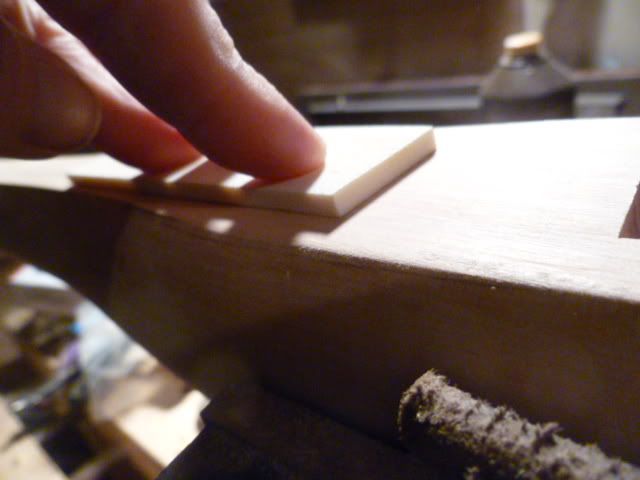
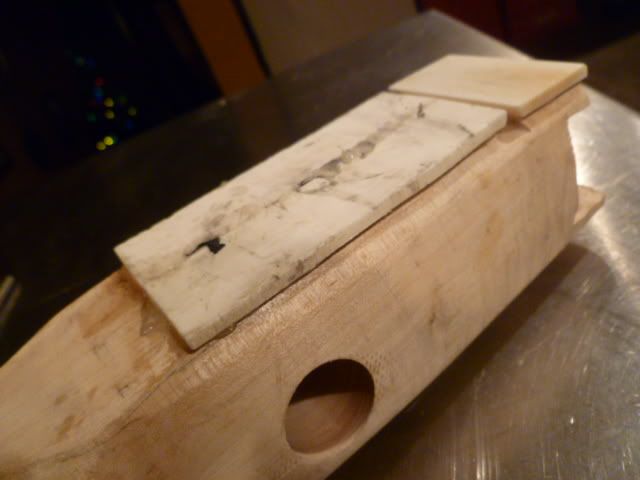
That being said, I found an online vendor that sells preshaped bone scales in various sizes all ready to go. Knife makers use them for handle scales. I purchased 14 pairs that were 4” x 1.25” by 1/8” thick. They came about a week after ordering, and looked great, and thus I had found an easy way to get a killer bone table.

However, and this is a big however, the scales were thick enough that not enough of the rolling nut would be there to properly string the bow. My big concern was that with the bone plating, the top surface of the crossbow would be too high, and thus interfere with the operation of the nut. In other words, the bolt would be riding too high and the notch in the nut would have to be so high, the lugs would not be sufficient for stringing the crossbow.

I had two options; 1, sand down the bone to half their thickness, or work down the top of the tiller. Being of sound mind and body, the thought of sanding and filing down that volume of bone was out of the question and in the stone cold crazy column of crossbow building. So, out came the old farrier’s rasps and the cabinet scraper, and I began what turned out to be a not too horrible task of reducing the height of the tiller.

And to think,, all this would have been unnecessary if I had had the bone scales at hand when I was laying out the initial dimensions, and I could have adjusted the socket hole depth without all this bother. A lesson there, for sure.


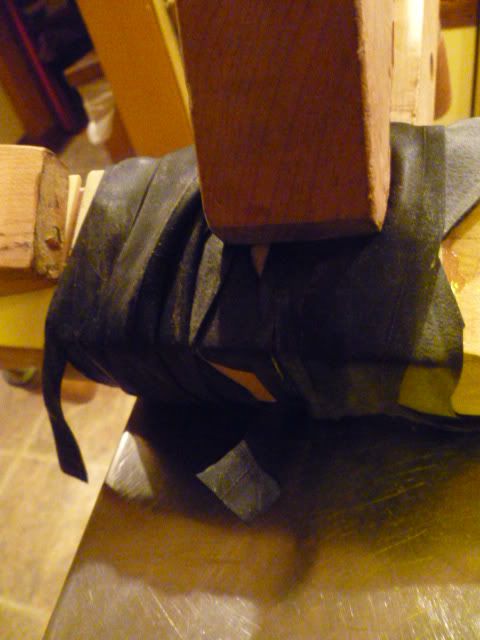
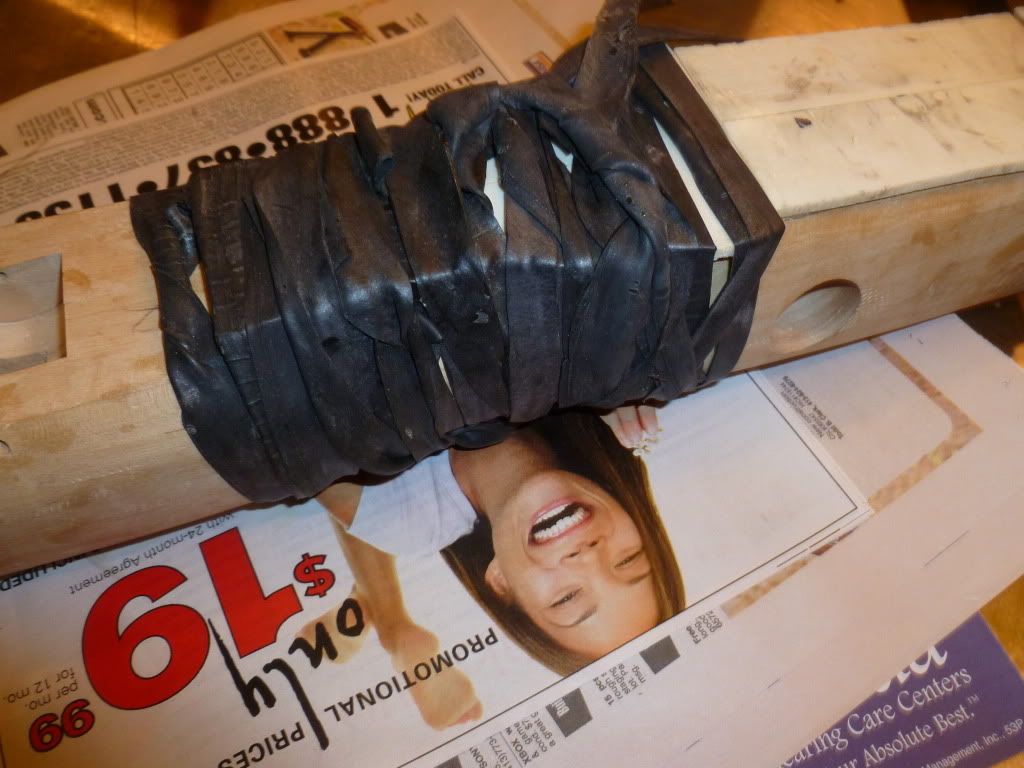
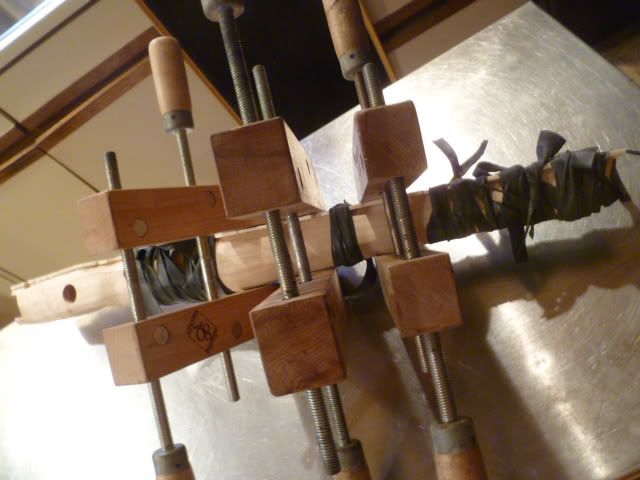
Once all was set, I liked the pattern I had developed, and I felt that the wood was as flush as I was going to get it, it was time glue it all down. I used two part epoxy, stuff I got at a big box store that said it was “professional grade.” Most likely any type – 3, min., 5 min, 7 min, etc will work. The used a few wood clamps, but mostly I used bicycle inner tubes cut into long strips to help glue this all together. It was easy to do, and I just tied on the tube strip where I wanted it to begin, wrapped, and then slipped the end into the next adjacent already tied tube.

It looks like a rubber mummy, a bit, and the scent of the inner tubes reminded me of when I was a kid and used to go to Pep Boys for those little Monkey inner tube repair kits.

I only glued a few bone pieces at a time, with a 24 hour wait between gluing operations, and thus, I got the job done.


Next posting, I will continue with the bone surface treatment, aka why the $#@#&**% didn’t I just settle for a plain table? :)
« Last Edit: January 27, 2012, 11:32:53 am by Dane »
Greenfield, Western Massachusetts

Offline Elktracker

  • Member
  • Posts: 1,964
  • Josh
Re: Central European Crossbow Project
« Reply #17 on: January 27, 2012, 01:33:01 pm »
Haha Nice work and very good write up! I think the bone table will be a great addition to this, cant wait to see it done!

Josh
my friends think my shops a mess, my wife thinks I have too much bow wood, my neighbors think im redneck white trash and they may all be right on the money!!

Josh Vance  Netarts OR. (Tillamook)

Offline Del the cat

  • Member
  • Posts: 8,298
    • Derek Hutchison Native Wood Self Bows
Re: Central European Crossbow Project
« Reply #18 on: January 27, 2012, 04:59:49 pm »
Dunno why that girl is laughin' at your rubber strapping ::).
Del
Health warning, these posts may contain traces of nut.

Offline Dane

  • Member
  • Posts: 1,870
Re: Central European Crossbow Project
« Reply #19 on: January 27, 2012, 05:20:17 pm »
Danke, Josh.

Del, poor thing. It is her frozen death cry. She only looks like she is laughing. Her body is missing below her shoulders. Her leg I shoved among the bloody mess, thus it sticks up. I had to do it because she was mocking my rubber bands, and she is only two dimensional. She is in a better place now, composting valhalla.
Greenfield, Western Massachusetts

Offline Dane

  • Member
  • Posts: 1,870
Re: Central European Crossbow Project
« Reply #20 on: January 27, 2012, 11:07:33 pm »
And so we continue. About six gluing jobs later, I had the entire table covered in bone. Everything looked good, so I began rasping down the waste bone with a farrier’s rasp. While not a great deal of fun, it got the job done relatively quickly.


As I got closer to the wooden edges, I realized that not every glue line was prefect. Maybe 3 or 4 inches total in various places had tiny gaps, with a few being not pretty at all.


After fretting and wondering what do to, I mixed some bone dust (you will generate gobs of it) with white school glue and made a kind of thickish paste. I pushed this stuff into the gaps, let it dry, and sanded. While not prefect, it did pretty much take care of the gaps, and I doubt anyone will spot the little areas. The big lesson here is to be very sure you have a perfect joining surface. I probably should have caught those areas, but didn’t. Sue me :)


I did a bunch of filing, sanding, more sanding, more filing, more sanding, and yes, more sanding. I used a hand held belt sander carefully, but mostly it was sanding blocks and sweat that did the job. Graduating to finer grades, I ended up with steel wool, and was pretty pleased. Nice and shiny, those surfaces.


Now, recall I said you will be defining and refining the tiller until the very end. Before adding all that bone, I didn't see a few problem areas, ie lopsidedness. Here is an example of just how off you can get and not even realize it. I drew lines, rasped and filed, and you can see how much better it is afterward.


After that, more sanding and polishing, not only the table but the rest of the tiller. I decided to just toss historical accuracy to the winds with this one and use new fangled sandpaper. Just dont tell the "thread nazis."


it was time to glue and nail the plates down. Many historic bows from this region of Europe used pins or nails, and they look is very handsome. I used a 1/16” drill bit to drill through the bone and into the wood about half the length of the pins. I then coated the pins with super glue and tapped them in very, very carefully with a small hammer. If you slip, you can risk damaging the bone, and that would be bad indeed. An bent pin would not be great, so you may want to guide the pin in partially with a pair of need nosed pliers.


And that is that. Bone tables in five easy steps :)

Next posting soon.

« Last Edit: January 27, 2012, 11:19:05 pm by Dane »
Greenfield, Western Massachusetts

Offline gstoneberg

  • Member
  • Posts: 3,889
Re: Central European Crossbow Project
« Reply #21 on: January 28, 2012, 02:06:46 am »
Nice!!!!
St Paul, TX

Offline Gus

  • Member
  • Posts: 1,829
  • It's Time To Make Some Shavings!
Re: Central European Crossbow Project
« Reply #22 on: January 28, 2012, 03:10:02 am »
Good Grief!!!

That Bone Work is Bleeping Awesome!!!
And your attention to detail and "thinking on your feet"!

Not like I don't already have enough projects going, now I have the distinct urge to build a Crossbow...
Then again, if I were an Evil Genius, I'd have my Minions do the sanding... :)

Excellent Build Along!
Thank You!

Regards,

-gus
"I taught him archery everyday, and when he got good at it he throw an arrow at me."

Conroe, TX

Offline Dane

  • Member
  • Posts: 1,870
Re: Central European Crossbow Project
« Reply #23 on: January 28, 2012, 09:55:51 am »
Thanks to both of you. I am glad you like the bonework. It was a ton of work but really worth it. Ever worth the hellish stink.

Dane
Greenfield, Western Massachusetts

Offline Dane

  • Member
  • Posts: 1,870
Re: Central European Crossbow Project
« Reply #24 on: January 28, 2012, 10:44:32 am »
Let’s finish the rolling nut. What it still needs are two lugs to hold the string and a steel sear as part of the trigger.

The sear is a Cat 8 3/8” threaded bolt with a sear step cut and filed into it. Yes, I know that hardened steel rod would be better, but not easy to find, and probably as I build stronger and stronger weapons, a stronger sear is going to be needed. For 200 pounds and under, this method is reliable and easy to install. Actual medieval weapons had a piece of steel joined or inserted as the sear, and that is a very viable option, particularly if you can machine the slot into the nut. Making that precise a inlet into antler is going to be a real challenge, but then, they used to do it 700 years ago with only hand tools.

Case hardening is also something I am still looking into. At the very worse, you will eventually have to replace the tickler and nut as one or the other wears out and you start to get misfires. And that is something I will worry about when the time comes.


I used a 5/16” drill bit to drill the hole for the bolt / sear. Then, I used a 3/8” NC tap to tap the hole for the sear. You can buy cheap taps at places like Harbor Freight, which is fine for this kind of project. I hope NASA sources their tools elsewhere, however. :)


(please note this is the deceased nut I am drilling, not the second one. Read on).


Now, see what happens when you don’t carefully ensure that your tap is entering the hole correctly?


I killed the rolling nut. But, it was a lesson learned, and I did have extra nut blanks. Out went the lathe, cut it to correct length, faced it, polished it, etc. It actually wasn’t that bad a situation, and this one came out much better, though I can’t say why. Maybe it just feels like it is better. In any case, I successfully tapped this one. A bit of advice on tapping. As you turn the tap handle, reverse every revolution of so to clear the threads so little chunks of antler don’t become little gremlins.

I tested the bolt / sear, it looked great, and so I then made the lugs. I measured very carefully, and used the end of a bolt / quarrel (not a hardware bolt, but a deadly sharp bolt) to ensure the bolt slot was not too big or too small. It may be hard to see here, but this is a common kind of bolt end for actually medieval bolts (and much to the shagrine perhaps of the warbow community with very few actual medieval war arrows surviving, there are hundreds of thousands of medieval bolts that have survived to today). The bolt kind of wedges into the nut and then presses lightly against the string. Later, I will do a posting on bolt / quarrel making.

So, files and care took care of the lug notch. I then cut out the sear notch, which is my own kind of lame term. I used the end of the tickler to make sure I had enough antler removed to allow for a perfect fit of the tickler against the sear. Then, I epoxied the sear bolt into the nut, and finally, used a 1/8” drill to drill a hole through the sear bolt to allow for the nut binding cord.


What? Did I hear someone ask what in the world a nut binding cord is? The nut rotates freely in the nut socket, and doesn’t have a metal axel. The socket is deep enough to keep it in there, except as it rotates forward when shooting the bow. The nut can then pop right out and get lost, and that would be a drag.

But with the binding cord, you keep it. I am using dried gut for this weapon, but have used artificial sinew in the past. Any tough, small diameter stuff will work. Real sinew would look great, I think. Gut is tougher, and yes, you can eventually have the cord break. Guess what happened when that happened to me at a big event I host each October at my club? I set the crossbow down on a picnic table among a bunch of atlatls and spears and other cool stone age stuff, and walked away, with the nut just sitting there next to it. It wasn’t operable in any way, so I wasn’t worried about someone shooting themselves, but I should have kept the nut in my pocket. It then walked away, never to be seen again. Maybe it became a hunter gatherer with a borrowed atlatl and is even now seeking the woolly mammoth.

Next posting soon.

PS I still need to download photos that show making the lugs, and I will do that when I post my next posting. Thanks for the patience.
« Last Edit: January 28, 2012, 10:47:54 am by Dane »
Greenfield, Western Massachusetts

Offline jpitts

  • Member
  • Posts: 312
Re: Central European Crossbow Project
« Reply #25 on: January 29, 2012, 03:12:53 am »
Wow Dane,
This is soooo cool. I love how you fashioned the bone table and the sear. I really appreciate you taking the time to show us each step. fantastic stuff
Thanks
Jimmy / Dallas, Georgia

Offline Del the cat

  • Member
  • Posts: 8,298
    • Derek Hutchison Native Wood Self Bows
Re: Central European Crossbow Project
« Reply #26 on: January 30, 2012, 05:55:40 am »
I bet tapping in those brass nails was a bit nerve wracking.
You could always case harden the sear to harden the face. It's a good trick as you can fettle the sear to get the angle spot on and even shoot it it a bit, and then case harden.
I just found this discussion about case hardening compound, it includes 'recipes' for making your own compound from bone ash or leather ash.
May be of interest.
http://www.model-engineer.co.uk/forums/postings.asp?th=64390
With a small piece like the sear it would dn't take much to get it up to orange heat and dip it in the compound.
BTW. why do metalworking books talk of heating stuff up to 'cherry red' when they really mean bright orange??? It seems to be a common mistake which has just been purpetuated. Cherries are a very dark red.
Del
Health warning, these posts may contain traces of nut.

Offline Elktracker

  • Member
  • Posts: 1,964
  • Josh
Re: Central European Crossbow Project
« Reply #27 on: January 30, 2012, 01:40:50 pm »
Great progress Dane and excellent work!

Josh
my friends think my shops a mess, my wife thinks I have too much bow wood, my neighbors think im redneck white trash and they may all be right on the money!!

Josh Vance  Netarts OR. (Tillamook)

Offline Dane

  • Member
  • Posts: 1,870
Re: Central European Crossbow Project
« Reply #28 on: January 31, 2012, 01:42:45 pm »
Thanks for the info, Del. And I agree, cherry red would be a very dark color, and in the case of some species of cherries, nearly black. If you went by the blossoms, it would be white hot. :) I should make up one of those tiny coffee can forges so I can do little stuff like this. A full sized forge is out of the question. The wife would toss me in it and the neighbors would complain about the stink of me burning up.

Josh, thanks man. It  will be a little while before I get back to this thread, as life stuff got in the way. Just finishing laying down a new kitchen floor, etc. I will see this thread through to final completion and shooting, however. Promise.

Dane
Greenfield, Western Massachusetts

Offline Dane

  • Member
  • Posts: 1,870
Re: Central European Crossbow Project
« Reply #29 on: February 10, 2012, 09:50:32 am »
Well, kids, for you following this, you may be wondering what has taken so long. I just laid down a new kitchen floor, and also, mega disaster struck. Adios and vaya con Dios, one maple tiller. Here are the photos. I think I mentioned that the very figured, burly wood toward the nose of the tiller was going to be either a blessing or a curse. I have heard the term chaotic grain, and that nicely describes this kind of grain.

So, I felt like the prod (bow) socket should be deepened about 1/8”. It should have been an easy job, but….


….and what do you do when a bow explodes or fails during tillering? Do you scream, moan, cry, crack open a case and drink it all at once? Do you assume the fetal position and turn your electric blanket up to 9? Do you wimp out and crawl away from the workshop, never to return?...

…or do you luche libra out!? Si! With gusto. I put on my metaphorical mask and cape and drank a shot of not metaphorical tequila (reposado, as I was all out of silver), and decided that this is a great excuse to go to the hardwood yard and look at all the pretty things. My rolling nut is just fine, as is the tickler and stirrup, my tools haven’t gone away, and although there is no way to recycle the bone, it wasn’t terribly dear in the end. I am lucky in that I have an amazing dealer here that has an immense and wonderful stock. There is an immense selection, including flame birch, tiger maple, blood wood, zebrawood, yellow heart, and many more (including really delicious tropicals), but the black walnut decided to adopt me, so I picked up more than enough for another go.


The stuff I purchased is really primo Q1 8/4 stock, and was about 4” deep. This is absolutely IDEAL for a single crossbow tiller. The bugaboo facing you of course is hewing out the tickler channel. On later weapons, I plan to do just that, but as before for the purpose of this project, I wanted to do a laminate construction jobbie, as I did with the late, great maple tiller. That means of course a whole lot of very nice black walnut was going to be wasted, and yes, that was more tear-inducing than losing the entire maple tiller. The next thickness for this particular wood was 1”, and while a tri-lam is very tempting (and would look fantastic; imagine a tiller made of flame birch and zebrawood, or lemonwood and osage?), I decided to keep things relatively simple and go with a two wood lamination.

Of course, if I had a really good band saw I could re-saw this material. Something to think about.


Notice my high-tech way of laying out the tickler channel after making the first one? It works.

Then, the other side is chiseled out. You can see my big, fat Russian autowinding watch. I love mechanical watches, and sometimes weird Soviet-era technology. I can always, if I miss my target, throw this watch and kill it dead.


It went well, I got my two boards planed so I would have a good, close glue line both on the table (top) and bottom of the tiller, rough cut in the slope for the nose, bore the rolling nut socket, and created the tickler channel, as before. I drilled the prod binding hole in one of the boards and did the same for the tickler pivot pin, and drilled both sides for the nut binding holes. The main reason I did the half holes is to make sure I had enough drill bit shank or shaft. Last time around, I almost didn’t for the prod binding hole. Plus, having the half holes will ensure I get the other halves nice and straight.


Just before the glue up, I rough cut the basic outline of the tiller, in this case (as before) a Central European model, but this time, with more subtle curves and a very narrow and wider tail or end area. That will become apparent as I work the tiller over the next few days. In addition, I am approaching how I deal with the bone work in a far different way. Instead of laminating on the bone pieces, I am going to inlay them into the tiller surface using basic chisels and mallet. The advantage to this is I don’t have to worry about ragged edges and bad glue lines. I think that it will be a faster process, as well. The plan is to ensure there is more than enough extra wood on both sides of the tiller (I will talk to my draw knife about not getting carried away), then that extra wood will come off, leaving a table fit for a king. :)


Here is the tiller, all glued and happy. The second shot features my pug Davenport, who is inspecting the tiller. You can see my new floor too. When the guys at Home Depot say it will be easy, they are generally lying. :)


Back again soon.
« Last Edit: February 10, 2012, 10:04:24 am by Dane »
Greenfield, Western Massachusetts