| 
 A
while back, a good friend of mine gave me a couple of Osage billets.
These billets had been prepared by a friend of his for use in the commercial
takedown handles you can buy at some of the traditional archery supply
stores that cater to the primitive in us. The only problem with these
billets was that they had been shaped to fit the metal tube while they
were still a bit too wet. This did not work out so well because once
the Osage had dried completely, the fit inside the brass tube was too
loose and there was no way to properly remediate the situation. My friend
tried to fill the gap with glue but the pressure was too high for that
to work. This is when he asked me if I could use them and I accepted,
figuring I could make something out of them. When they arrived by mail,
I looked them over carefully and found them to be very nice with good
thick rings. They had a bit of character to them and only one of the
billets had a back ring chased down, the other was only half done. I
put them aside until I could figure out what to do with them. A
while back, a good friend of mine gave me a couple of Osage billets.
These billets had been prepared by a friend of his for use in the commercial
takedown handles you can buy at some of the traditional archery supply
stores that cater to the primitive in us. The only problem with these
billets was that they had been shaped to fit the metal tube while they
were still a bit too wet. This did not work out so well because once
the Osage had dried completely, the fit inside the brass tube was too
loose and there was no way to properly remediate the situation. My friend
tried to fill the gap with glue but the pressure was too high for that
to work. This is when he asked me if I could use them and I accepted,
figuring I could make something out of them. When they arrived by mail,
I looked them over carefully and found them to be very nice with good
thick rings. They had a bit of character to them and only one of the
billets had a back ring chased down, the other was only half done. I
put them aside until I could figure out what to do with them.
They sat
in my shop for a few months and every once in awhile I would look at
them, I guess to see if I would get any inspiration. They were plenty
long enough that I could have cut the spigot end off and cut a joint
in for splicing, but I have plenty of Osage I can do that with. The thought
crossed my mind about trying to get some metal tubing of the right diameter,
but I deduced that this would not be an easy task. Then it came to me.
Why not make a sleeve out of another non-traditional material: fiberglass.
I have used fiberglass for auto body repairs before, and it is quite
strong for its size. I had nothing to lose, plus I had all the materials
I would need on hand. Here is how I went about making this twopiece takedown.
 The
limbs had been cut out on a band saw, so the first thing I did was to
clean up the saw marks from the belly and sides. The limbs were a bit
less than 34" from tips to spigot end, so they were plenty long
enough to make a bow for my drawlength, and more. They were also about
5/8" thick
by 1¼" wide so I knew I could make a bow of at least 50#
at a 28" draw out of them. I then finished chasing a ring on the
one limb. The fades had been roughly shaped so I didn’t have to
do any work on them for now. Next, I removed the dried glue from the
spigots. (photo 1): The two limbs before working
on them. The
limbs had been cut out on a band saw, so the first thing I did was to
clean up the saw marks from the belly and sides. The limbs were a bit
less than 34" from tips to spigot end, so they were plenty long
enough to make a bow for my drawlength, and more. They were also about
5/8" thick
by 1¼" wide so I knew I could make a bow of at least 50#
at a 28" draw out of them. I then finished chasing a ring on the
one limb. The fades had been roughly shaped so I didn’t have to
do any work on them for now. Next, I removed the dried glue from the
spigots. (photo 1): The two limbs before working
on them.
I have never
made a bow using the commercial metal tubes—lack of interest being
the reason—so I had no idea of their length, other than what
I had seen in pictures. I started out by laying the limbs end to end
so I could calculate how long of a handle I would need to fit my hand
comfortably. I settled on a handle length of about 5", although
I realized later on that I could have made the handle shorter. A 5" handle
however, would leave a space between the two limbs since the shaped ends
that were to be inserted into the handle piece were not long enough to
butt together. I would therefore need a spacer. I didn’t want to
leave that empty space inside the handle as this would weaken it. The
ends that had been shaped for inserting into the commercial handle were
about 2" long so I would need a spacer of about 1" to give
me the 5" handle I was looking for. I decided
to use elm for the spacer (it’s a tough wood that takes quite well
to glue) and shaped it to match the shape of the Osage ends that were
to be inserted into the handle piece.
 I figured that the majority of
the pressure exerted on the handle would be on the belly, at the opening
of the handle, and back where the spigot ended with the sides of the
handle merely holding them together. I also didn’t want a round
handle but one more narrow and deep, in keeping with the general shape
of the limb spigots. With that in mind, I started cutting strips of glass
cloth. I cut a couple strips the full width of the handle and fairly
long so that I could wrap them completely around. These would be the
first pieces that I would use to establish the base of the handle. I
didn’t
want them too long though, as it would have made them unmanageable. Since
my plan was to lay a number of narrow, 1" wide strips along the
belly and back to build up some depth and add strength, I would also
need a few narrow strips, about 1" wide and long, to wrap around
the openings to secure the ends of these strips. I also cut a number
of wider ones, about 3" wide, and about 6" long to build up
the center of the handle, and also to hold down the narrow back and belly
strips. Next, I cut a large number of the 5" long and narrow pieces
that would lie down along the length of the back and belly of the handle.
I wanted to do as much of the glasswork as I could in one shot as the
resin I was going to use is quick-setting, so I tried to get as much
glass cloth cut up as I would need. I figured that the majority of
the pressure exerted on the handle would be on the belly, at the opening
of the handle, and back where the spigot ended with the sides of the
handle merely holding them together. I also didn’t want a round
handle but one more narrow and deep, in keeping with the general shape
of the limb spigots. With that in mind, I started cutting strips of glass
cloth. I cut a couple strips the full width of the handle and fairly
long so that I could wrap them completely around. These would be the
first pieces that I would use to establish the base of the handle. I
didn’t
want them too long though, as it would have made them unmanageable. Since
my plan was to lay a number of narrow, 1" wide strips along the
belly and back to build up some depth and add strength, I would also
need a few narrow strips, about 1" wide and long, to wrap around
the openings to secure the ends of these strips. I also cut a number
of wider ones, about 3" wide, and about 6" long to build up
the center of the handle, and also to hold down the narrow back and belly
strips. Next, I cut a large number of the 5" long and narrow pieces
that would lie down along the length of the back and belly of the handle.
I wanted to do as much of the glasswork as I could in one shot as the
resin I was going to use is quick-setting, so I tried to get as much
glass cloth cut up as I would need.
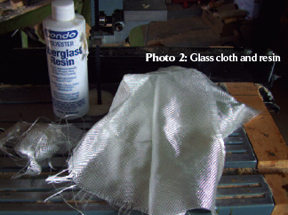
 (photo 2): Glass cloth and resin (photo 2): Glass cloth and resin
Now that I had my materials prepared, I was ready to make the handle.
I clamped a 2x4 long enough to accommodate the length of the bow into
the vise of my workbench. After greasing the spigot ends of the Osage
limbs with Vaseline so the glue wouldn’t stick to them, I clamped
them to the 2x4, elevating them a couple of inches with small blocks.
I did it this way so I could have free access around the limbs to be
able to wrap the fiberglass cloth around the handle. I then inserted
the elm spacer in between the two limbs and drew the Osage limbs up
tight to it; the limbs held the spacer in place.
I carefully sighted
down the limbs to make sure I had proper alignment and made adjustments
accordingly. I then mixed up a quantity of polyester resin and started
by brushing some lightly on the spigots. Then, using the long full-width
cloth, I wrapped it around the handle, applying resin as needed to keep
the cloth wet. Then I applied a number of the short pieces along the
back and belly, followed by the narrow, long pieces along with the wider,
long pieces to hold everything together. It was messy work. Polyester
resin sets extremely fast (about 5 minutes), so applying all the cloth
in alternating layers was impossible to do in one application. It took
three applications (about an hour) to completely apply all of the fiberglass
and make the handle to my satisfaction.
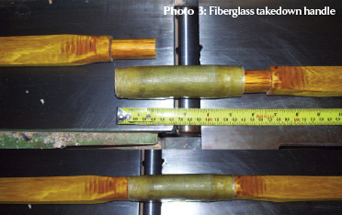
 Once I was done, I let the bow
sit for a couple of hours to give the resin time to cure. Finally, I
separated the handle from the limbs: the fit was quite tight. The step
up from the spigots to the limb proper was a bit more than 1/8" and
now the fiberglass handle was pretty well flush with the limbs so that
would give it a wall thickness of at least 1/8". Once I was done, I let the bow
sit for a couple of hours to give the resin time to cure. Finally, I
separated the handle from the limbs: the fit was quite tight. The step
up from the spigots to the limb proper was a bit more than 1/8" and
now the fiberglass handle was pretty well flush with the limbs so that
would give it a wall thickness of at least 1/8".
(photo 3): Fiberglass
takedown handle
After a couple of days, I decided to start doing a bit of work to the
bow. I began by sanding the back edges of the limbs and then scraping
the belly into a shallow D section. Floor-tillering showed me that it
was strong and though I was a bit worried about the handle, I didn’t
see any flex in it while bending the limbs. I was a bit leery of the
handle as this was something entirely new to me so I kept a close eye
on it at every step. I clamped the handle of the bow into my vise, protecting
it from the steel with some wood, and applied pressure to the limb tips.
There was still no flexing of the handle or any telltale sounds of imminent
failure.
 Even though the job I did with the fiberglass was pretty smooth, there
were some areas that needed to be worked on. I sanded the handle down
to give it a fairly smooth and uniform shape: I did most of this work
outside since fiberglass is toxic. The finished dimensions of the handle
came out to 1¾" deep by 1 3/8" wide
at the center and 1 5/8" deep by 1¼" wide at both ends.
After sanding the handle down, I once again clamped it in my vise and
flexed the limbs by pushing on the tips. Still no flexing of the handle,
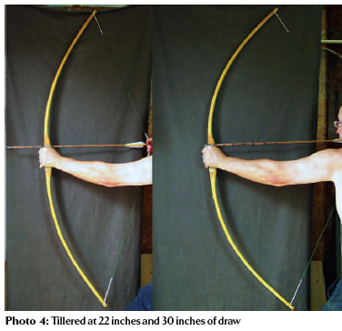
so I continued tillering the bow out. The overall length of the bow was
69" long
so I knew that I could get a 30" draw out of this bow. Tillering
the bow out was fairly easy and uneventful. I was quite concerned that
the handle would give out along the way but it didn’t give me any
indication that it was being stressed too much and easily held up to
the bow’s finished draw weight of 65# at a 30" draw. Even though the job I did with the fiberglass was pretty smooth, there
were some areas that needed to be worked on. I sanded the handle down
to give it a fairly smooth and uniform shape: I did most of this work
outside since fiberglass is toxic. The finished dimensions of the handle
came out to 1¾" deep by 1 3/8" wide
at the center and 1 5/8" deep by 1¼" wide at both ends.
After sanding the handle down, I once again clamped it in my vise and
flexed the limbs by pushing on the tips. Still no flexing of the handle,
so I continued tillering the bow out. The overall length of the bow was
69" long
so I knew that I could get a 30" draw out of this bow. Tillering
the bow out was fairly easy and uneventful. I was quite concerned that
the handle would give out along the way but it didn’t give me any
indication that it was being stressed too much and easily held up to
the bow’s finished draw weight of 65# at a 30" draw.
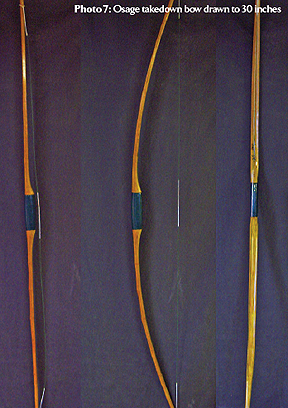 (photo
4): Tillered at 22 inches and 30 inches of draw (photo
4): Tillered at 22 inches and 30 inches of draw
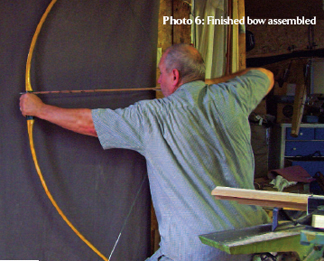
The final dimensions of the bow turned out to be 69" long overall,
with limbs 1¼" wide tapering to 3/8" nocks. The bow
took a bit of set tillering it out but still came out to the above mentioned
65# @ 30" of draw. Test-shooting it was surprisingly pleasant. It
had very little hand shock, and I was quite pleased at how well the bow
shot on target. Performance was not spectacular but more than adequate
and it shot the 550 grain, 30" arrows spined at 55# extremely well.
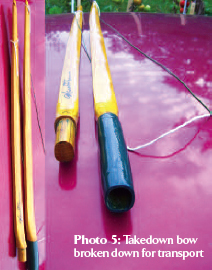
I applied a little bit of Forest Green spray enamel paint to hide the
unsightly color of the fiberglass and then I permanently glued the lower
limb into the handle with epoxy. A little bit of rasping and sanding
of the nocks and fades with a final sanding of the limbs, then an alternating
finish of Tung oil and shellac for the limbs and this bow was done (photos
5–7).
I’ve shot the bow many times since I finished it and I am always
pleased with how well it shoots. If you are thinking of building yourself
a two-piece takedown, perhaps you should consider this buildalong. The
most interesting aspect of this type of takedown is that it could be
made with a reflexed handle or a deflex handle just as easily as with
a straight handle. This gives one the ability to make different styles
of takedown bows. 
|