|
|
||||||||
|
|
|
||||||||
|
|
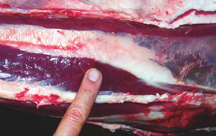
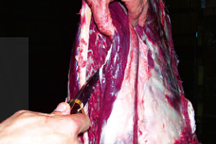
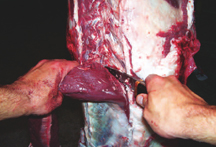
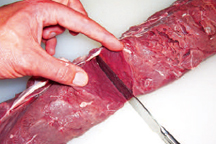
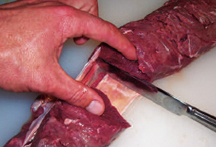
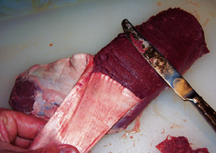
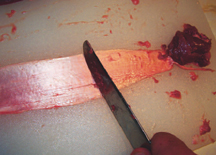
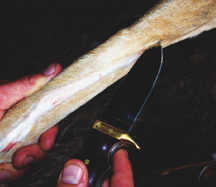
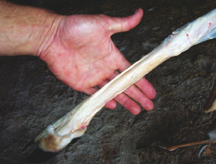
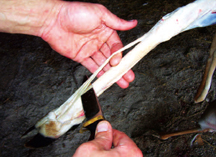
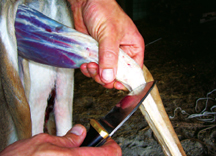
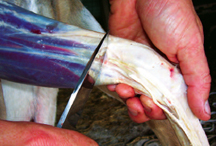
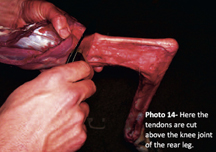
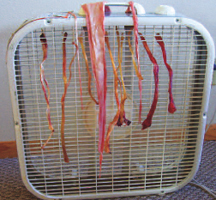
A common question among primitive bowyers, especially beginners, is, “What is sinew and how do you get it?” This article will not be a tutorial on how to butcher an entire deer; instead it will show the process for sinew removal. These techniques can be applied to other animals such as antelope, elk, moose, and buffalo. First off, sinew is just another word for tendons. Tendons are the strong, silverywhite connective tissue that attach muscle to bone. Ligaments are essentially tendons, the difference being that they attach bone to bone and are of very short length, making them unusable for our purposes. There are two different types of sinew used by primitive archers: back sinew and leg sinew. Back sinew lies in a flat ribbon on top of each backstrap, found on either side of the spine in quadrupeds (photo 1). The backstrap is the filet mignon, and these long, tender muscles provide the longest sinew found in the deer. The backstraps must be removed whole and the sinew removed from them before they are cut into steaks, otherwise the sinew will be ruined. When I process a deer, I hang it with the head up. This makes skinning and butchering easier for me, so keep this in mind as I describe the process. Many hunters hang their deer by the back legs using a gambrel. Either way works. Removal of Back Sinew Continue deepening each cut until you hit the top of the ribs. Once the ribs are encountered, begin pulling the meat away from the cut, using the knife to cut the backstrap free from the ribs (photo 3). Once the backstraps are partially freed from the ribs, cut across them at the uppermost incision (across the neck if the deer is hung head-up). You will then cut underneath the backstrap to free it from the top of the ribs (photo 4). This is an easy process because the backstraps are only held in place with minimal connective tissue. Continue cutting just above the ribs until the entire backstrap is free from the carcass. You should now have an intact “tube” of meat that contains an unbroken sheet of sinew. Repeat the process for the other backstrap. To remove the sinew, place the backstrap on a cutting board with the sinew side down. Use a very dull knife (a butter knife is ideal) to cut through the backstrap until you reach the sinew (photo 5). Do not use a sharp knife for this step because it can easily cut into the sinew and damage it. Once the sinew is reached, hold the knife at a 90 degree angle and begin scraping the meat away from the sinew while separating the meat with your fingers (photo 6). Continue scraping the backstrap free from the sinew until that portion of the backstrap is removed from the sheet of sinew. Then flip the backstrap over so the sinew side is up. Gently pull on the sinew and scrape the meat free until the entire piece of back sinew is removed (photo 7). To remove any adhering meat or fat, place the sinew on the cutting board and, using the same dull butter knife held at 90 degrees, scrape any remaining meat and fat off the sinew (photo 8). Again, avoid using a sharp knife as it will cut into the sinew. When the sinew is clean, allow it to dry, and it will last indefinitely until it is needed. Removal of Leg Sinew Use a sharp knife to cut through the skin on the inside of each leg, beginning at the toes and proceeding well above the knee joint (photo 9). Use caution when slicing the skin to make sure you don’t accidentally cut into the tendons and damage them. Once this initial cut is made, cut very carefully around the toes so the skin can be peeled away from the lower legs, exposing the sinew. Be very careful when making this cut around the toes; you only want to cut the skin, not the underlying tendons. Once the toe cut is made, use your knife to begin separating the skin from the toes, working toward the knee joint. When enough skin has been freed from the toes, simply grab the skin and peel it off toward the knee joint, exposing the underlying tissues (photo 10). The leg tendons come in long “rods” on the front and back of each leg, meaning that each leg will provide two pieces of sinew. Use a sharp knife to cut between the sinew and the leg bone, again being careful not to cut into the tendons themselves (photo 11). Do this for both tendons on each leg (front and back). Do NOT cut the tendons free at the toes at this point. Most people just cut the sinew off below the knee joint (photo 12). Don’t! If you cut the tendons above the knee joint you will gain several more inches of usable sinew that would otherwise be wasted. After the initial long cuts have been made along each leg bone, follow the tendons above the knee joint to find where they enter the muscle and cut them there (photo 13). Then, the sinew can be pulled away from the leg bone and pulled through the knee. Once this tendon is pulled through the knee, cut it free at the toes. The tendon on the rear of the back legs is covered by a sheath; the tendon itself goes through a hole whereas the sheath does not. This means the sheath will have to be cut a few inches shorter than the tendon. Cut through the sheath and notice how the tendon goes through the bone at the knee joint; cut through the sheath at the knee joint, and then cut the sinew where it enters the muscle several inches above the knee joint (photo 14). Cutting the sinew above the knee joint will produce leg sinew approaching the length of back sinew. This long leg sinew can be used for wrapping stone points or feathers onto arrows and even for sewing. If your only source of deer legs are those obtained from a processor, oftentimes the legs will be cut below the knee joint with a bone saw. Unfortunately, this also cuts the tendons into shorter lengths. They are still usable, and if that is your only source of sinew then by all means use them. But if you have the opportunity to obtain sinew from intact deer, the abovementioned method for sinew removal will provide considerably longer leg tendons (photo 15). Drying and Storing Sinew Helpful Hints on Using Sinew This next tip comes from my friend David Knight of North Carolina. When pounding leg sinew, it will flatten. Turn it on edge, and pound it flat again. But before separating the dry sinew into fibers, soak the pounded sinew in warm water for several minutes. When the sinew has softened, pull the sinew apart starting at the center of the bundle and work toward the ends. The soaked sinew is less likely to rip apart at the ends and the strands will be more uniform than sinew that is pulled apart dry.
|
Copyright ©2015
Primitive Archer Magazine
All rights reserved.