|
|
||||||||
|
|
|
||||||||
|
To begin the construction of the arrow, assemble as much information and photographs as possible of the type of arrow you wish to produce, (preferably color photographs, though black and white illustrations are a close second). Once you decide on the type of arrow you want to replicate, the next step is to begin to assemble the materials you will need to successfully reproduce the arrow.
You can be “stone age” and use a flint knife and sharp pieces of flint or chert if you so choose, but by the middle of the 19th century, metal hand tools were available and being traded to and used by the Plains Indians. Once you have assembled the materials, begin with making your shaft. I will use a split cedar shaft since split cedar is readily available locally and, if I make a mistake, I can replace the shaft quite cheaply. Most of the wood that grows locally where I live (photo 2) has a substantial pith and is soft. A shaft can be made from such local wood, but I would rather use split cedar as my shafting material. The length of a Plains Indian arrow shaft averaged between 25 and 27 inches long. You may, however, choose to make you reproduction arrow the same length that you actually shoot. Either length is fine. Choose a shaft that is as straight and without knots as possible. If the shaft is not straight, you will have to straighten it. Otherwise, you will have an arrow that will not fly straight. To straighten the shaft, I use heat and my shaft straightener which I made from an extra piece of deer antler (photo 3). I usually straighten the shaft once the shaft is a diameter within the parameters I want. This is slightly larger than what the finished product will be since you can always remove wood but you cannot add wood. This is especially true with the nockend of the arrow. It is noticeably bigger than the diameter of the shaft, and this difference in size should be reflected in the finished arrow. Many of the shafts of that time period taper from the middle of the shaft to the point and from the middle of the shaft back to the nock. A number of the Sioux arrows pictured in Jim Hamm’s book depict this tapering with included measurements (photo 4).
At this point, you have a shaft with the nock cut into it though it is not yet ready for a point and fletching. Cutting the groove for the point to be mounted is the next step. I do not mount the point at this time. The mounting of the point will be the last step in my reproduction process. To make the groove for the point, I use a small hand saw that is slightly smaller than the point. I can always remove wood both when making the nock and the groove for the point, but I cannot add wood should I take too much off. I next add the three grooves that seem to have been common on many Plains arrows. I do this with a tool that I constructed using a scrap piece of wood routed out to half the diameter of the shaft slightly protruding into the groove. The grooves are just deep enough so that the indentation in the shaft is noticeable but does not weaken the shaft in any way (Photos 7 & 8). To make the grooves, simply place the tool on the shaft and, with just enough pressure applied, slide it down the shaft either from the nock to the point or vice-versa. You may also take into consideration that when “grooving” the shaft that the grooves do not line up with where you want to put the fletchings. This is why I cut the nock in first, so that I can use it as a reference when “grooving” the shaft, thus insuring that the grooves and feathers are where they need to be located on the shaft.
Note that the turkey buzzard feathers are attached with real sinew and hide glue. However, if you only have artificial sinew and Fletchtite cement available, you can use those and still have an attractive reproduction Plains Indian arrow like that pictured in photo 19.
Many of the Plains Indian arrows were crested under the fletching, which means that this must be done prior to applying the fletching. I use “authentic materials” that come from the present. Mrs. Fletcher’s Whitening Solution is a coloring that I use, but I also use paint made from locally available materials. Adding just a smidgen of talcum powder (scented types have little sparkles that will make your paint shine once it dries) will thin out the paint and give it a bit of an antique look. There are other things that you can do to make your shaft look older, but I will save those tips for another article. In my research, I have paint meets another or simply ends are quite straight on the originals. I use tape to accomplish this. To apply one color, simply tape around the shaft the area that you will paint and if you want multiple colors, repeat the taping and painting after each color has dried. The arrows pictured are of two of a set of six Western Apache arrows that I am reproducing for someone. The feathers are Japanese hawk that came from “road kill.”
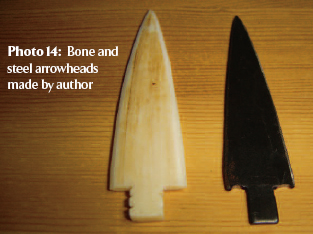
Now it is time to mount the point on the arrow. Typically, Plains Indian arrows were mounted with bone or steel points such as the two replicas pictured below. However, there is nothing incorrect with mounting a stone point in place of bone or steel. All that means is that your arrow will be representative of an earlier time period. (Photo 14)
Having chosen
the metal point to mount to the shaft, a groove must then be cut in
the shaft at the end opposite to the nock. Typically, and as is depicted
in many extant illustrations, the point was mounted so that approximately
3/8 to 1/2 an inch of the wood shaft extended onto the point to assist
in keeping it in place. You can apply hide glue and/or pitch inside the
groove cut for the insertion of the point and then insert the point.
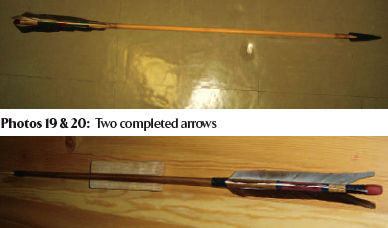
Allow a moderate time for the hide glue or pitch to harden and dry. The shaft has been made, the nock cut, the grooves grooved, the feathers fletched, and the point mounted. You now have a reproduction Plains Indian arrow that is ready to shoot or hang on the wall that you can be proud of. (Photos 19 & 20)
|
Copyright ©2016
Primitive Archer Magazine
All rights reserved.

 Making an accurate reproduction of a Plains Indian arrow is a hobby
that many archers have today. There are numerous sources of information
available to accomplish this worthy task. Available sources of information
include books, articles, published photographs, and museum displays.
Two noteworthy publications, Encyclopedia
of Native American Bows, Arrows, and Quivers by Jim Hamm
and another written and illustrated in the 19th century by Otis Tufton
Mason, North American Bows, Arrows, and Quivers, An Illustrated
History, are well written and handsomely illustrated with photographs
and drawings that will provide excellent information for anyone wanting
to replicate a Plains Indian arrow. In addition to these resources, Billy
Berger recently published a series of articles in Primitive Archer
Magazine and the accompanying photographs that supplement the written
information are superb!
Making an accurate reproduction of a Plains Indian arrow is a hobby
that many archers have today. There are numerous sources of information
available to accomplish this worthy task. Available sources of information
include books, articles, published photographs, and museum displays.
Two noteworthy publications, Encyclopedia
of Native American Bows, Arrows, and Quivers by Jim Hamm
and another written and illustrated in the 19th century by Otis Tufton
Mason, North American Bows, Arrows, and Quivers, An Illustrated
History, are well written and handsomely illustrated with photographs
and drawings that will provide excellent information for anyone wanting
to replicate a Plains Indian arrow. In addition to these resources, Billy
Berger recently published a series of articles in Primitive Archer
Magazine and the accompanying photographs that supplement the written
information are superb!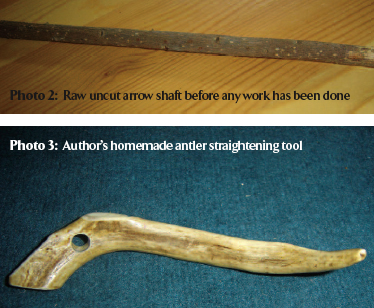 Using these available resources and the materials I have available locally,
I will detail how to construct a Plains Indian arrow. Not only will the
arrow be an accurate reproduction of a 19th-century Plains Indian arrow,
but it will also be one that you can shoot. The arrow I will detail is
probably closer to a Sioux arrow (no particular sub-tribe) than other
tribes of the 19th century. However, you are free to choose any of the
tribes of that period of history for replicating.
Using these available resources and the materials I have available locally,
I will detail how to construct a Plains Indian arrow. Not only will the
arrow be an accurate reproduction of a 19th-century Plains Indian arrow,
but it will also be one that you can shoot. The arrow I will detail is
probably closer to a Sioux arrow (no particular sub-tribe) than other
tribes of the 19th century. However, you are free to choose any of the
tribes of that period of history for replicating.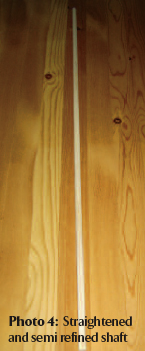
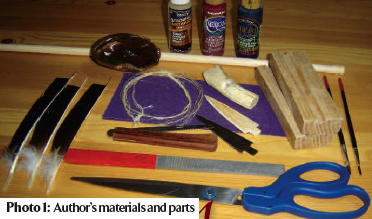
 As a minimum, you will need sinew (real
or imitation), some type of wood suitable for shafting material, feathers
(eagle and hawk were used on the originals, however you may only be
able to obtain buzzard and turkey). You will also need material for the
point of the arrow; this will be steel, bone, or stone, and some type
of bonding agent or glue to attach the feathers and point to the shaft.
If you want to crest your arrows, you will need paints and a brush. Tools
needed at a minimum are:
As a minimum, you will need sinew (real
or imitation), some type of wood suitable for shafting material, feathers
(eagle and hawk were used on the originals, however you may only be
able to obtain buzzard and turkey). You will also need material for the
point of the arrow; this will be steel, bone, or stone, and some type
of bonding agent or glue to attach the feathers and point to the shaft.
If you want to crest your arrows, you will need paints and a brush. Tools
needed at a minimum are: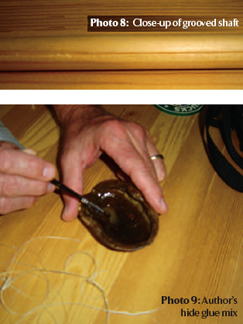 I mark off the length of the nock leaving some extra wood so that if
I make a mistake, I can easily rectify it by cutting off the wood that
is in error and making the nock end again. In photo
6, I have removed
enough wood to define the separation between the nock and shaft. Now,
I begin carefully removing wood but keeping enough so that the difference
in size between the nock and shaft is quite noticeable. This adds to
the authenticity of the reproduction arrow. When working on the nock,
I can choose to either have a vshaped groove or it may be slightly more
uniform in the shape of a “U” such as in photo 6.
I mark off the length of the nock leaving some extra wood so that if
I make a mistake, I can easily rectify it by cutting off the wood that
is in error and making the nock end again. In photo
6, I have removed
enough wood to define the separation between the nock and shaft. Now,
I begin carefully removing wood but keeping enough so that the difference
in size between the nock and shaft is quite noticeable. This adds to
the authenticity of the reproduction arrow. When working on the nock,
I can choose to either have a vshaped groove or it may be slightly more
uniform in the shape of a “U” such as in photo 6.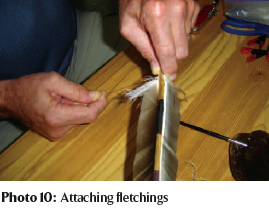 The shaft is now grooved and ready for the next step, which will be
to choose the hawk, and turkey buzzard but probably the hawk and turkey
buzzard will make the reproduction arrow look more accurate. I used turkey
buzzard to fletch the shaft and then began to mix the hide glue. I just
add water to dried hide glue to reconstitute it. That’s what I
use the small turtle shell for (Photo 9).
The shaft is now grooved and ready for the next step, which will be
to choose the hawk, and turkey buzzard but probably the hawk and turkey
buzzard will make the reproduction arrow look more accurate. I used turkey
buzzard to fletch the shaft and then began to mix the hide glue. I just
add water to dried hide glue to reconstitute it. That’s what I
use the small turtle shell for (Photo 9). Notice in photo 11, the “fluff” attached under the artificial
sinew—this is copied directly from an illustration in Jim Hamm’s
book, Encyclopedia of Native American Bows, Arrows & Quivers,
Volume 2. Compare the wrapping of the arrow above with artificial
sinew with the one pictured in the next picture. This arrow has turkey
buzzard feathers glued with hide glue and wrapped with deer sinew. (Photos
12 & 13)
Notice in photo 11, the “fluff” attached under the artificial
sinew—this is copied directly from an illustration in Jim Hamm’s
book, Encyclopedia of Native American Bows, Arrows & Quivers,
Volume 2. Compare the wrapping of the arrow above with artificial
sinew with the one pictured in the next picture. This arrow has turkey
buzzard feathers glued with hide glue and wrapped with deer sinew. (Photos
12 & 13)
 If you have crested your arrow, it is now time to fletch the arrow.
The average length of fletches on Plains Indian arrows was between 6
and 8 inches. Photographs and drawings of actual specimens bear this
out. The height of the arrow fletching is left to you. The average is
about ¼ to ½ inch, and many of the originals had fletches
extending beyond the nock. Hide glue is applied to each feather and then
the feathers are mounted at 120 degrees to each other on the shaft. I
then wrap the feathers with sinew to ensure they will remain mounted.
If you have crested your arrow, it is now time to fletch the arrow.
The average length of fletches on Plains Indian arrows was between 6
and 8 inches. Photographs and drawings of actual specimens bear this
out. The height of the arrow fletching is left to you. The average is
about ¼ to ½ inch, and many of the originals had fletches
extending beyond the nock. Hide glue is applied to each feather and then
the feathers are mounted at 120 degrees to each other on the shaft. I
then wrap the feathers with sinew to ensure they will remain mounted.

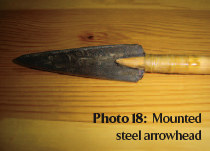
 I
normally have a long piece of sinew ready to use to wrap with once
I think the hide glue is dried sufficiently. I wrap the shaft behind
the point for a distance equal to 2/3 the length of the arrow point.
I wrap the sinew for this length because many of the specimens of actual
arrows appear to have been wrapped 2/3 the length of the arrowhead.
I can verify that wrapping the shaft for this length reinforces and
strengthens the shaft immediately behind the point, having shot one
of my arrows into a concrete wall (I missed the target, but the arrow
stuck 3/4 of an inch into the wall). This did not break the shaft and
only bent the point, which I removed, straightened, and remounted on
the same shaft.
I
normally have a long piece of sinew ready to use to wrap with once
I think the hide glue is dried sufficiently. I wrap the shaft behind
the point for a distance equal to 2/3 the length of the arrow point.
I wrap the sinew for this length because many of the specimens of actual
arrows appear to have been wrapped 2/3 the length of the arrowhead.
I can verify that wrapping the shaft for this length reinforces and
strengthens the shaft immediately behind the point, having shot one
of my arrows into a concrete wall (I missed the target, but the arrow
stuck 3/4 of an inch into the wall). This did not break the shaft and
only bent the point, which I removed, straightened, and remounted on
the same shaft.