|
|
||||||||
|
|
|
||||||||
|
|
To make a pickax handle flat bow, you can only use the billet method of construction. You will need two hickory pickax handles with the grain running across the widest part right through the length of the handle and with at least 9 to 12% moisture content (see The Bowyer’s Bible for information on seasoning wood).
For glue, I use 24-hour Araldite in a curing box. My curing box is simply two incandescent light bulbs as a controlled heat source and a thermometer. By using the right wattage, I can regulate the drying heat to about 100°F. You only have to make a curing box to fit the handle section of the bow, not the whole stave. In a well-made pickax handle flat bow, the handle section does not bend. I have never made a successful English longbow out of a hickory pickax handle; although, with perfect grain, perfectly matched handles, and a sinew backing, it should be possible. When I do make one, I will certainly back it with sinew. I tend to keep my handles in the corner of the attic or in the house for a short while before I start construction so that they will have the right moisture content. When I come to use them, I find they are just about right. You can use a moisture meter if you have one, or have them tested by a lumber company if in doubt. Too low in moisture content and you risk breaking the bow, too high and it will be weak and springy. Hickory pickax handles are very hard to match, but once matched they will make a superb flat bow—I know, I have four of them and I’ve used them in speed shooting for years. It is worth the effort. Two pickax handles may not come from the same tree or even from the same state, but once you succeed with a bow that has been properly tillered and backed with a suitable backing you will have created something that is both beautiful and resilient, a bow you can be proud of. I made one for my brother and he consistently shoots eighteen to nineteen arrows a minute out of it. That to me says a lot for hickory as an excellent and durable flat bow wood when it is treated in the right way and backed with theright material. This bow is backed with three layers of natural silk ribbon and has the grain running off the edge on one limb, but most important, both limbs match in perfect tiller; again, it’s worth the effort.
The weight of my brother’s bow draws 60lb at twenty-eight inches. I have one I use, which is 65lb at twenty-eight inches and 66" in length between nocks. Again, a good bow can be made from hickory pickax handles if you treat them right. Remember to keep the limbs as wide and as long as possible, at least 64" between nocks. Taper the limbs to the nocks from about twelve inches in from the nock ends. ALWAYS BACK YOUR BOW TO BE ON THE SAFE SIDE, and always try to keep over 64" between nocks unless you are backing it with sinew. Howard Hill believed that a longer bow is less sensitive and more stable than a short one; he was right. There are some good books on primitive bow making on the market should you need some help. Try the web sites for more information, they stock a wide selection. The only design I have found successful so far, using hickory, is the primitive flat bow that does not bend through the handle. The one I have had the most success with is one of my own designs where I use the full width of the pickax just below the head end as the guide to my final limb width, (about one and three quarter inches wide). I have made a flat bow and a longbow from a piece of 5" x 2" oak using the same stave. The longbow broke, the flat bow I still have and shoot. Its over two decades old, 68" between the nocks, 2 1/2" wide at the flare-out and goes down to 3/8" nocks. The limbs are slightly thicker than a hickory bow of the same design and weight from belly to back, and the grain is close and perfectly straight from nock to nock. I found the stave holding a door open at my local wood store, it had been doing so for years. I gave this stave a new life, and it’s one of the best flat bows I have ever made. I backed it with raw linen, as in England it is hard to obtain sinew.
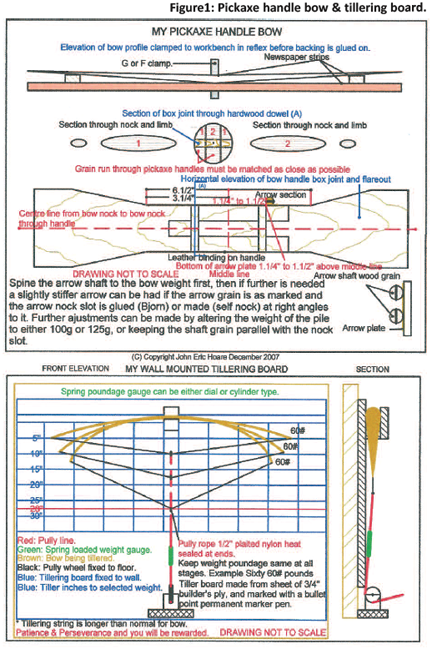
When you choose your pickax handles, make sure the grain runs horizontally across both the head end and the haft end and matches as closely as possible before making the joint. The head and the haft need to be made square in cross section for easier marking and cutting, even if the corners are still rounded. I prefer the box joint, as this design does not bend through the handle like the longbow. The joint runs at right angles to the grain. The job of cutting is made easier if you use a band saw, although a good fine-cut handsaw will do the job. The overall length of the joint is 4 1/4" long. When I cut the tongue end of the joint I try to keep the thickness of the tongue to about 3/8", which gives the shoulders of the groove part about the same thickness. Overall, thickness of the finished handle is about 1 1/8" to 1 1/4". To cut out the groove, I bore a hole through the bottom of the groove with a 5/16" drill and cut down to the hole with the band or handsaw, afterward cleaning the bottom out with a 1/4" chisel. Try to keep the joint as tight as possible. To glue the joint, I use the 24-hour drying Araldite. When the joint is clamped and glued, I insert the two hardwood 1/4"- diameter dowels at right angles to the joint and a small-glued wedge. The wedge is made from the waste of the tongue shoulders and tapered to a fine end into the small gap at the end of the tongue left there from forming the reflex. The wedge goes in from the belly side, filling the gap with strong wood and glue.
Before cutting out or tillering, make sure you have marked a center line on the bow blank from nock to nock. This line passes right through the center of the bow handle on the belly and back side; I use a string line to do this. Then, take the back of the bow down to a grain ring on both handles. As long as the center of the handle and the two nocks are in perfect alignment, even if you have a slightly snaky bow between the nocks, it will still shoot with accuracy when perfectly tillered. To tiller, I use a tillering board made from a 3/4"-thick sheet of building plywood mounted on my workshop wall and marked with horizontal and vertical lines for each tillering stage. To draw the bow to each stage, I use a block and tackle attached to a spring weight gauge (see figure 1). I prefer the board to a tillering stick in theearly stages because you can stand back as you pull on the block and view the bend of the limbs, working them lightly at each stage to train the limbs. Because speed shooting with long arrows is a disadvantage, I would not go any more than 28" for the final draw length unless you make the bow a little longer between nocks. Before I apply the backing, I have almost tillered the bow to its final weight. When the backing is on and dry, I finish the bow to its final weight, give or take a pound or two.
I am now ready to apply the fabric backing. First, I dampen the back of the bow to raise the grain. When it has dried, I sand the back lightly to give me a smooth clean surface. On this, I spread a layer of PVA glue. Then I take my first two strips of fabric and lay them one on top of each limb to either side of the clamped handle. This design of flat-bow does not bend through the handle so you don’t need to take the fabric under the clamp, just finish close to it. When the fabric is in place, I rub the glue well into it so that the fabric becomes a matrix for the glue. I then place the next layer on and do the same, rubbing more glue into the surface until I have a smooth finish.
Remember, never make a pickax handle flat-bow any less than 64" unless you plan to back it with sinew. I personally believe a bow can be made shorter than 64" if sinew is used, but it can be unstable. I have a brown hickory blank of 68" already made up just waiting for a sinew backing, I am very impatient to finish it. I personally find a weight somewhere between 50 to 65 pounds the ideal weight for speed shooting, using a 28-inch 5/16" arrow with three 5" helical fletches and brass bullet piles of 100 to 125 grains depending on spine. I prefer black Bjorn nocks over white parabolic feathers; hit a plastic nock and you still have a chance of saving the arrow, hit a self nock and the arrow shaft would split, resulting in a lost arrow.
I apologize if I have repeated myself; I have only done that for emphasis. Well there it is, have a go and see what you can come up with. You might spoil the few first bows, but with knowledge and perseverance, you will succeed. My brother’s bow is the second one I made and still going strong. You will never know until you try. Good luck. I can tell you it’s well worth the effort if in the end you have created a beautiful bow that shoots well. AUTHOR’S COMMENT: My pickax handle flat bow has been specifically designed for my indoor short-range ‘Relative-Speed’ games. It follows the string slightly to take the hardness out of the release. If I could have backed it with sinew I would have layered enough to give it a straight tiller, which would have the same result. To have a bow set in reflex for short distance shooting would be a disadvantage, as then the bow would be too sensitive and tend to kick in the hand. I have written a book to give the genuine instinctive archers and off-season hunters a game of skill which they can play professionally and thereby discover a super champion who comes close to the phenomenal skill of Howard Hill. The sport of modern archery needs this to justify itself in the eyes of the sponsor and the spectator. I may not be around to see it, but at least my book and the means to accomplish this will be out there. The photographs are shown with two types of nocks; one wrapped with unwaxed jute sail twine soaked in PVA glue and the other a conventional filed nock. The designs are from the Modoc Indian bow backs from a book I have on Early American Indian Tribes. By tillering to follow the string slightly, I have reduced sensitivity and gained a smooth and accurate bow. My favorite is the wrapped nocked bow and the one I shoot most.
|
Copyright ©2014
Primitive Archer Magazine
All rights reserved.

 Joined at their widest ends with a
suitable joint like a fishtail or, as I use, a box joint glued with two
hard wood dowels through the handle, my flat bows don’t bend through
the handle (see figure 1). The box joint I find is easier to
make than the fishtail joint. This joint makes the two matched handles
into a stave, which I like to glue together with a slight reflex from
belly to back. If the reflex should come out after use, don’t worry.
A bow that follows the string I find less sensitive and extremely accurate
at short distances. It is important though, to glue the reflex in at
the start (see figure 1).
Joined at their widest ends with a
suitable joint like a fishtail or, as I use, a box joint glued with two
hard wood dowels through the handle, my flat bows don’t bend through
the handle (see figure 1). The box joint I find is easier to
make than the fishtail joint. This joint makes the two matched handles
into a stave, which I like to glue together with a slight reflex from
belly to back. If the reflex should come out after use, don’t worry.
A bow that follows the string I find less sensitive and extremely accurate
at short distances. It is important though, to glue the reflex in at
the start (see figure 1). 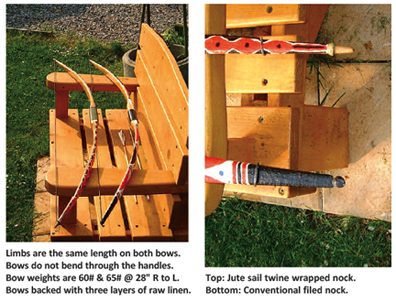 If you want to end up with
a sixtypound bow, then as you tiller at the differing draw facsimiles,
i.e., 12", 15",
If you want to end up with
a sixtypound bow, then as you tiller at the differing draw facsimiles,
i.e., 12", 15",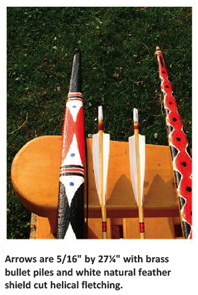 Do not try to make a flat-bow
too narrow in the limb unless you can back it with rawhide or sinew.
The ones I made have been backed with unbleached raw linen cloth or natural
silk, two to three layers thick. I always use white acrylic waterproof
PVA glue to apply the fabric backing and rub it in well. For sinew and
rawhide, I use a natural hide or animal glue, but I am going to experiment
with the PVA. In the following exercise, we will use a fabric backing
as it is much easier to obtain and apply. Although not as strong as sinew
or rawhide it keeps the bow safe. The glue used must be 100% waterproof
and is the same glue I use for my target faces. It’s a PVA solution,
which is water soluble when applied, but waterproof when dry.
Do not try to make a flat-bow
too narrow in the limb unless you can back it with rawhide or sinew.
The ones I made have been backed with unbleached raw linen cloth or natural
silk, two to three layers thick. I always use white acrylic waterproof
PVA glue to apply the fabric backing and rub it in well. For sinew and
rawhide, I use a natural hide or animal glue, but I am going to experiment
with the PVA. In the following exercise, we will use a fabric backing
as it is much easier to obtain and apply. Although not as strong as sinew
or rawhide it keeps the bow safe. The glue used must be 100% waterproof
and is the same glue I use for my target faces. It’s a PVA solution,
which is water soluble when applied, but waterproof when dry.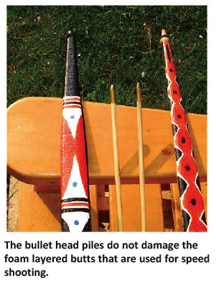 After gluing and while the joint is
still wet, clamp the handle section of the bow in the vice from belly
to back making sure you have a slight reflex in the bow toward the back.
Then drill the two 1/4"-dowel holes right through to the other side
ensuring a soft drive-in fit for the hardwood dowels. The dowels should
be positioned about one inch in from the joint ends. Do not take any
wood from the handle section at this stage; only the waste wood from
the joint has been removed so far. With the joint glued, doweled, and
still wet, I cure the finished joint in the curing box described above
for a full 24 hours.
After gluing and while the joint is
still wet, clamp the handle section of the bow in the vice from belly
to back making sure you have a slight reflex in the bow toward the back.
Then drill the two 1/4"-dowel holes right through to the other side
ensuring a soft drive-in fit for the hardwood dowels. The dowels should
be positioned about one inch in from the joint ends. Do not take any
wood from the handle section at this stage; only the waste wood from
the joint has been removed so far. With the joint glued, doweled, and
still wet, I cure the finished joint in the curing box described above
for a full 24 hours.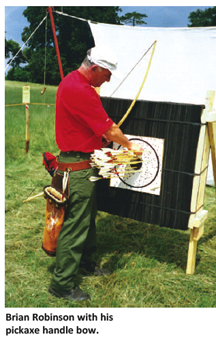 To set the bow up for the backing, I first make a clean flat surface
on the workbench. This I cover with several sheets of old newspaper to
take the length of the bow. I take two wooden blocks of 4" x 2" section
about 6" long, which I place under the belly of the bow at about
8" to 12" from the nock ends. I then place between the blocks
and the belly of the bow several small sheets of newspaper a little larger
than the top of the blocks. I use the newspaper to keep the blocks from
sticking to the bow limbs and the bow to the workbench when I have glued
on the backing. I then take a G or F clamp and clamp the center of the
handle to the bench until the belly side of the handle is forced down
far enough to touch the work surface and newspaper. Always use several
sheets of newspaper so the glue does not soak right through to the bench
surface. The clamp pressure puts the bow further into reflex and under
tension. You can move the blocks in or out to adjust the reflex to suit.
Mainly my fabric backings are for safety, although they do take a little
tension. My first choice of backing for a primitive speed bow is sinew.
It adds greatly to bow performance and safety. In my next bow I am going
to try stinging nettle fibers laid at least 1/8" thickness.
To set the bow up for the backing, I first make a clean flat surface
on the workbench. This I cover with several sheets of old newspaper to
take the length of the bow. I take two wooden blocks of 4" x 2" section
about 6" long, which I place under the belly of the bow at about
8" to 12" from the nock ends. I then place between the blocks
and the belly of the bow several small sheets of newspaper a little larger
than the top of the blocks. I use the newspaper to keep the blocks from
sticking to the bow limbs and the bow to the workbench when I have glued
on the backing. I then take a G or F clamp and clamp the center of the
handle to the bench until the belly side of the handle is forced down
far enough to touch the work surface and newspaper. Always use several
sheets of newspaper so the glue does not soak right through to the bench
surface. The clamp pressure puts the bow further into reflex and under
tension. You can move the blocks in or out to adjust the reflex to suit.
Mainly my fabric backings are for safety, although they do take a little
tension. My first choice of backing for a primitive speed bow is sinew.
It adds greatly to bow performance and safety. In my next bow I am going
to try stinging nettle fibers laid at least 1/8" thickness.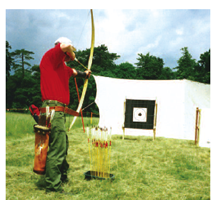 Next, I mold the backing to the bow while it is still wet, right up
to and covering the nocks to take out any air bubbles. I leave it to
set for about six hours after which I trim any overhanging pieces of
fabric with a sharp Stanley knife or new razor blade. Do not be afraid
to use a bit of pressure when rubbing the glue into the fabric. The glue
must be worked well into the fabric to be of any use. I would not put
any more than three layers of fabric on. When the bow has been roughly
trimmed, and after it has dried for at least twelve hours, I rub a hard
piece of wood, smooth plastic, or large smooth pebble all over the fabric
surface to burnish it smooth. This process helps to expel any air bubbles
which may still be trapped there. After I have finished this, I leave
the bow for a whole week in a warm temperature to mature before I touch
it again. I tend to be very impatient at this time, but I know I must
wait for the glue to harden. When the clamp finally comes off, I finish
the bow to its final tiller and apply the finish. I finish it in the
normal way, and I will not use it for at least three weeks after the
glue has set. Again I become very impatient!
Next, I mold the backing to the bow while it is still wet, right up
to and covering the nocks to take out any air bubbles. I leave it to
set for about six hours after which I trim any overhanging pieces of
fabric with a sharp Stanley knife or new razor blade. Do not be afraid
to use a bit of pressure when rubbing the glue into the fabric. The glue
must be worked well into the fabric to be of any use. I would not put
any more than three layers of fabric on. When the bow has been roughly
trimmed, and after it has dried for at least twelve hours, I rub a hard
piece of wood, smooth plastic, or large smooth pebble all over the fabric
surface to burnish it smooth. This process helps to expel any air bubbles
which may still be trapped there. After I have finished this, I leave
the bow for a whole week in a warm temperature to mature before I touch
it again. I tend to be very impatient at this time, but I know I must
wait for the glue to harden. When the clamp finally comes off, I finish
the bow to its final tiller and apply the finish. I finish it in the
normal way, and I will not use it for at least three weeks after the
glue has set. Again I become very impatient!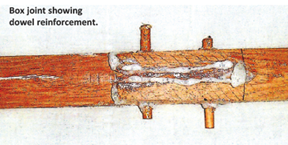 Both my bow limbs are the same length
from middle line to bow nocks. The handle section is 6 1/2" with
3 1/4" below and
3 1/4" above middle line with the bottom of the arrow plate positioned
between 1 1/4" to 1 1/2" above middle line. This
gives me a hand grip of between 4 1/2" to 4 3/4", my arrow
being shot off the hand. The bow tillered to sixty pounds draw weight
at 28" with a nocking point of 3/8" to 1/2" above center
gives me a sweet shooting flat bow with no feather burn, which is perfect
for speed shooting (see figure 1).
Both my bow limbs are the same length
from middle line to bow nocks. The handle section is 6 1/2" with
3 1/4" below and
3 1/4" above middle line with the bottom of the arrow plate positioned
between 1 1/4" to 1 1/2" above middle line. This
gives me a hand grip of between 4 1/2" to 4 3/4", my arrow
being shot off the hand. The bow tillered to sixty pounds draw weight
at 28" with a nocking point of 3/8" to 1/2" above center
gives me a sweet shooting flat bow with no feather burn, which is perfect
for speed shooting (see figure 1).