|
|
||||||||
|
|
|
||||||||
|
High Performance R/D Bowby Marc St. Louis Alot of people are making what many call R/D bows these days. I consider them more as D/R bows because, to me, a bow starts at the handle with the limbs flowing out from there. Most of these bows are a simple composites because they are usually an assembly of two separate parts: the core wood and the wooden backing strip. These two parts are glued up into the required shape. The "D" in such bows stands for deflex. The deflex angles the limbs in towards the archer at the handle. Deflex can be glued in with the backing strip or through the use of billets, and it can be moderate or severe. Quite often, the more severe deflex is glued in with billets. I always glue deflex in regardless of whether it is a mild or highly deflexed bow, mainly because I find it is much easier to do and has a better end result. The "R" stands for reflex which is what is done to limbs to make them curve away from the archer; generally the bow is reflexed a few inches. Reflex is also often glued in. However, I often reflex a bow's limbs through a combination of heat and glue, especially when I am working with a white wood or Osage (heat reflex first, then glue in more reflex with the backing). The very dense tropical wood species do not react well to high heat so these are strictly glued-in reflex. Reflex allows the bow to store a certain amount of energy at brace and results in the high string tension needed for high performance. The more reflex, the higher the string tension. There is a point of diminishing return when reflexing though, and sometimes too much reflex can introduce instability in the limbs. This instability can give one fits; as a rule, I try to keep the overall glued-in reflex to less than seven inches. These types of bows have the potential for very high performance, but sadly many of them are made in a less than optimum profile. The bow that I describe how to build is a simple composite, and the profile is one that I have found to have very high performance. I use Osage billets for the core wood with hickory backing strips. Hickory makes an excellent backing for Osage and a plain sawn backing strip, which I will use here, is a very reliable backing for highly stressed bows. The bow will be built to make full use of the design and tap into its performance potential.
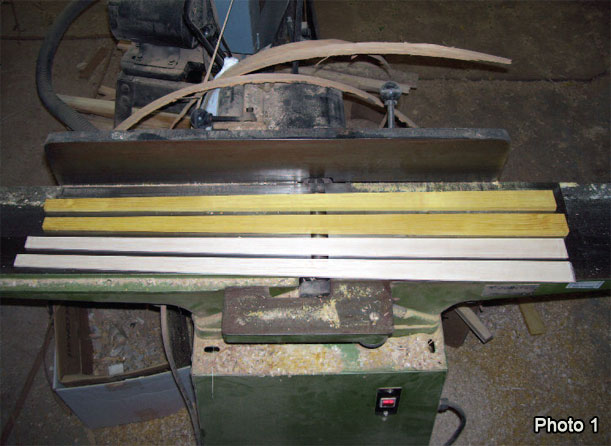
To begin, prepare two Osage billets by dressing them up on a jointer. The billets are 31" long with a 2" tapered finger joint that will result in a bow about 60" long. They are dressed up to about 5/8" thick by 1 1/4" wide at the joint end tapering to just over 1/4" thick by 5/8" wide at the tips (photo 1). This can result in a bow of at least 70 lbs of draw weight at a draw length of 28"; the bow in this case will be of a hunting weight between 50 and 60 lbs. Second, cut the hickory backing strip. A one-piece backing strip is best, but a twopiece backing can also be used with a lap joint in the middle. I used a two-piece backing strip. These strips are plain sawn from a board with a pristine back ring. They come out to just over 1/8" thick after the belly side has been planed smooth. Then taper them to fit the shape of the limbs. I also thickness taper the backing slightly (photo 1). the billets are prepared, cut in a tapered finger joint two inches long using a band saw (a previous issue of Primitive Archer shows how this is done). The next step is heat treating and reflexing the limbs. After scraping the belly of the limbs into a shallow D-section, start the heat treating process five inches from the splice. This is where the handle laminations will end. Continue heat treating to within a couple inches from the tips. Both limbs take about four hours to complete (further information on this process is available in The Bowyer's Bible, Volume 4).
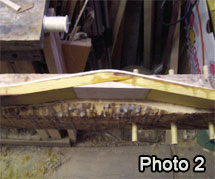
Now that the splice is solid with little likelihood of moving, glue a power lamination onto the back to further strengthen the splice. The power lam goes between the core and the backing. The power lam's dimensions are: 1/8" thick by 1 3/8" wide by 9" long. It is feathered out at both ends to a knife-edge (I used HHB here again). This lamination will increase the thickness around the splice and handle area to make sure it will not flex once the bow is finished. Glue the power lam in using TB3 (photo 2). Note that the order of some of these steps can be moved around. For example, you could glue the billets together along with the triangular reinforcing piece before heat treating. A bow made from a high density wood such as Ipe that does not need to be heat treated will be done this way. However, the power lam should not be done before the heat treating process as it extends close to that part of the limb that will be heat treated, and the high heat could destroy the glue bond. Now comes the fun part, gluing the backing strip. Some mental preparation beforehand is a good idea here. You should be well prepared with all that you will need at hand and doing a dry run would not hurt either. I use 1/4" by 3" rubber bands as clamps and five of them are just enough for a good tight bond. There are different methods of clamping, all of which can produce good results. Place a block of wood under the handle directly in the center so the bow is supported with the limbs just touching the gluing board. The board I use is made so that the bow can be banded every inch and a half. Make sure both the core and backing strip are well coated with glue (in this case TB3). First, simply lay the backing on the core. Place a spring clamp on the tip to make sure the strip doesn't slide off during the next part. Then, starting at the handle, securely clamp down the strip with an adjustable clamp. Next, clamp the backing with the rubber bands to just past the power lam. At this point, I start to prop the limb tips up to add more reflex; to help the process, I have specially-made supports to prop up the tips. I have two supports, each of different height; the one I use will determine how much reflex I add to the bow. Once the tips are propped up, continue banding the bow, supporting the limb every few inches with small blocks of wood of varying heights. If the limbs are not supported, the rubber bands can exert enough force to actually collapse and break the limbs (photo 3).
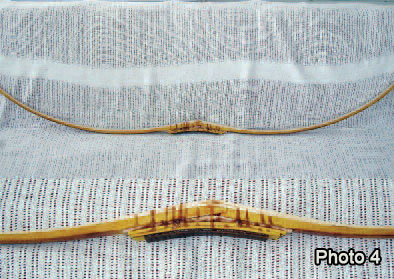
Begin by rounding off the small triangular piece of HHB that was glued in initially so that the transition where it meets the core is smooth. Then glue in the 1/8" thick strip of HHB (9" long) with TB3. The fit of this lamination should be about as perfect as you can get it, and you will likely have to play with it to get a perfect fit. After gluing this first HHB lamination, I select another lam with good gluing properties, sometimes a wood with a bit of color such as black cherry, walnut, or another white wood. After that, I switch to the more dense and oily tropical woods for more color. Doing the handle this way is more likely to result in a trouble-free bow when you are done. Generally, four or five 1/8"-thick laminations are needed to build up the handle (photo 4).
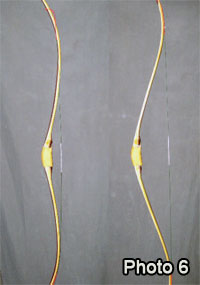
Now that all the parts are glued on, it's time to start tillering the bow. This being an Osage bow, I will keep the shallow round belly that was initially scraped in for heat treating. I would do the same with HHB, yew, or any of the tropical woods commonly used for bows. With wood species such as maple, white ash, or black locust, I prefer a flat belly. With a padded vise, clamp the bow sideways with the back facing towards you. Push on the limb tip and examine the bending limb. Use a pencil to mark any stiff spots and scrape wood from those areas until the limbs bend smoothly. The outer limbs should hardly bend at all here with most of the bend concentrated on the inner to mid limbs (photo 5). After the limbs are tillered to bend moothly, they still need to be balanced with each other and tillered to brace height before the bow can be braced. File in shallow nocks with a small round file, and select a long string that just fits on the bow with no slack. Once again, clamp the bow at the handle in a vise, this time with the belly facing outwards. Check the limbs with a T-stick for balance at a short draw. If one limb is stronger than the other, reduce its strength by scraping until both limbs have essentially the same bend. With the use of a T-stick, the bow is progressively tillered to a longer draw until it reaches brace height, or just above. Take your time and pay careful attention to the tillered shape at this point—you will reap the rewards when you first brace the bow. Now that the bow's limbs are balanced, have the proper bend, and the bow is tillered to brace height, make a short string for it and brace it for the first time. See photo 6 for the profile the bow should have once braced. Now that the bow is braced, it needs to be tillered to the proper draw length. In this case, the bow will be tillered to a 28" draw. I use a T-stick until I get to about 20" of draw. This way I can examine the bow from many different perspectives, such as dead on to see how the limbs compare to each other, or by sighting down the edge of the bow's limb while held back with the Tstick to see how it bends. I can look at both sides of the limbs to see how they compare or sight down the back to see if there is a tendency for the limbs to twist. Even sighting down the limb while it's clamped in the vise and while the string is held back to partial draw with the T-stick will give you a useful perspective of the bow. Until about 20" of draw, I find a T-stick an invaluable tool, but care must be exercised when it's being used because it can become a projectile.
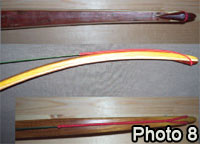
You will notice that most of the work being done by the limbs is located from the inner limbs to about mid limb. The limbs are bending smoothly with the outer limbs hardly working at all and the limb tips remaining stiff. The profile seen in the braced picture (photo 6) will give you the best performance and durability. The limb tips should be stiff for about 4 to 5" and should not flex at all, yet they need to have excess mass removed. The tips should not be much more than 3/8" wide at the nocks and the last 4" of the tips should not be much wider. This particular bow has the string resting on the limbs so I have left them a bit wider. These narrow tips have low mass and also low wind resistance. Having the string lie close to the limb tips at brace height increases string tension which can boost performance. The downside to this is that increased tension makes the bow a bit more sensitive to string alignment. Leaving the tips wide while tillering will give you some leeway in case you need to adjust string tracking. Once you finish tillering, start to narrow the outer limbs. Trace a line on both sides of the string at the tips and remove excess wood to within 1/4" of this line. The width of the limb tip should run to about 1/2" and at the nock it should be about 3/8" wide. Doing this will keep tip mass low and boost performance. Then it's just a matter of dressing up the tips with overlays so that an FF string can be used or just for looks (photo 8).
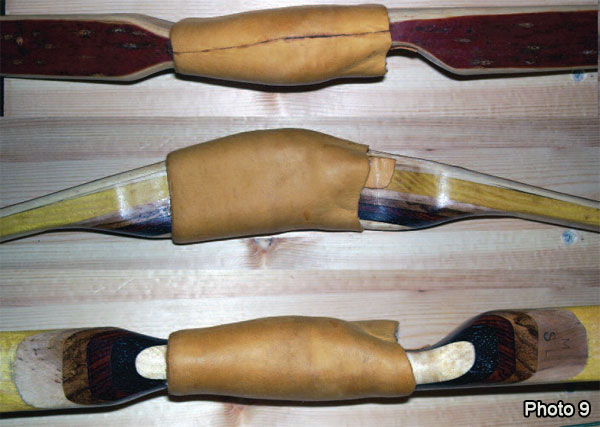
The last part is the handle and arrow pass. I prefer a carved-in arrow pass with a leather shelf rather than a cut-in shelf, but this is just a matter of preference (photo 9). Apply a sealant of your choice, and your high-performance R/D bow is finished and ready to use.
|
Copyright
©2015 Primitive Archer Magazine
All rights reserved.
 Next, glue the billets together in an appropriate amount of deflex; in this case about 40 degrees. Once the billets are glued together, shape a small triangular piece of hardwood (I use HHB here) to fit the inside angle of the splice joint. I often use HHB for strengthening because it glues very well and is strong and elastic. This triangular piece of wood not only fills in the sharp angle that the splice creates, it also strengthens the splice in preparation for the next steps in construction. Seal the splice on the back of the bow with packing tape and glue in the triangular piece of wood using good gap filling glue. I use G2 epoxy, making sure to use enough glue to fill all the voids.
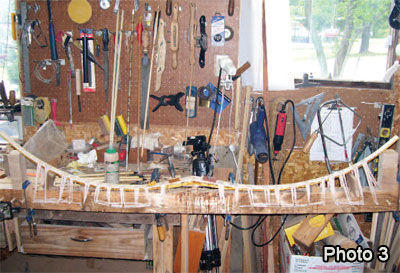
 Once the bow is glued up, clean excess glue off the sides and bring the shape closer to that of the finished bow. The bow still needs a handle, and I prefer one made of several laminations because they are stronger. I have learned from experience that short, highly-stressed bows with limbs that work close to the handle must have the best wood as a first lamination next to the core. Once again, I use a 1/8" thick strip of HHB for this because of its gluing properties, strength, and elasticity. I have used white ash in the past, but the porous spring growth in the ash sometimes creates problems that create the possibility of failure. I avoid Osage or any other wood species with ring porous wood for the same reason. I also avoid oily tropical wood species because problems can also develop with them.
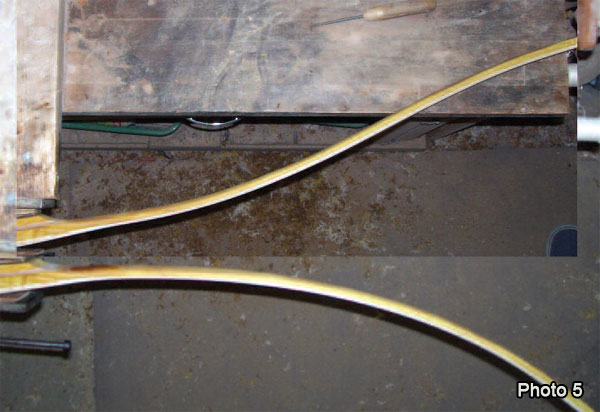
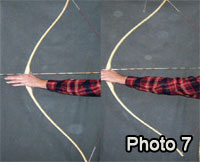 At this point the bow's tiller should be well sorted out and nothing more than a touch up here and there should be needed as the bow is exercised out to full draw. At 20 inches, I switch to a digital camera and take a picture of the bow while it is drawn so I can examine the picture on my computer, rotating it 360 degrees to see the bow from different views. In photo 7 you can see how the bow should bend at 20" of draw and how it should look at full draw.