|
|
||||||||
|
|
|
||||||||
|
|
A dream hunt warranted a new elk hunting bow and a special set of arrows, so back to the PA site with the news of our upcoming adventure and lots of questions to anyone that has had such an adventure. I wanted to make a short, sinew-backed static recurve for this hunt and that’s where the story of “Elkie” begins. Over the years I have collected and used Osage orange (Maclura pomafera) for bows and knew that this was the wood I wanted to use for a hunting bow because of its toughness and resilience. I decided on a 60-inch bow with slightly recurved static tips, which is similar to a bow that Gary Davis had taken an elk with a few years ago. I also wanted to add a sinew backing, like Gary’s, to give this bow that little extra oomph! So back on the PA site, I went to see if anyone had a little extra sinew that they were willing to trade. Trading is the way many of us get materials that we don’t have readily available to us, and “Crooked Bow” (Charlie) spoke up and said he had some elk leg sinew that he would send me for my new bow. A few weeks later I received a package in the mail from Charlie, and when I opened it, I found three baggies with three different lengths of sinew, already shredded and ready to use. The medicine for this special bow and hunt was already being accumulated.
With my electric heat gun and a little olive oil, I recurved the last 4 inches of each limb. I had left the tip areas of both limbs full width because I knew further adjustment would be needed later— either by taking a little wood off one side or the other or by reheating and adjusting the hot wood. Now, it was time to shape the limbs, both the working parts and the tips. I began to reduce the belly wood, all the while floor tillering to check for even bending along each limb and to compare the strength of each. When she hit the 4 to 5-inch floor tiller bend, it was time for the long string and tiller tree.
My tiller tree is a 2x4 bolted vertically to my basement cement block wall. On the top of the 2x4 is a small block that the bow handle rests on. At the bottom, a pulley is attached and a 10-foot piece of nylon rope runs through it. An S-hook on the end of the rope hooks over the bow string. Early on in the process, the tiller “long string” attaches to each limb tip but hangs loosely below the bow with no tension on the limbs. As the tiller rope is pulled slightly, you can see the bend of each limb from about 6 feet away so a good comparison can be made. When the limbs can be pulled to about 6 to 8 inches and both limbs seem to be bending evenly and together, it’s time for a regular length bowstring and a low brace height of about 4 inches. By bracing at this point, you can tell how the limbs are bending, and, most importantly, if the string is tracking down the center of each limb. This is especially important for a recurved bow. If everything is done properly, it is usually just a little adjustment of each limb tip with heat that will have the string lining up with the center of the bow. I always leave the 4-inch handle area full thickness and width until the very last. By doing so, I have a place to clamp the “to be” bow without damaging the final finished bow. Also, a little alignment can be made by removing wood from one side of the handle area or the other as I shape it. The bitby- bit wood removal from the belly of each limb means that you must check and recheck the bend on the tiller tree. By exercising the wood as I go along, a little at a time, the limbs come to shape with good even bending in the working portion of each of them. I was looking for a bow of about 55-60 pounds after the
sinew was applied and cured and knew the sinew would add about 10 pounds
of draw weight when fully cured. With that, I knew a bare bow of about
50 pounds was in order. As I checked the bend of each limb, I would periodically
use a bow scale to see how far At this point in the process, and even though the handle was still its full width and thickness, I cut string groves with a chainsaw file and strung the bow for its first time to the ultimate brace height of 5 1/2 - 6 inches: my fistmele. I took her out to the target butt to see how she shoots, for this would let me know whether she was just a shooter or a good shooter…and she was a good shooter, putting three hunting weight arrows where I was looking, from 15 yards.
Now it was time to apply the sinew backing to my new hunting bow. This was done in three sessions, with a month of drying time between each session. The back of the bow was scored with a toothing plane blade to insure good adhering of the sinew/Knox gelatin “hide glue” to the back of each limb. I then degreased the wood of its natural oils and the oils from my hands with a good scrubbing with acetone. After the residual acetone had evaporated and before more natural oils could come to the wood’s surface, I sized the back of each limb from the handle to about 6 inches from each limb tip with warm glue. I used Knox gelatin as glue for several reasons. Knox is readily available from your grocery store, it’s quite inexpensive, and basically it is highly refined hide glue. Before prepping the bow and adding the sinew, I reverse strung it and lifted the string to where the tips had about 4 inches of backset. This helped to pre-stress the limbs to give the bow its extra power. I started with the longest strands of sinew that Charlie had tediously shredded and sent to me. I dipped a small bundle of the sinew in the warm glue, squeezed out the excess, and laid it down the center of each limb, overlapping the ends a bit. As this was done, I worked my way towards the edges of each limb to insure good coverage with the sinew. The bow remained reverse strung until the sinew had cured for a month, and, by the end of that month, the tie up string was slack. The sinew was doing its job. Sinew shrinks as it cures and will draw up the wood it is attached to. After the curing time, I applied another course of slightly shorter sinew, filling in the spaces left between the first course and trying to get a good even coverage. The reverse strung bow was then put back up for another month of curing. With the addition of each course of sinew and glue, moisture was absorbed into the wood and I felt a month of curing was a good idea to remove this added moisture. For the third and final course, I used Tite Bond III carpenters glue to apply the sinew. I knew the TBIII was compatible with the sinew and Knox glue I had already used and wanted the added protection of its waterproof properties. The third course of sinew was the shortest of the three sizes Charlie had sent and was basically to fill in any voids and uneven spots along the back. After each layer of sinew was added, I wrapped each limb with strips of cloth to help hold down the sinew for a relatively smooth backing. When the third course had cured for a week, I un-wrapped the cloth strips and added a timber rattler skin covering over the back of each sinewed limb. This was also done with TBIII glue, and it adds a bit more moisture protection as well as beautiful natural camo covering. Then the cloth wrapping was re-applied and the bow went back for a few more weeks of curing time.
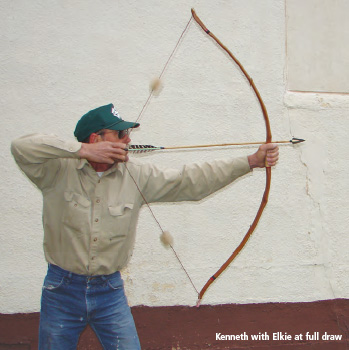
For the handle wrap I used rattan chair caning because it is attractive and gives a good slip resistant grip, even in wet conditions. Under this wrap at the arrow pass I used a small wedge of shoe leather, saturated in super glue, as an arrow rest and locator. Then I used more red silk to secure the sinew/snake skin at the handle and to decorate the handle area. I wanted a good weatherproof finish for this bow so I applied a few coats of Massey finish (2 ton epoxy thinned with acetone); a few coats of Tru-Oil, a linseed oil gunstock finish; and a quick spray of satin poly. The polyurethane was primarily to eliminate the shine of the Tru-Oil. The bow was completed several months before our trip to elk country in late August, so I had plenty of time for shooting to break her in and to be sure she was up to the task ahead. She settled in at 56 pounds at 26 inches, which was just about perfect for me, and shot a 600gr hardwood shoot arrow with authority. With the reason for building this special bow being an elk hunt, and the elk sinew that Charlie had sent and the elk antler for the tip overlays that Kenneth had sent, her name popped into my head … “ELKIE.” An excellent name for an excellent elk hunting bow, but this ain’t the end of the story of “ELKIE.” Earlier this spring towards the end of the school year, an acquaintance of mine who teaches in a local private school asked me to speak to her classes one morning to show off my wooden bows and arrows, my collection of Native American artifacts, and modern litchis’ made by some of my friends. Needless to say, I was thrilled to show off something I’m so passionate about, to spread the word, and to “PASS IT ON” to another generation. When I got to the school that morning, Yvonne met me in the parking lot and helped me carry my goodies to an outdoor pavilion on campus. The first class showed up and seemed somewhat interested as I showed off and explained what I had brought and how the Native Americans used it. When the second class showed up, they also were very interested and asked lots of questions that I tried to answer so they could truly understand. Towards the end of the class, one young man asked me if I would shoot a bow for them. I picked up “Elkie,” explained the building process as I braced her and prepared for the shot into a dirt bank behind the pavilion. As I placed an arrow on the string, pulled her to full draw, and released, I heard a sickening “POP” sound. The kids were pleased with the shot and unaware of the problem. I immediately unbraced “Elkie” and laid her down on the table and asked if there were any more questions from the kids. Just then the class bell rang, and they were gone before I knew it. As I was packing everything up to leave, I noticed that about 6 inches of the sinew backing had lifted off the bottom limb near the tip and a sick feeling came over me to see the injury “Elkie” had developed.
The first thing I did was to remove the silk wrap at the damaged end of the sinew/snake skin. Then I lifted the sinew “sheet” to inspect what was underneath to be sure there was no serious damage; fortunately, there wasn’t. The sinew had just lifted off of the scored Osage in one clean sheet for about 6 inches. I poured in some acetone and wiped the wood and sinew to degrease it, added a liberal amount of TBIII to both surfaces, and wrapped that area with cloth strips. After the repair was completed, I placed “Elkie” on top of the hot water heater for a week or so to be sure the glue was completely cured. When the curing was done, I un-wrapped the repaired area, removed the excess glue and inspected the repair very carefully. I wanted to be sure it was fixed. After some light scraping and sanding it was time to add another silk wrap, set it in super glue, and spend the next three or four days adding a good finish. This summer, “Elkie” and I went to three different 3D shoots where I put her through her paces, and she preformed well. Each day when I got home from work, “Elkie” and I would go out to the target butt and I’d shoot a couple of dozen arrows with her. All in all, I guessed I have shot about 500 arrows since the repair and the start of my elk hunt a week ago. As I write this story, I’m in elk camp along the Salt Creek drainage of the San Juan Mountains after six days of morning and evening hunting. Even though I haven’t had the opportunity to take an elk, “Elkie” has handled cool moist mornings, warm afternoons, and a few afternoon rain showers and come through like a champ, holding her original weight no matter what. In a few days I’ll be leaving Colorado after one of the most exciting hunting trips I’ve ever taken but I think “Elkie” will remain behind, here in Colorado. After all, she was thought up and constructed with Colorado elk hunting in mind. This may be my one and only elk hunting trip, and “Elkie” deserves better. She will be a gift to Kenneth for the invitation to hunt with him and for the fantastic time he has shown me in this exotic, to me, environment. Kenneth has gone way above what I expected of him but that is another story for another time. So, “Elkie,” you will have your chance to do what you were meant to do with someone more capable than I, and I know both of you will come through with flying colors. Aim small, miss small!
|
Copyright ©2016
Primitive Archer Magazine
All rights reserved.

 About a year ago “Little John,” a regular on
the Primitive Archer website, asked, “What
would be your dream hunt?” With little hesitation, I replied
back that I had always dreamed about hunting elk. A few days later,
Kenneth (Little John) sent me a private message through the Primitive
Archer website asking me if I would like to come out to
Southwest Colorado to hunt elk with him in the San Juan Mountains
just north of Durango. This would be a non-guided backpacking hunt
at the end of August of 2006. Needless to say, I was thrilled and,
after checking with my wife, the plans were made. Marcia, my wife,
had visited the Four Corners area of the Southwest the year before
and knew that I couldn’t turn down such an opportunity. So,
with an OK to Kenneth it was time to start planning my trip, gather
the necessary equipment, and get myself in shape.
About a year ago “Little John,” a regular on
the Primitive Archer website, asked, “What
would be your dream hunt?” With little hesitation, I replied
back that I had always dreamed about hunting elk. A few days later,
Kenneth (Little John) sent me a private message through the Primitive
Archer website asking me if I would like to come out to
Southwest Colorado to hunt elk with him in the San Juan Mountains
just north of Durango. This would be a non-guided backpacking hunt
at the end of August of 2006. Needless to say, I was thrilled and,
after checking with my wife, the plans were made. Marcia, my wife,
had visited the Four Corners area of the Southwest the year before
and knew that I couldn’t turn down such an opportunity. So,
with an OK to Kenneth it was time to start planning my trip, gather
the necessary equipment, and get myself in shape.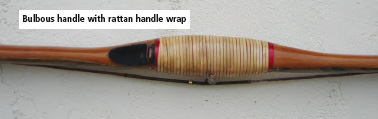 I cut the Osage stave to length and brought the width to
1 1/2 inches for its full length, then started reducing the back of the
stave to one continuous growth ring. I took a lot of care to not violate
this important back ring even though I knew the sinew would hold it together
later. Then, I marked out the 4-inch handle in the center of the stave,
added 1 1/2 inches on either side of the handle for the fadeouts, and
started reducing the belly of each limb to a workable thickness.
I cut the Osage stave to length and brought the width to
1 1/2 inches for its full length, then started reducing the back of the
stave to one continuous growth ring. I took a lot of care to not violate
this important back ring even though I knew the sinew would hold it together
later. Then, I marked out the 4-inch handle in the center of the stave,
added 1 1/2 inches on either side of the handle for the fadeouts, and
started reducing the belly of each limb to a workable thickness.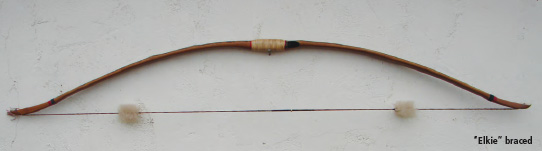

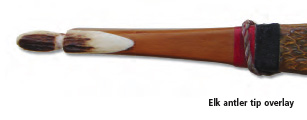
 After shaping and tillering this bow and three months of
sinew curing, it was time for the final shaping of the blocky handle
area to a more comfortable handle; I prefer the Dean Torges style of
bulbous handle. Also, the tips were reduced to their final shape and
elk antler overlays were added; Kenneth sent the elk antler to me. On
the few sinew backed bows I’ve made, I’ve only applied the
sinew to the working portion of each limb. The handle area and about
6 inches of the static tips were without sinew. To secure the ends of
the sinew and snake skin cover I used red silk thread wrapped tightly
and set in super glue.
After shaping and tillering this bow and three months of
sinew curing, it was time for the final shaping of the blocky handle
area to a more comfortable handle; I prefer the Dean Torges style of
bulbous handle. Also, the tips were reduced to their final shape and
elk antler overlays were added; Kenneth sent the elk antler to me. On
the few sinew backed bows I’ve made, I’ve only applied the
sinew to the working portion of each limb. The handle area and about
6 inches of the static tips were without sinew. To secure the ends of
the sinew and snake skin cover I used red silk thread wrapped tightly
and set in super glue.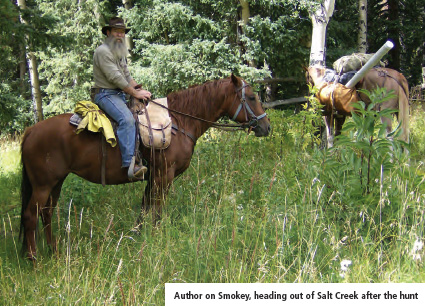 That night I was back on the PA website asking what I could
do to repair my “Elkie.” Folks told me everything from hide
glue to super glue to TiteBond glue. I decided on the TBIII for the repair
because of its viscosity. I thought the thickness of this glue would
help it remain in place for good adhesion between the sinews and bow
back.
That night I was back on the PA website asking what I could
do to repair my “Elkie.” Folks told me everything from hide
glue to super glue to TiteBond glue. I decided on the TBIII for the repair
because of its viscosity. I thought the thickness of this glue would
help it remain in place for good adhesion between the sinews and bow
back.